
I’m pretty bad at goodbyes. I’m also the last one to leave every party or gathering. Wrapping things up isn’t my forte. I’m best at lingering. As I watch the cursor blink, blink, blink, bumming a desk space at the studio as I write this post, I’m having trouble wrapping up this project too. The Pinch of Yum Studio, a project that began 6 months ago, has come to an end. I’ve learned so much, mostly learning how much I’ve yet to learn. What is it they say—the more you know, the less you really know? And yet, I’m so proud of what we created. And proud, too, that I took my own advice, to play, and figure out where The Faux Martha is headed in the future. OK, without any further awkward lingering at the front door, come on in. I’d love to walk you through the Pinch of Yum Studio Kitchen and Dining Room reveal, where the magic happens, especially that magic green sauce. (PS—Here’s the office tour in case you missed it.)
A note of thanks
A huge thank you to IKEA®, who furnished a good chunk of the studio, from the offices to the kitchen, which was amazing as I was already using their products in the design. IKEA is a registered trademark of Inter IKEA Systems B.V. The views, ideas and opinions expressed here are my own. Note: Affiliate links are used throughout.
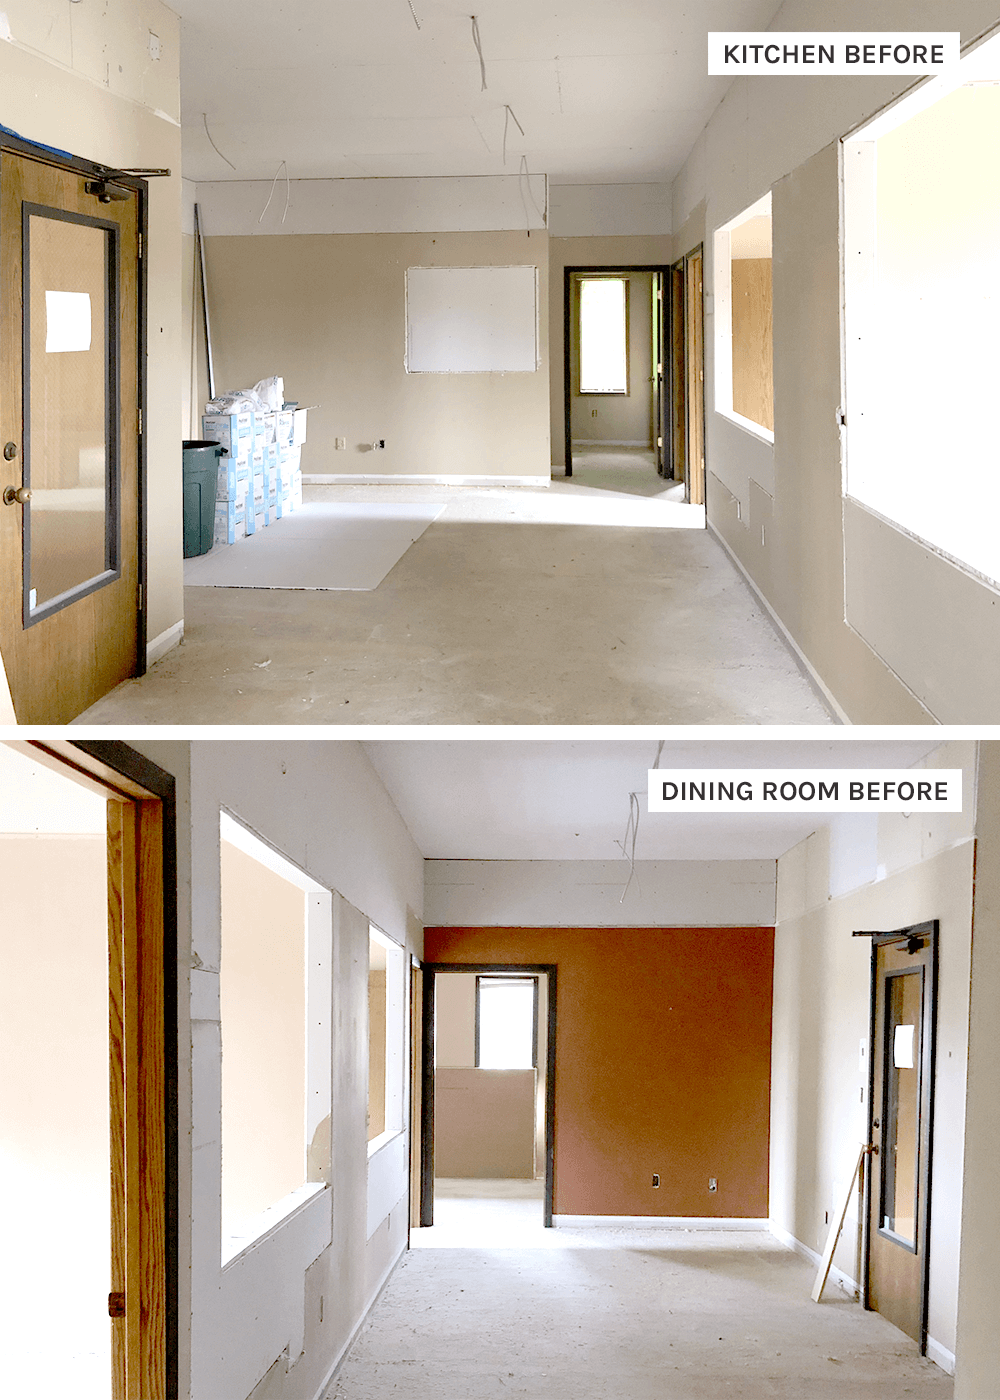
You can’t really appreciate an AFTER without taking a quick glance back at the BEFORE. Look at how far we’ve come! Above is the space when I walked into the project. They had already raised the roof ceiling and added interior window openings (you know, the hard stuff).
Then I came in and created mood boards first and then design renderings of each of the spaces (the much easier stuff, in my opinion). And, with a lot of highly skilled contractors (not me), patience, and hard work, we pulled it off. We pulled it off! I’m still in a bit of disbelief.
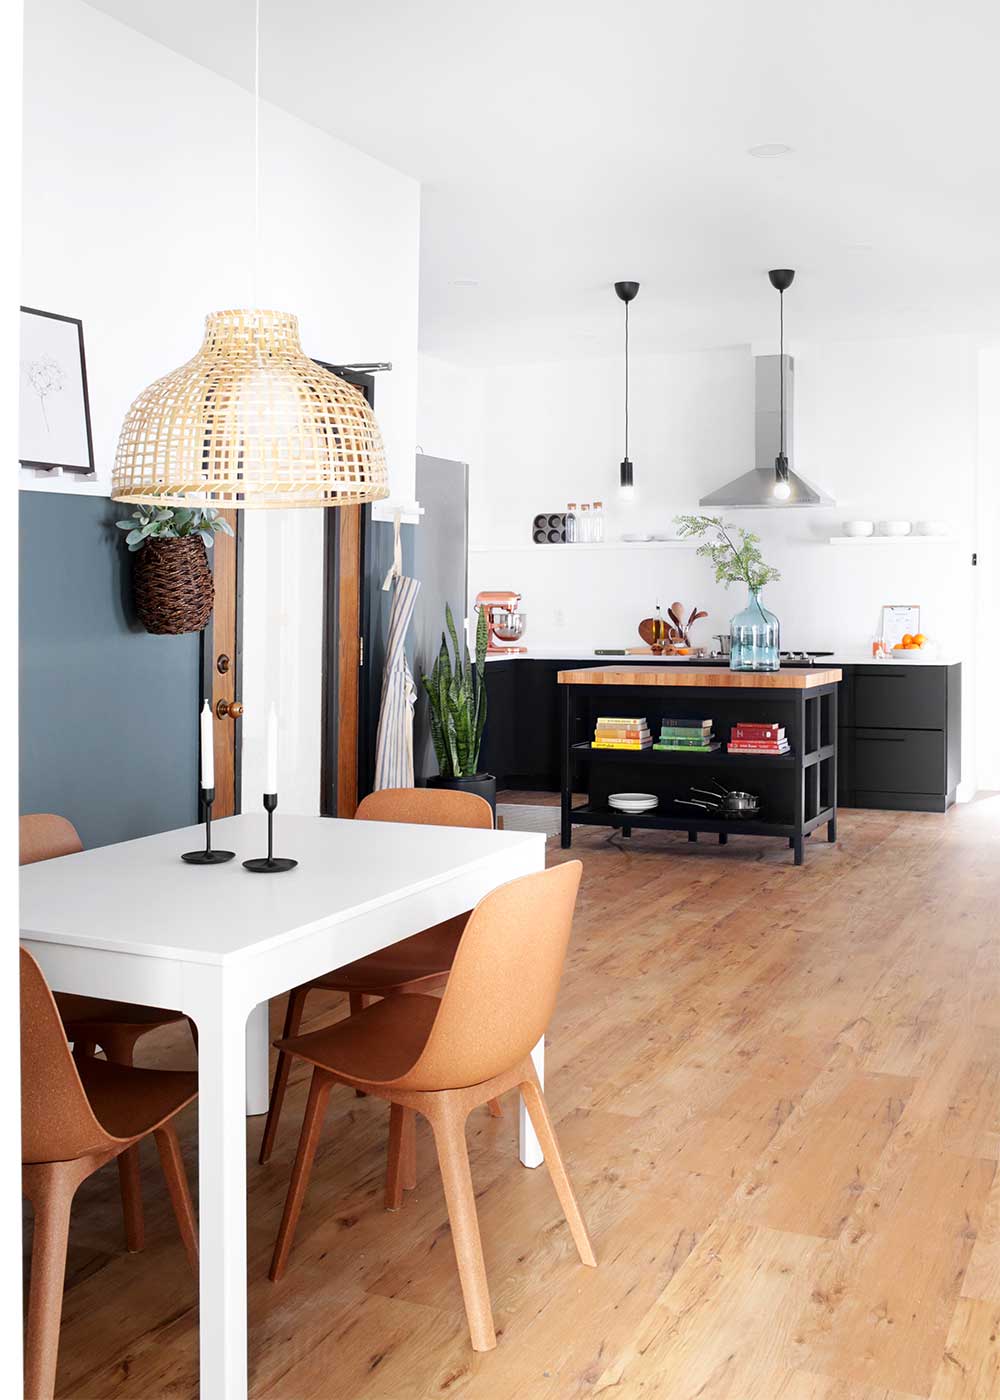
Kitchen
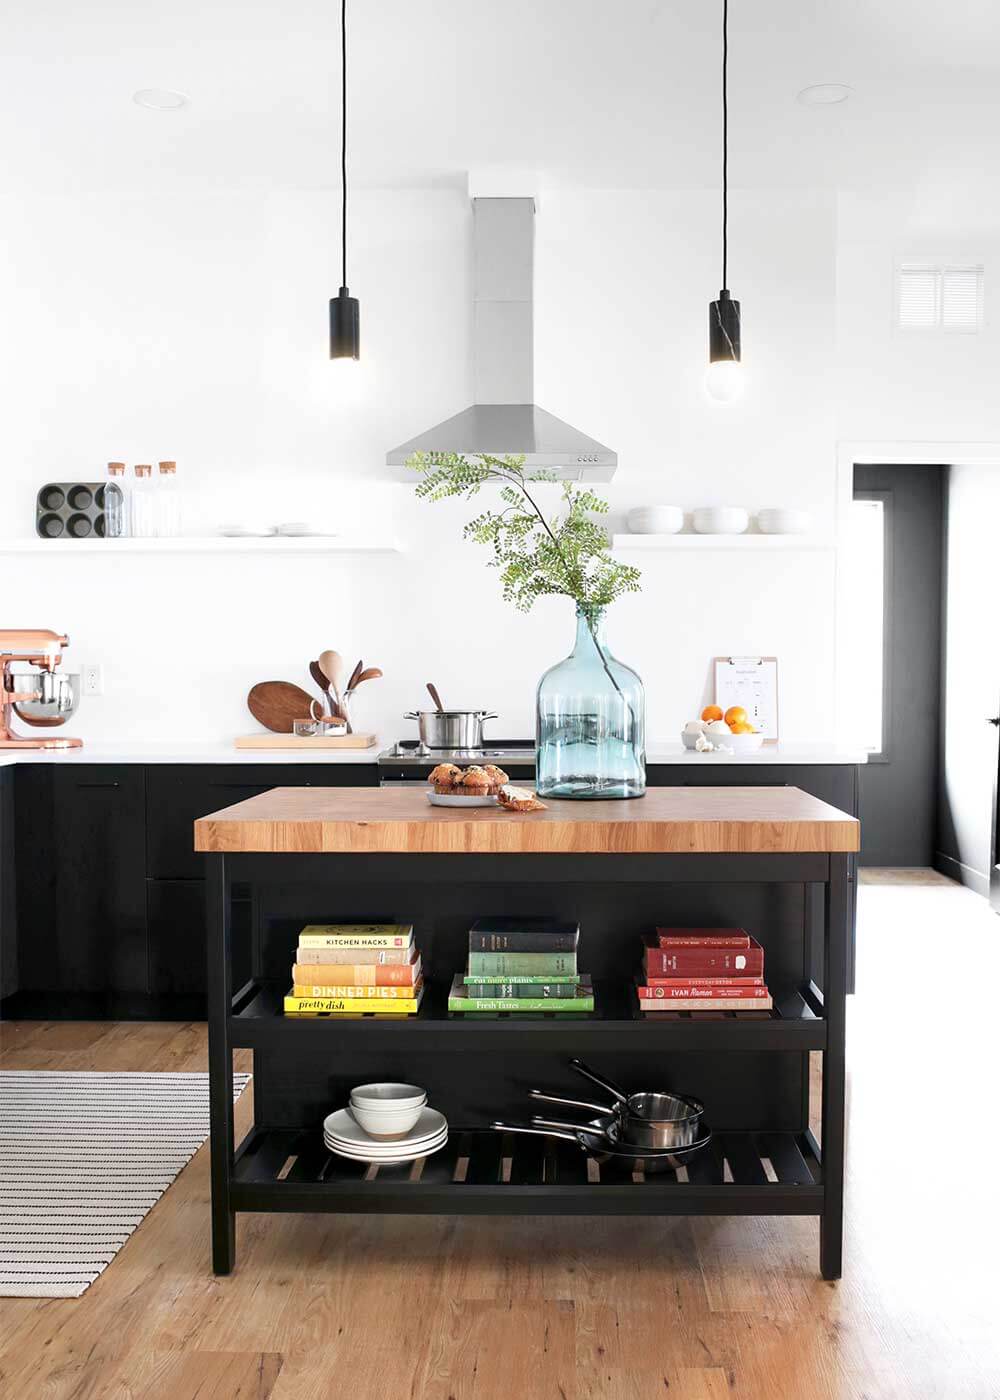
I won’t rehash all the design plans and thinking for the kitchen and dining room. You can read that here. Onto the big reveal! Going with pitch-black cabinets felt a little bold and risky for the kitchen design, but I absolutely love how these matte IKEA Kungsbacka cabinets (made from plastic bottles) look in the space. Stunning. They add the perfect amount of visual weight to all the white walls and heavy black accents in the space as if it was always meant to look this way.
While I love to put together an IKEA shelf or five, I left the kitchen to the professionals. You know, to keep oranges from rolling down and off the counters. Everything is level in here! Speaking of, the IKEA install teams were amazing. I highly recommend the added expense. The cabinets took 1.333 days (!!) to build and install, while the counters went in in a couple of hours. (By the way, it took me a whole day to build this.) There was surprisingly little lag from purchase to install, maybe 2 weeks for each, and this was right around Thanksgiving, too. It’s really hard to pull off a kitchen install that fast.
Visual Aesthetic: Naturally Neutral—bright whites accented with blacks, greys, natural creamy creams, and warm wood tones.
Paint Colors: Extra White in flat from Sherwin Williams.
Laminate Flooring: Cambridge from Karndeen
SOURCES
Vadholma Island | Markfrost Pendants | Recycled Glass Jug | Kungsbacka Cabinets | Törslev Runner | Luftig Venthood | Shelving (custom) | Saxborga Glass Jars with Cork Lid | Fascinera Chopping Board | Copper Kitchen Aid Mixer | Glass Carafe with Cork Lid
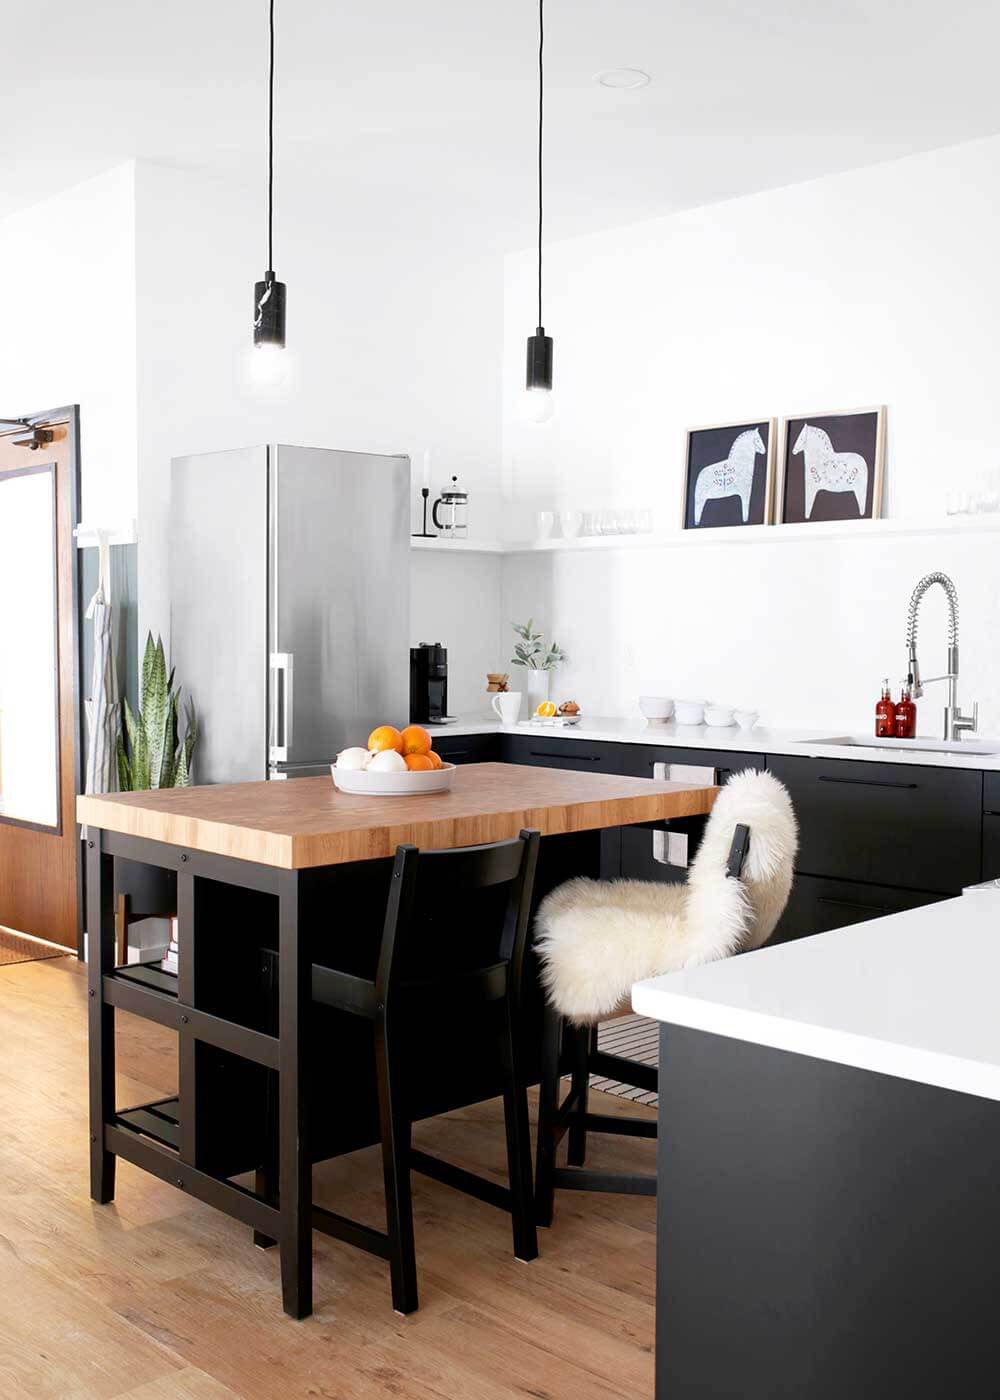
The free-standing Vadholma Island is nice and weighty, adding seating, shelving, and chopping space, and can also slide out of the way when needed, making this space transient to their ongoing, changing needs.
SOURCES
Vadholma Island | Nordviken Stools | Faux Fur | Dinera Serving Bowl | Markfrost Pendants | Kungsbacka Cabinets | Bagganäs Pulls (installed with the washers) | Frosty Carrina Quartz Countertops | Counter-depth Studio Fridge
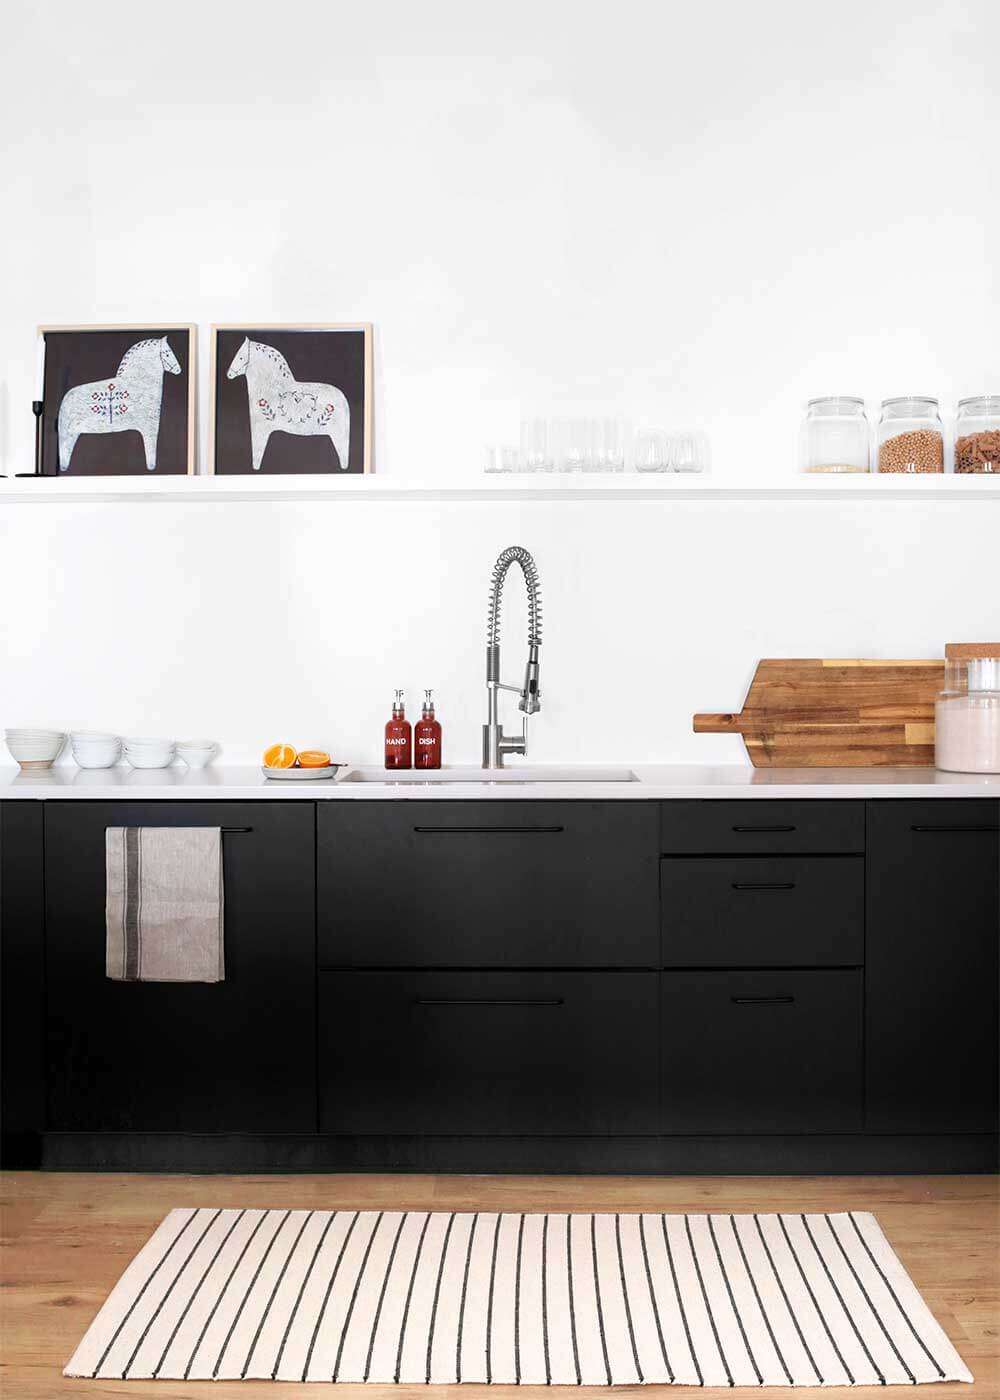
As you can see above, the kitchen U’s a bit. The upper shelf bends the entire shape of the studio kitchen, helping to bring continuity to this open format, no upper cabinet layout, while also contributing some easy-to-reach storage space. I’m a bit iffy on open shelving for the home kitchen. But, in a studio kitchen, one that gets a whole lot of everyday use, it makes sense to have a place to display ingredients and tools within arms reach, in the same way you’d keep pens out on your desk. With as much cooking that happens in this space, there’s no time for dust build-up.
We ended up forgoing a backsplash to save money and decision-making brain space, instead painting the space below the shelving a semi-gloss sheen, which is both wipeable and stain-resistant. Should they decide to add a tile backsplash down the line, it’s an easy addition. PS—can you spot the dishwasher? It’s just to the left of the sink. We used a panel ready dishwasher and put a Kungsbacka cabinet front on it.
SOURCES
Kungsbacka Cabinets | Bagganäs Pulls (installed with the washers) | Frosty Carrina Quartz Countertops | Törslev Runner | Vardagen Dish Towel | Hovsta Framed Horse Art | Fulltalig Candlesticks | Segersjön Soap Dispenser | Norrsjön Sink | Faucet | Smääta Chopping Board | Sinnerlig Glass Container with Cork Lid | Glass Containers
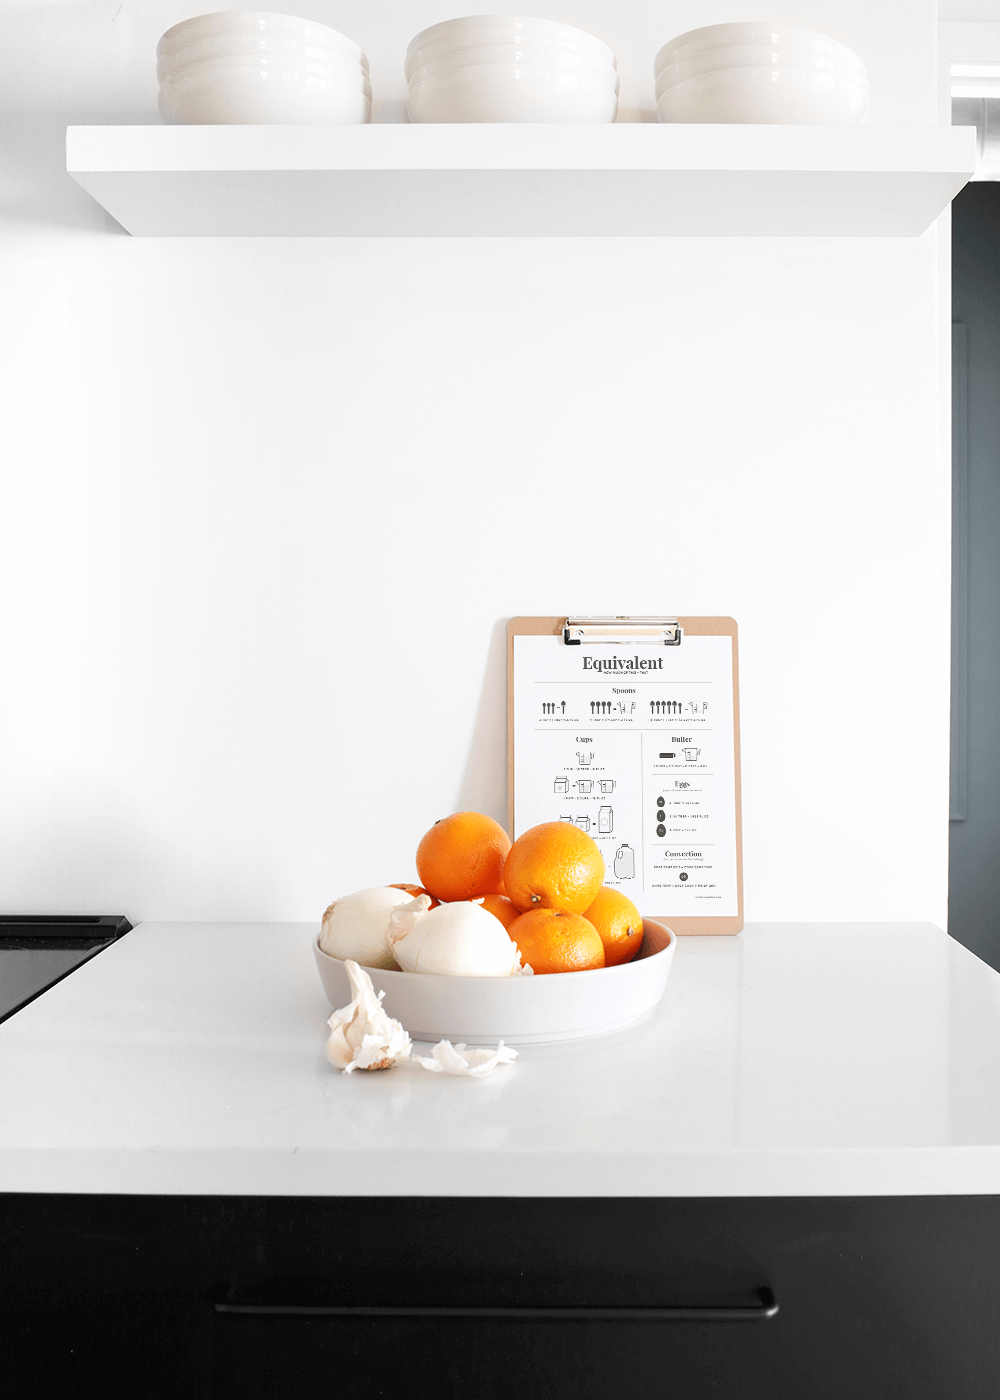
I love the minimal pulls we landed on. Actually, I had to make a last-minute swap out. I had planned to use these pulls, but they were out of stock. So I grabbed these Bagganäs Pulls and had them omit the round washers they came with, ending up with the happiest of accidents. I left the Pinch of Yum team a little gift on the counter, too—a Faux Martha poster for the days when your brain can’t remember how many teaspoons are in a tablespoon or cups in a pint and clipped the print to a $2 clipboard.
SOURCES
Kungsbacka Cabinets | Bagganäs Pulls (installed with the washers) | Frosty Carrina Quartz Countertops | Dinera Serving Bowl | Equivalent Art | Clipboard | Shelving (custom)
Kitchen Costs
Now to the nitty, gritty juicy details. How much does an IKEA kitchen with install cost? I tallied it all up and we came in under $10k, which blew my mind for a 14′ x 11′ kitchen.
IKEA Cabinets: $3,685
IKEA Cabinet Pulls: $82.70
IKEA Cabinet Install: $1,558
IKEA Quartz Counters + Install: $4,045.50
TOTAL $9,371.20*
*This does not include appliances, custom shelving, electrician, plumber, and drywall repair costs. We also started with a newly remodeled empty space, so there were no demo or kitchen removal costs.
Dining Room
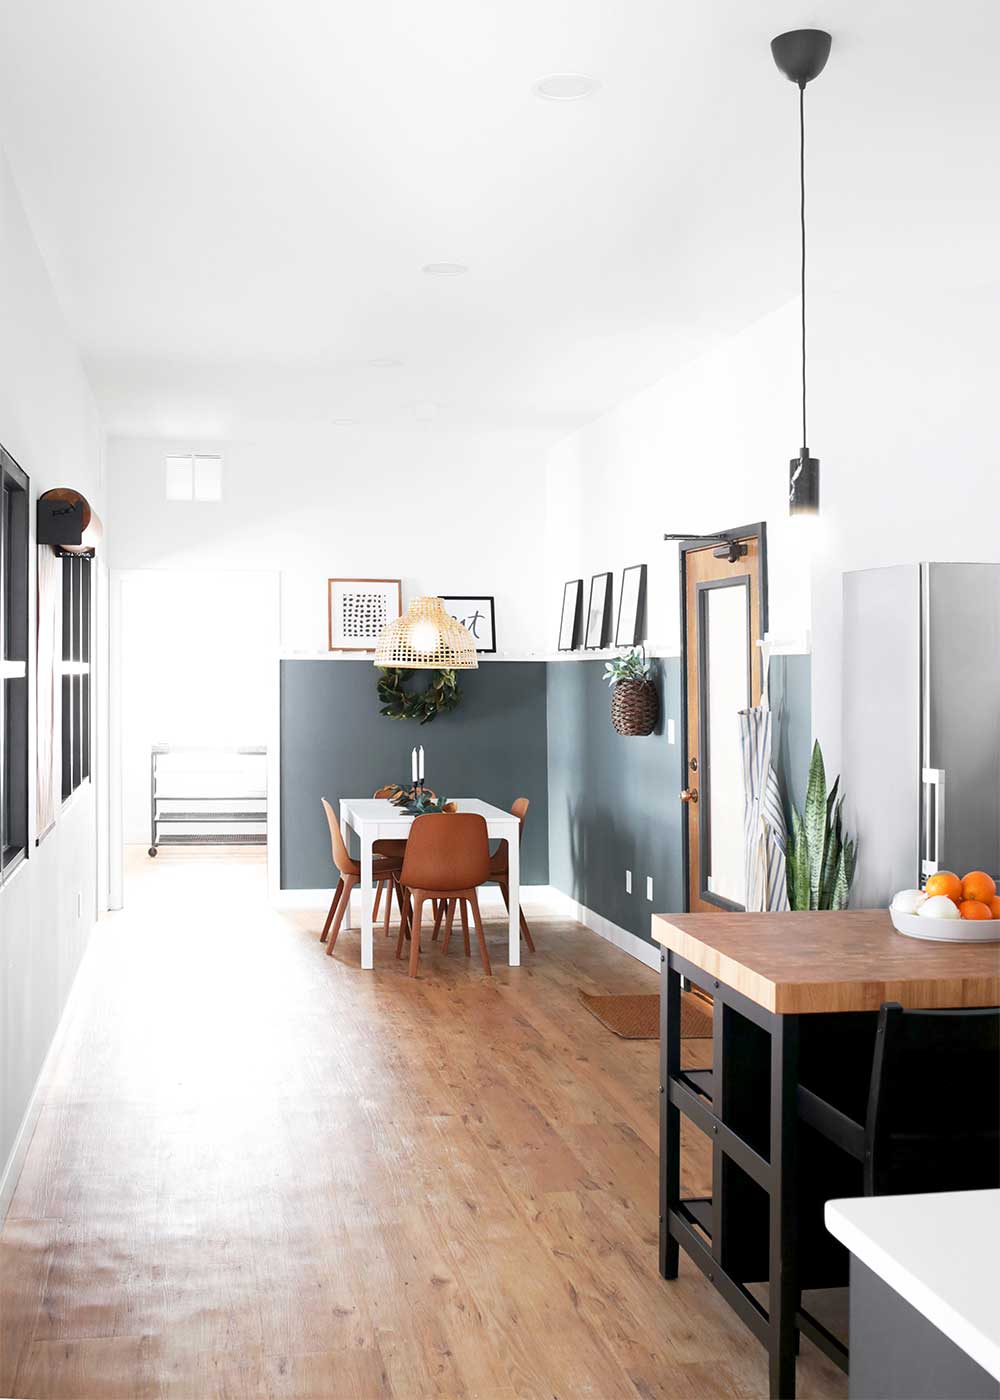
Sharing space with the kitchen is the dining room that doubles as a meeting space, entryway, welcome area, and coat rack for guests. The Ekedalen Table easily extends for extra seating. It’s ultra-sturdy and simple enough to assemble, even while pregnant. Though, these Odger Dining Chairs win for easiest assembly. Hal can attest.
I love the flexibility of the hooks in the area, functioning as you’d expect while also creating a space to lean artwork. Breaking up the space like this also allowed us to add a muted pop of color to define the dining space, without having to paint entire walls in this open-format layout. This application also helped to visually balance the black cabinets.
Paint Colors: Extra White in flat and Homburg Grey in flat from Sherwin Williams.
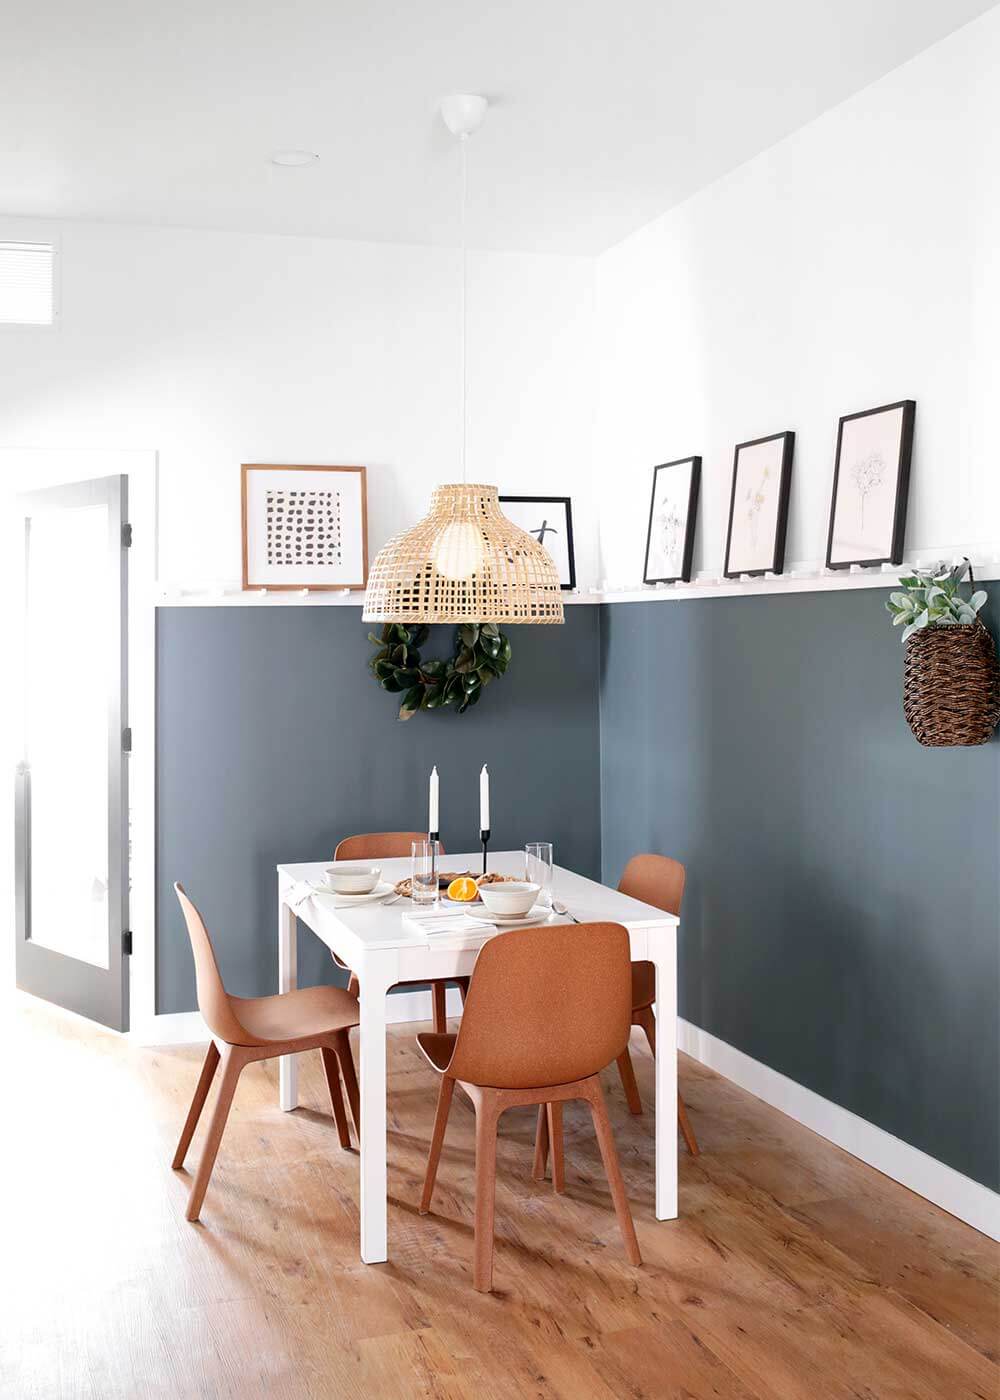
You know the part in Fixer Upper where Chip brings the kids over to the house for pizza as a family before they leave to let Jo finish up the space? Kev and Hal ate a couple dinners at that table, after school and work, helping me do some heavy lifting, ladder climbing, and furniture assembly. It was just like the movies show. I broke the news to Hal that we were officially done designing the studio. We. I don’t know who was sadder. Pinch of Yum team, you have a budding employee. Her current perks: she’s a really good picky eater taste tester, great at putting together IKEA furniture, and asking lots of questions. Lots and lots of questions.
SOURCES
Ekedalen Extendable Table | Odger Brown Dining Chairs | Gottorp Pendant with cord set | Kubbis Hooks | Fulltalig Candlesticks | Bild Flower Posters | Hovsta Frames | Additional Artwork (from previous studio) | Hanging Basket
I turned in my keys and called Kev on the way home to tell him how strange it is to own a project, own it in the figurative sense, and then let it go. There’s an odd sense of loss wrapped up in finishing this project, and maybe my questions about the future are wrapped up in this goodbye too. Did I find all the answers I was looking for? Some but not all. I got a text with a picture of the team cooking in the kitchen. The space is getting used just as it was intended, and that makes me very happy.
Here’s to playing—in life, in work, and in the kitchen. And here’s to also leaning into something new without all the answers. You might just pull it off. And, if you don’t, the value of playing in the middle, of sorting through your questions, is so valuable. I always seem to find good answers this way, even the ones I don’t want to hear.


I love that the fridge is counter depth, but goodness the storage space seems so limited for a working kitchen. How is is working out?
They had a Smeg fridge in their previous studio of a very similar size, so we went with something similar here.
Oh my goodness! This project turned out SO well! The details are beautiful and I’ve loved those matte black door fronts since I laid eyes on them at ikea when they first came out! So glad you took such a risk using them bc they are SO good! Bravo on all your hard work! And I totally related to wrapping up a huge project and feeling an odd sense of loss, questions about the future, etc.! ? Ah! The joys of the unknown! Love watching your journey… in whatever direction you head! Thanks for sharing with us! ♥️♥️♥️ Great work, as always!
You did an AMAZING job, Melissa. <3 So impressed with these designs, and I know the POY team is LOVING the new space!
Thank you thank you, Alexa!