
Two years ago, almost to the day, my sister and I made my brother’s wedding cake for over 200 people. We said I do to making cake for over 200 people. It’s as crazy and foolish as it sounds. However, we built in some fool proof buffers to keep the catastrophes at bay, which is why I’m sharing this DIY Wedding Cake with you—in case you too find yourself saying I do foolishly. Practice safe wedding cake making, friends.
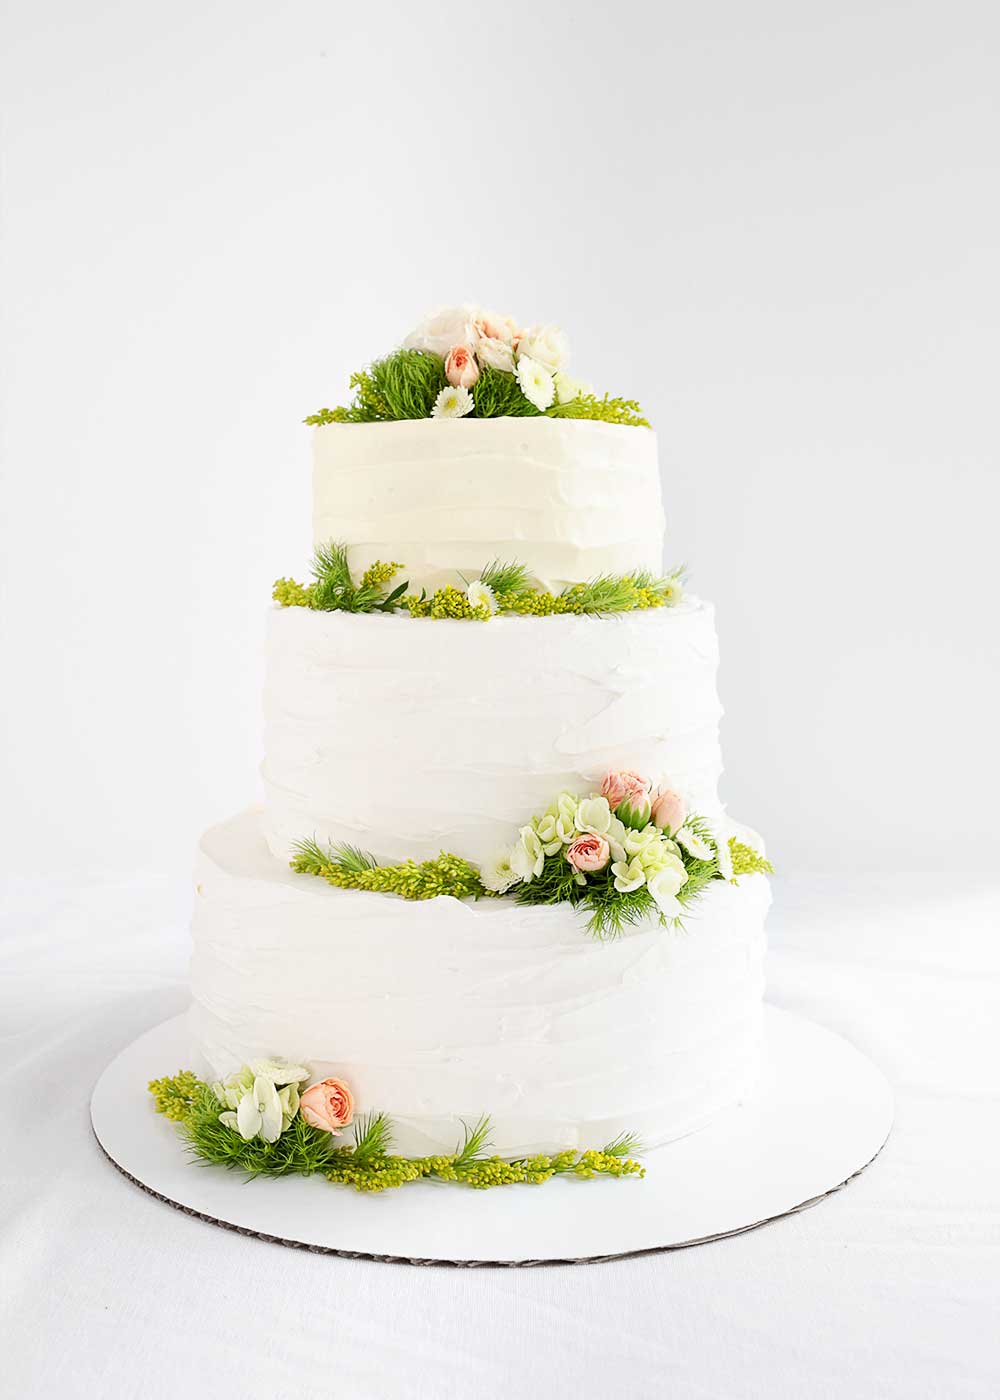
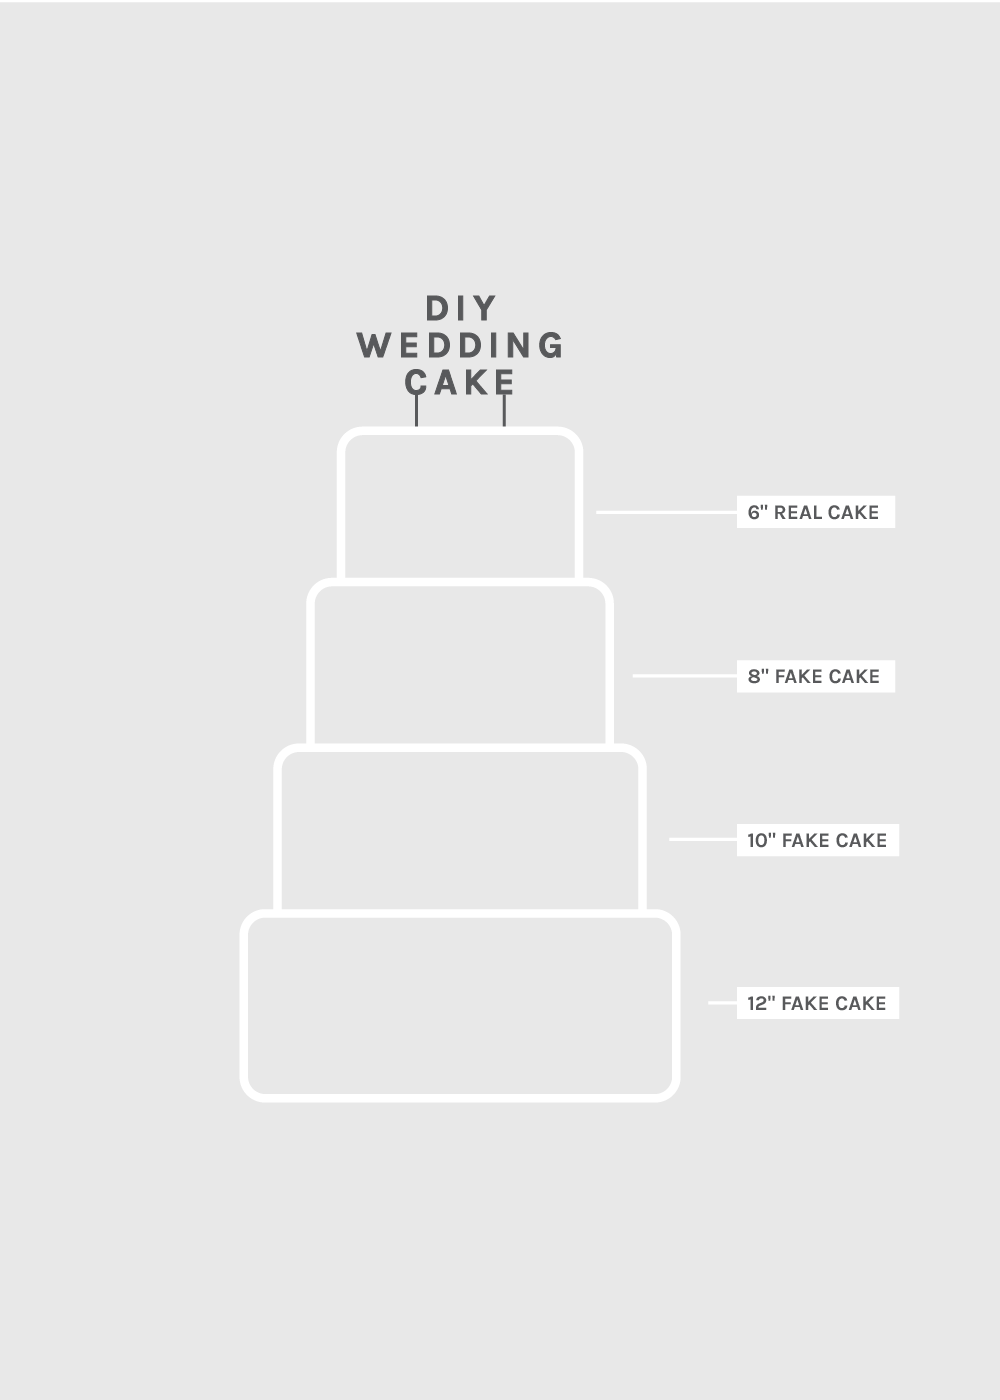
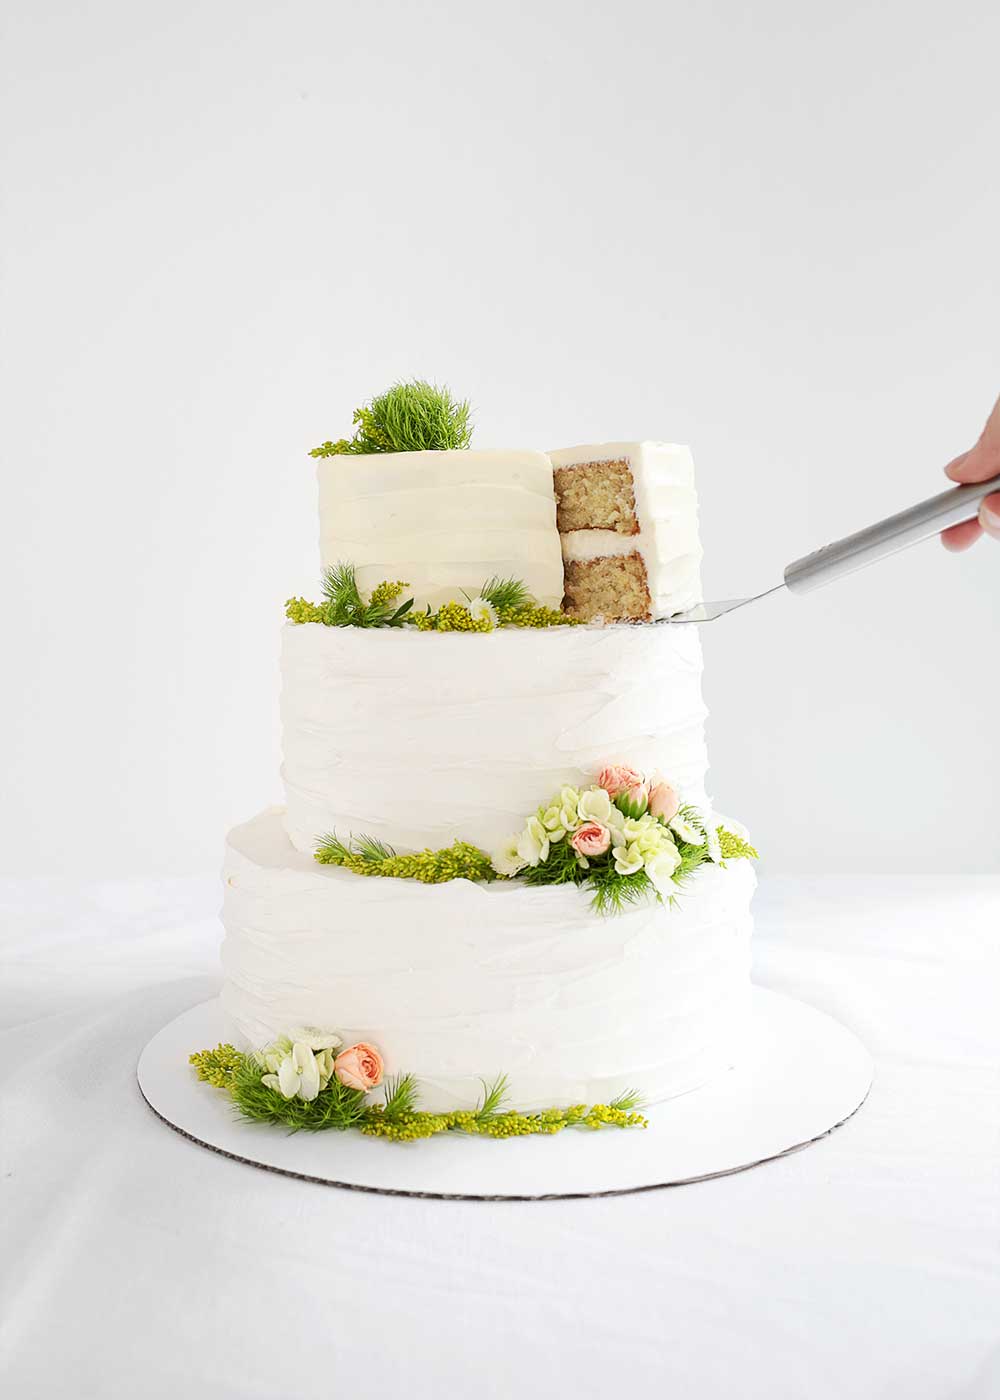
Despite my blog name, I like to keep it real when it comes to food—real ingredients, no faux anything. But when it comes to wedding cakes, I broke my rules to make it doable and fool proof. Because making a structurally sound wedding cake crafted entirely from real cake requires a degree in cake architecture or hours and hours of practice and recipe testing, neither of which I had. So we opted to build the cake out of styrofoam (I know, worst material ever). Three layers of stacked and frosted styrofoam, topped with a tiny real cake for the happy couple to cut, smash, and eat as they wish.
If you fall in the inexperienced wedding cake maker camp like me, I recommend this approach for a couple of reasons—the cake was easy to assemble on site. It was also light to transfer (unlike the very large groom’s cake we made, weighing as much as a small child). And it didn’t disappear for the rest of the night. A typical wedding cake sits on a table in all its glory for mere minutes before getting wheeled away, surgically deconstructed, cut, and served. Not this cake. It stands beautifully all night.
Maybe the best news of all, if you want to serve a moist cake (I said it) without worrying about the structural integrity, you can! My sister-in-law wanted Italian Cream Cake. But it’s so moist and dense, which is also what makes it so good, it likely would have collapsed in on itself or leaned further right than the Tower of Pisa had we built it entirely out of cake.
So, what cake did we serve the guests? We had a lot of 9″ square Italian Cream Cakes for cutting and serving in the back. The cake layers were made in advance, wrapped and frozen, and assembled on-site, the day of. No traveling conundrums to lose sleep over.
Ok, now that you’ve got the basic backstory, let’s distill this process down to doable. Below are the tools needed, a basic schedule to follow, and wedding cake assembly instructions.
DIY Wedding Cake Tools
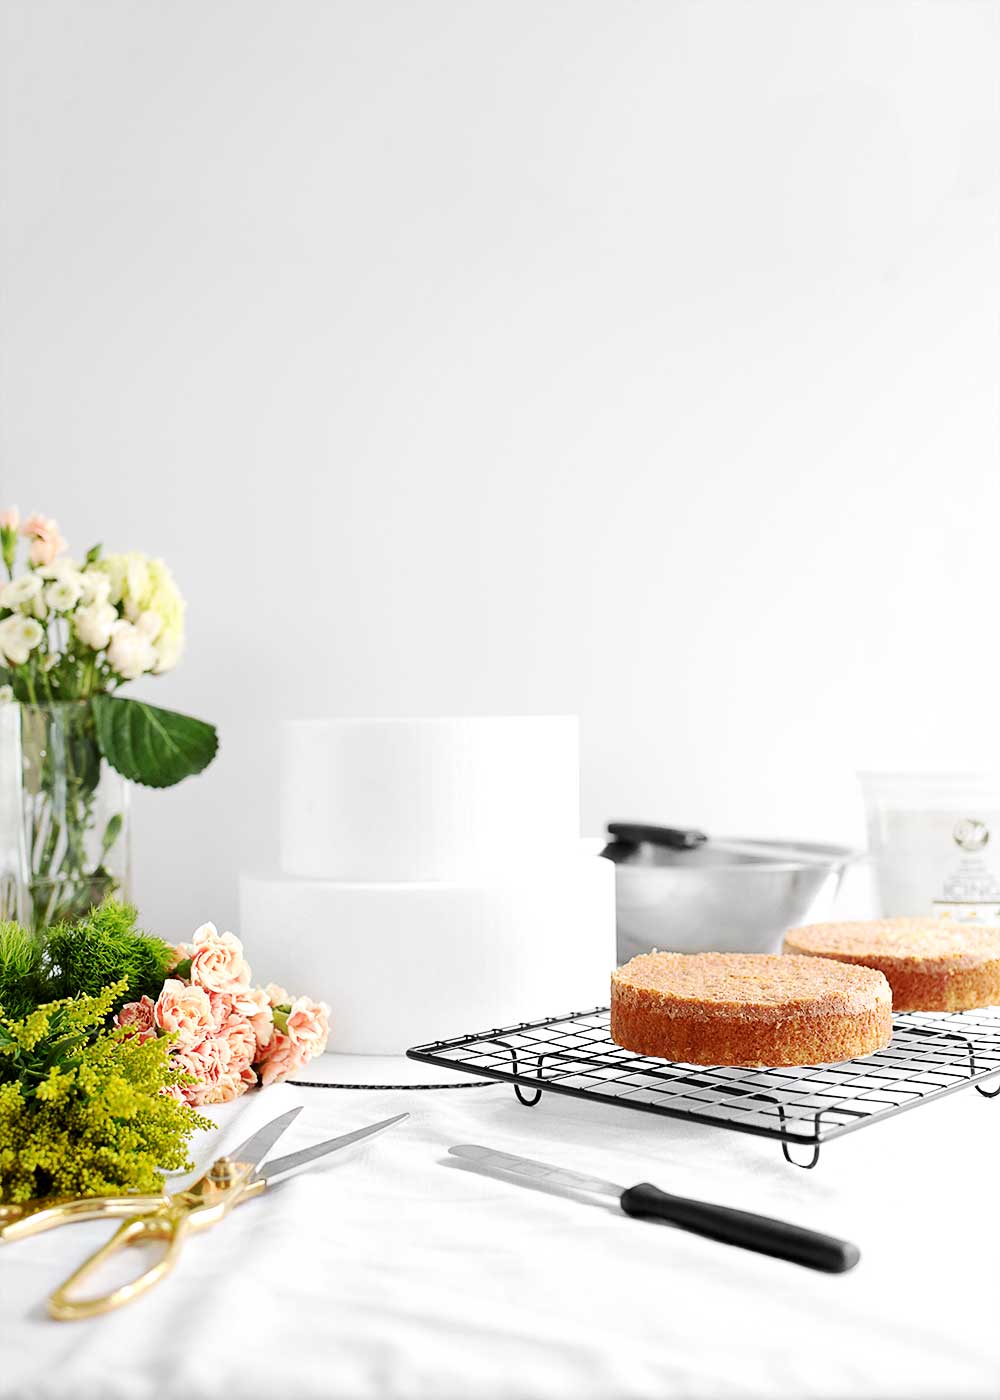
4″ Tall Styrofoam Cakes
(8″, 10″, 12″) I’ve been able to find these at specialty kitchen or craft stores. If you’re on a time crunch, Amazon might be your best bet. Or call around to stores before driving all over town. Time is of the essence.
14″ White Drum or Cakeboard
This is the visible base of the cake. For a more formal presentation, opt for the drum, which is what we used at the wedding. For this post, I used a cakeboard, which is basically cardboard. You can also find these at specialty kitchen or craft stores.
6″ Cake Pans
These pans are for the edible top layer. Actually, this is my favorite sized cake to make, no matter the occasion. Most times, you can half an 8″ or 9″ recipe, to create a taller 2-layer cake or thinner 3-layer cake. For 2-layers, add a couple more minutes to the baking time for the taller cake height. For 3-layers, decrease the baking time.
Sturdy Icing (not for eating)
Don’t waste your time and money on coating the styrofoam cake layers in high quality, edible icing. This is the perfect time to cheat. It also adheres really well to the styrofoam layers. Note, when choosing this icing, try to match the color of the icing used on the top layer as close as possible. You can see in the pictures, my top layer was creamier in color. I used this Sturdy Cream Cheese Frosting and made the mistake of using organic heavy cream, which I usually use. Organic is creamier in color compared to conventional. In this case, I should have gone conventional to color match.
Offset Spatulas
You’ll want a small and a large offset spatula at minimum for frosting the cakes. You’ll also want sturdy metal spatulas (burger turners) for transporting cake layers on top of each other.
Turntable (optional)
I didn’t have a turntable, but wish I had borrowed or purchased one. When you’re making this many cakes in a short amount of time, every second counts.
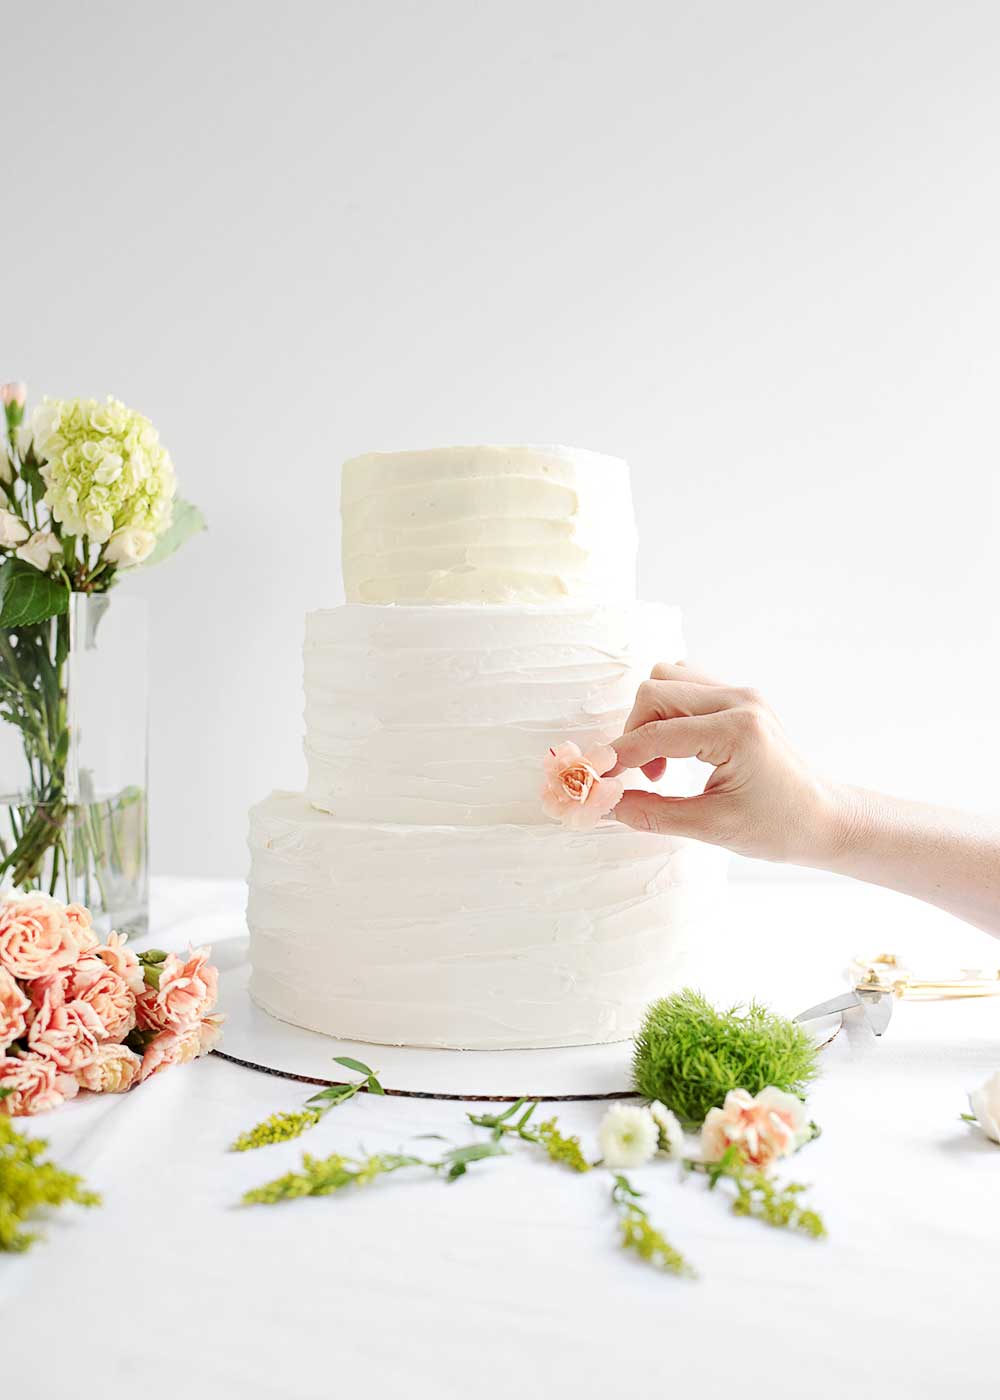
Flowers
Ask the bride to reserve a couple large blooms for you. When choosing additional flowers, vary scale and texture to add interest. Be mindful of when you buy your flowers. Do you want them tight or in full bloom? If tight, use right away. If in bloom, purchase a couple days in advance before using, and allow them to open. Trader Joe’s has super affordable flowers, which I used for this post, however you have to be open to whatever they’re selling that day.
DIY Wedding Cake Schedule
Your schedule will vary based on the number of slices needed (# of guests), the amount of help you have, your proximity to the venue, fridge and freezer storage space, and the time of the reception. Here’s a brief summary of our schedule.
My sister and I came in from out of town a couple days early and started baking the cakes for serving, wrapping each cooled layer in plastic wrap and foil, before stacking in the the freezer until assembly. My brother’s wedding started at 6pm. We arrived at the venue at 9am. During that time, my sister and I made the frosting to frost and assemble all the serving cakes; we frosted, assembled, and added flowers to the wedding cake; ran to the closest store in the middle of no where to buy a knife to cut the cakes (panic); ordered fries and the largest water possible in a drive thru; and got ready for the wedding in the venue bathroom just moments before the pictures started. Some may say we barely pulled it off. I like to think that we planned it just right. Either way, liberally estimate the time it will take you to pull this off, and then add some more time.
2 months out
- Test recipes for the 6″ cake and the serving cakes, if different. You’ll want the final frosted cake topper to measure 4″ tall, like the styrofoam layers. As you test your recipe, try a 2- or a 3-layered cake to meet that height requirement.
- Test frosting recipe. Can it be made in advance? If so, does it need to be stored in the fridge? If yes, will you have space to store it?
- Practice frosting technique. Note: A smooth cake is hard to pull off. Read more below for our fool-proof technique.
- Look up inspiration for florals and floral applications. Confirm with bride. Here’s a couple I pulled.
1 month out
- Confirm guest count and determine number of cake slices needed.
- Scale recipe(s) and calculate ingredient totals.
- Make a grocery list and purchase non-perishable ingredients.
- Make a supply list and purchase as much as possible in advance. Don’t forget the plastic wrap and foil.
- Confirm kitchen space(s) to make cakes.
- Create a basic cake baking and assembly schedule. Start with the end and work backwards. Consider cake transportation. Will you be able to safely transport the frosted cakes or is it best to frost on site?
Week of Wedding
- Confirm and adjust final cake baking and assembly schedule.
- Purchase remaining perishable ingredients.
- Make serving cake layers as well as the top layer of the wedding cake. Wrap layers individually in plastic wrap and then foil. This can be done further in advance, about 1 month. However, consider freezer space and freezer burn.
Day before/day of Wedding
- Transport cakes, frosting, tools, and flowers to venue. Assemble serving cakes and wedding cake.
- About 1 hour before the wedding, add fresh flowers to the cake.
DIY Wedding Cake Assembly
- Prepare the edible top layer cake and frosting. Set aside.
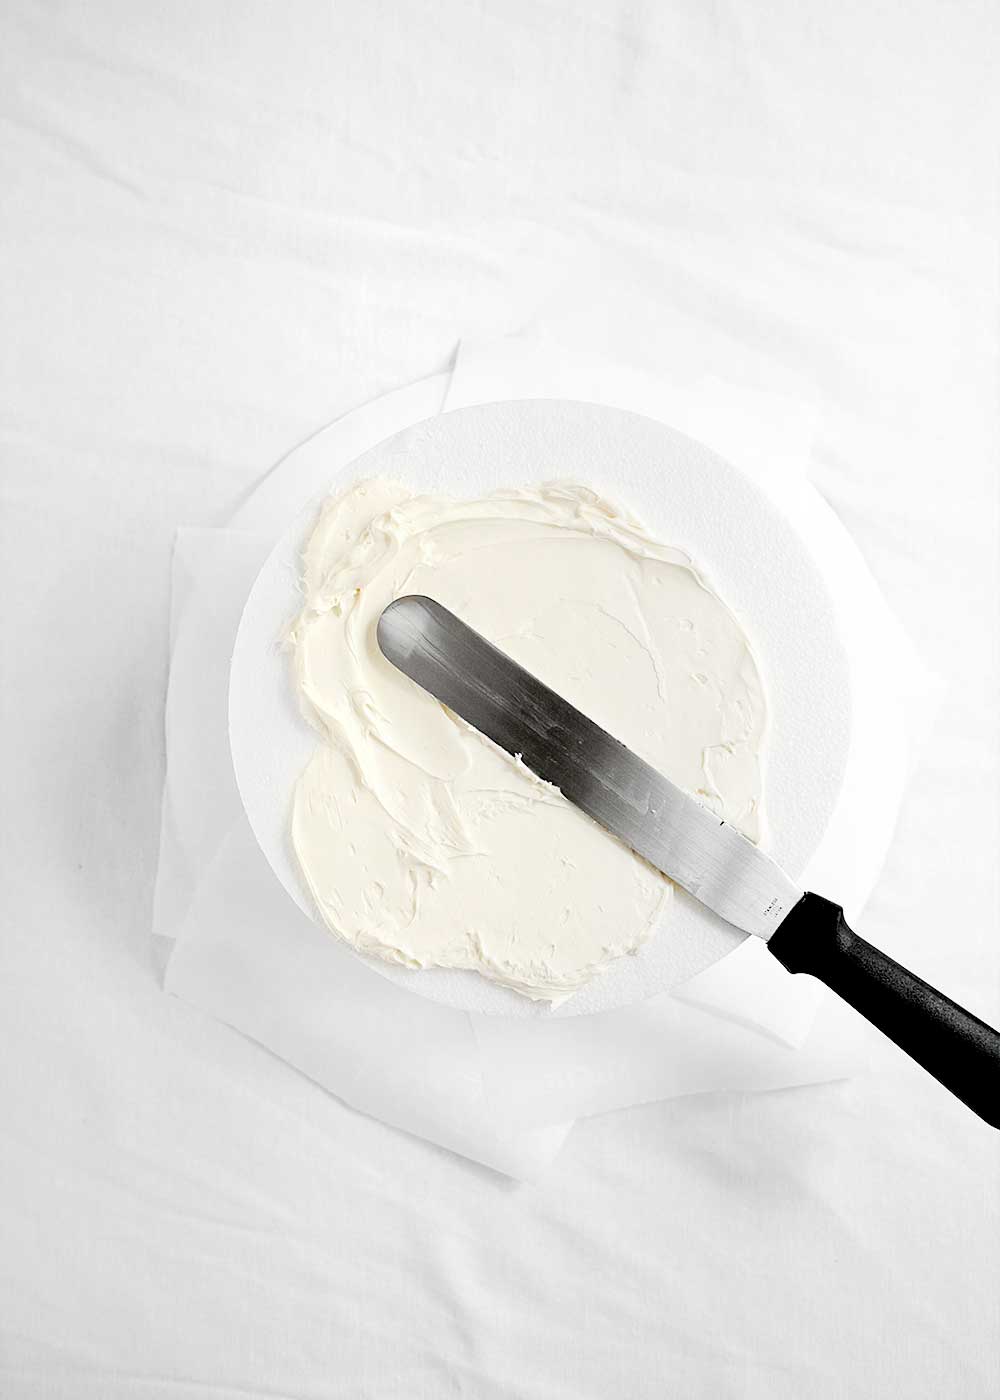
- Place a couple of swipes of store-bought frosting on the cake drum or board to act as glue for the base layer.
- Place the largest styrofoam layer on the board and press firmly to “glue” to the board. Add strips of parchment paper underneath the base cake to keep the board clean.
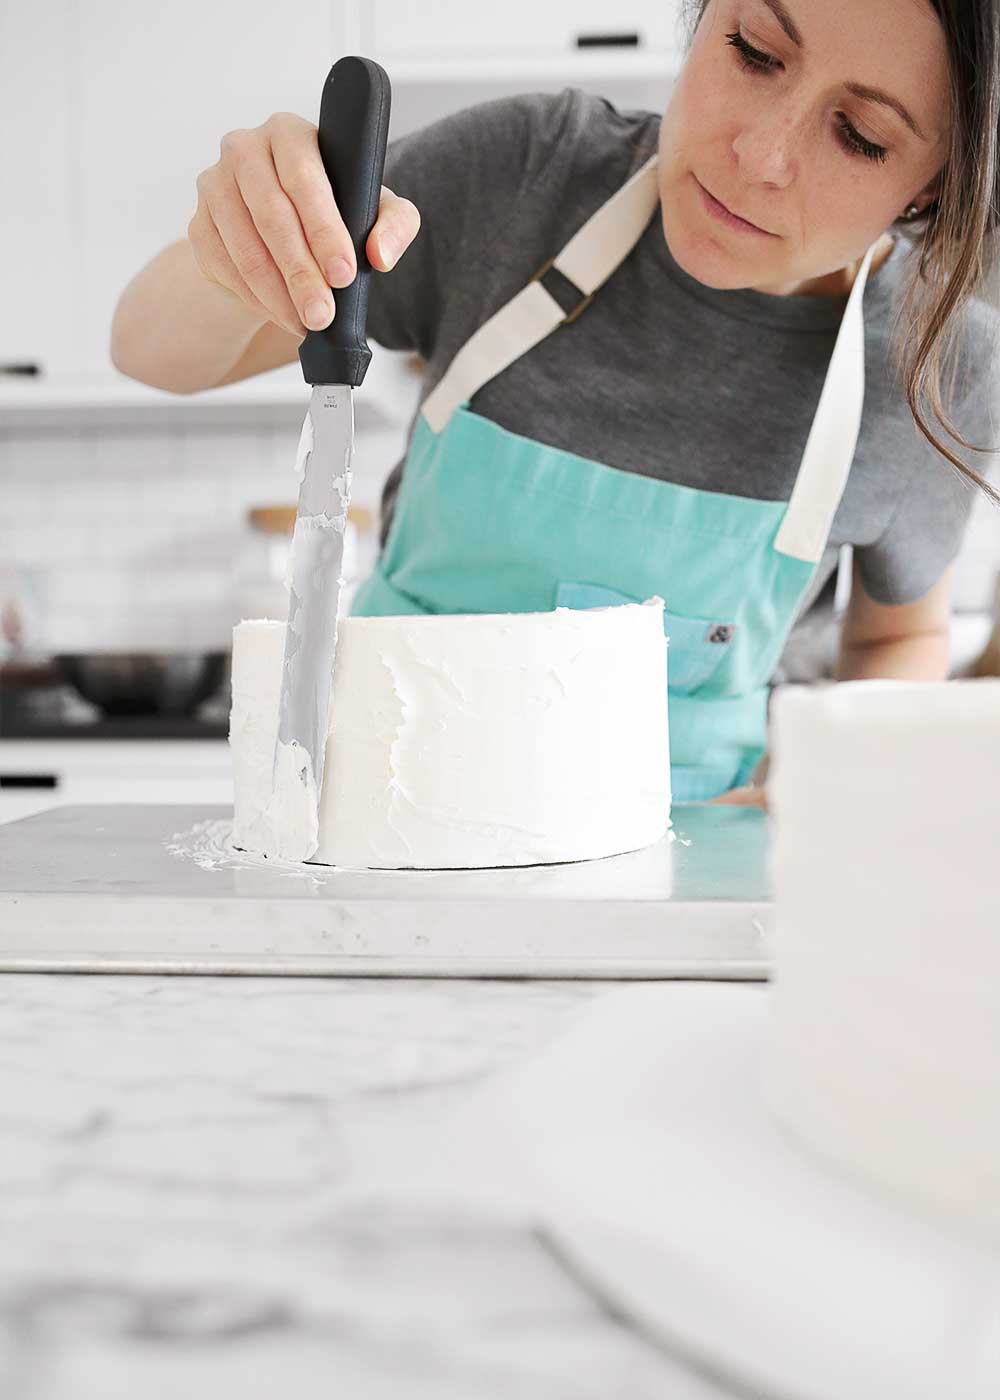
- Frost the base layer using the store-bought frosting, including the top of the cake. Smooth and add texture in as desired. We pulled a spoon in horizontal layers around the cake to create a rustic finish (and also to hide imperfections). Carefully removed parchment scraps.
- Frost all additional styrofoam layers individually.
- Assemble and frost the edible top layer with the homemade frosting. Spend a little extra time here to make sure this cake is ultra symmetrical, leveling off the cake layers if needed. If cake transportation isn’t an issue, assemble this a day before the wedding for easy on-site assembly.
- Using a couple sturdy spatulas (and an extra person if you can), pick up the cakes and slowly center and layer.
- Clean up any mishaps. Carefully seal the seems of the cakes together by running a tiny spoon or piping beads between the layers.
- About 1 hour before the ceremony, add flowers to the cake. Adding flowers in between layers helps to also cover the seems and make the bottom layers cohesive with the edible top layer. Try an asymmetrical flowers application to create interest and balance.


This is beautiful! Glad to have the detailed instructions for the next time I tackle something like this. Thanks for sharing
Thanks, Sydney!
For folks who want to do a tiered cake without the styrofoam, I used bubble tea straws for mine to keep the layers even/in place. I assembled it where it was going to be all night, so I didn’t have to worry about moving it. Otherwise I did much the same thing for my wedding. The freezer is your friend!
We must be the same kind of crazy—attempting wedding cakes ?. Amen to the freezer! We played cake tetris trying to fit all the layers into my parents freezer.
oh. m g. As someone who has been looking into having a minimalist intimate wedding, this is amazing, not only is it so much cheaper but also so much less stressful. Once people hear “wedding cake” they hike up prices so much, it’s absolutely ridiculous. Thank you for this <3
Amen, weddings and babies seem to add so many dollar signs!
Hi Melissa, love this post! Would you mind sharing the total cost all-in?
Hi Christina! We made it two years ago, so I can’t remember the overall costs. But if you were to buy all the tools I listed for the wedding cake, it would be around $100, maybe a little less depending on where you buy your styrofoam cake rounds and if you already have some tools on hand. This doesn’t include ingredients and flowers. I went a little overboard and bought all organic ingredients for the very best flavor, so we spent a pretty penny on ingredients. We made 8 9-inch italian cream cakes for serving and spliced together 4 9-inch cakes for the grooms cake (which ended up being 18″x18″). We served smaller, rectangular slices (3″ x 1.5″), and determined at a 9-inch cake would serve 18 slices. Total, we had 12 9-inch cakes and came up with plenty of leftovers!
I’m confused! Only the top layer is edible? How can that be sufficient for all the guests??? Am I as dense as the wedding cake—yikes!
Hi Barbara! It’s a super long post, but I answer it in there. We made square cakes for serving!