
This week—I was a graphic designer by day and a baker by night.
I dream of being a full-time baker. Especially after this week, where I made 120+ cookies for a friend’s wedding shower. It wore me out, no lie. But I loved every last second of it. If only I didn’t have to work 8-5.

In regards to most recipes on this blog you’ve probably heard me say—This is easy, I promise. Not the case with these little guys. They are hard work. Back breaking work. And they take tons of practice. So, now that I’ve scared you away, let me also say, You can do it. It will be so rewarding. I promise.
Before you get started, I recommend watching this clip from The Martha Stewart Show (the video is on the lefthand side of the page). The trickiest part about these cookies is working with the royal icing. This segment will teach you how to make the royal icing, as well as all the important lingo like damming and flooding. Best of all, it will teach you how to achieve the chevron-like pattern I did on several of the cookies.
You’re also going to need a couple of tools before you get started, such as a condiment bottles. I found mine in the baking section at Michael’s.
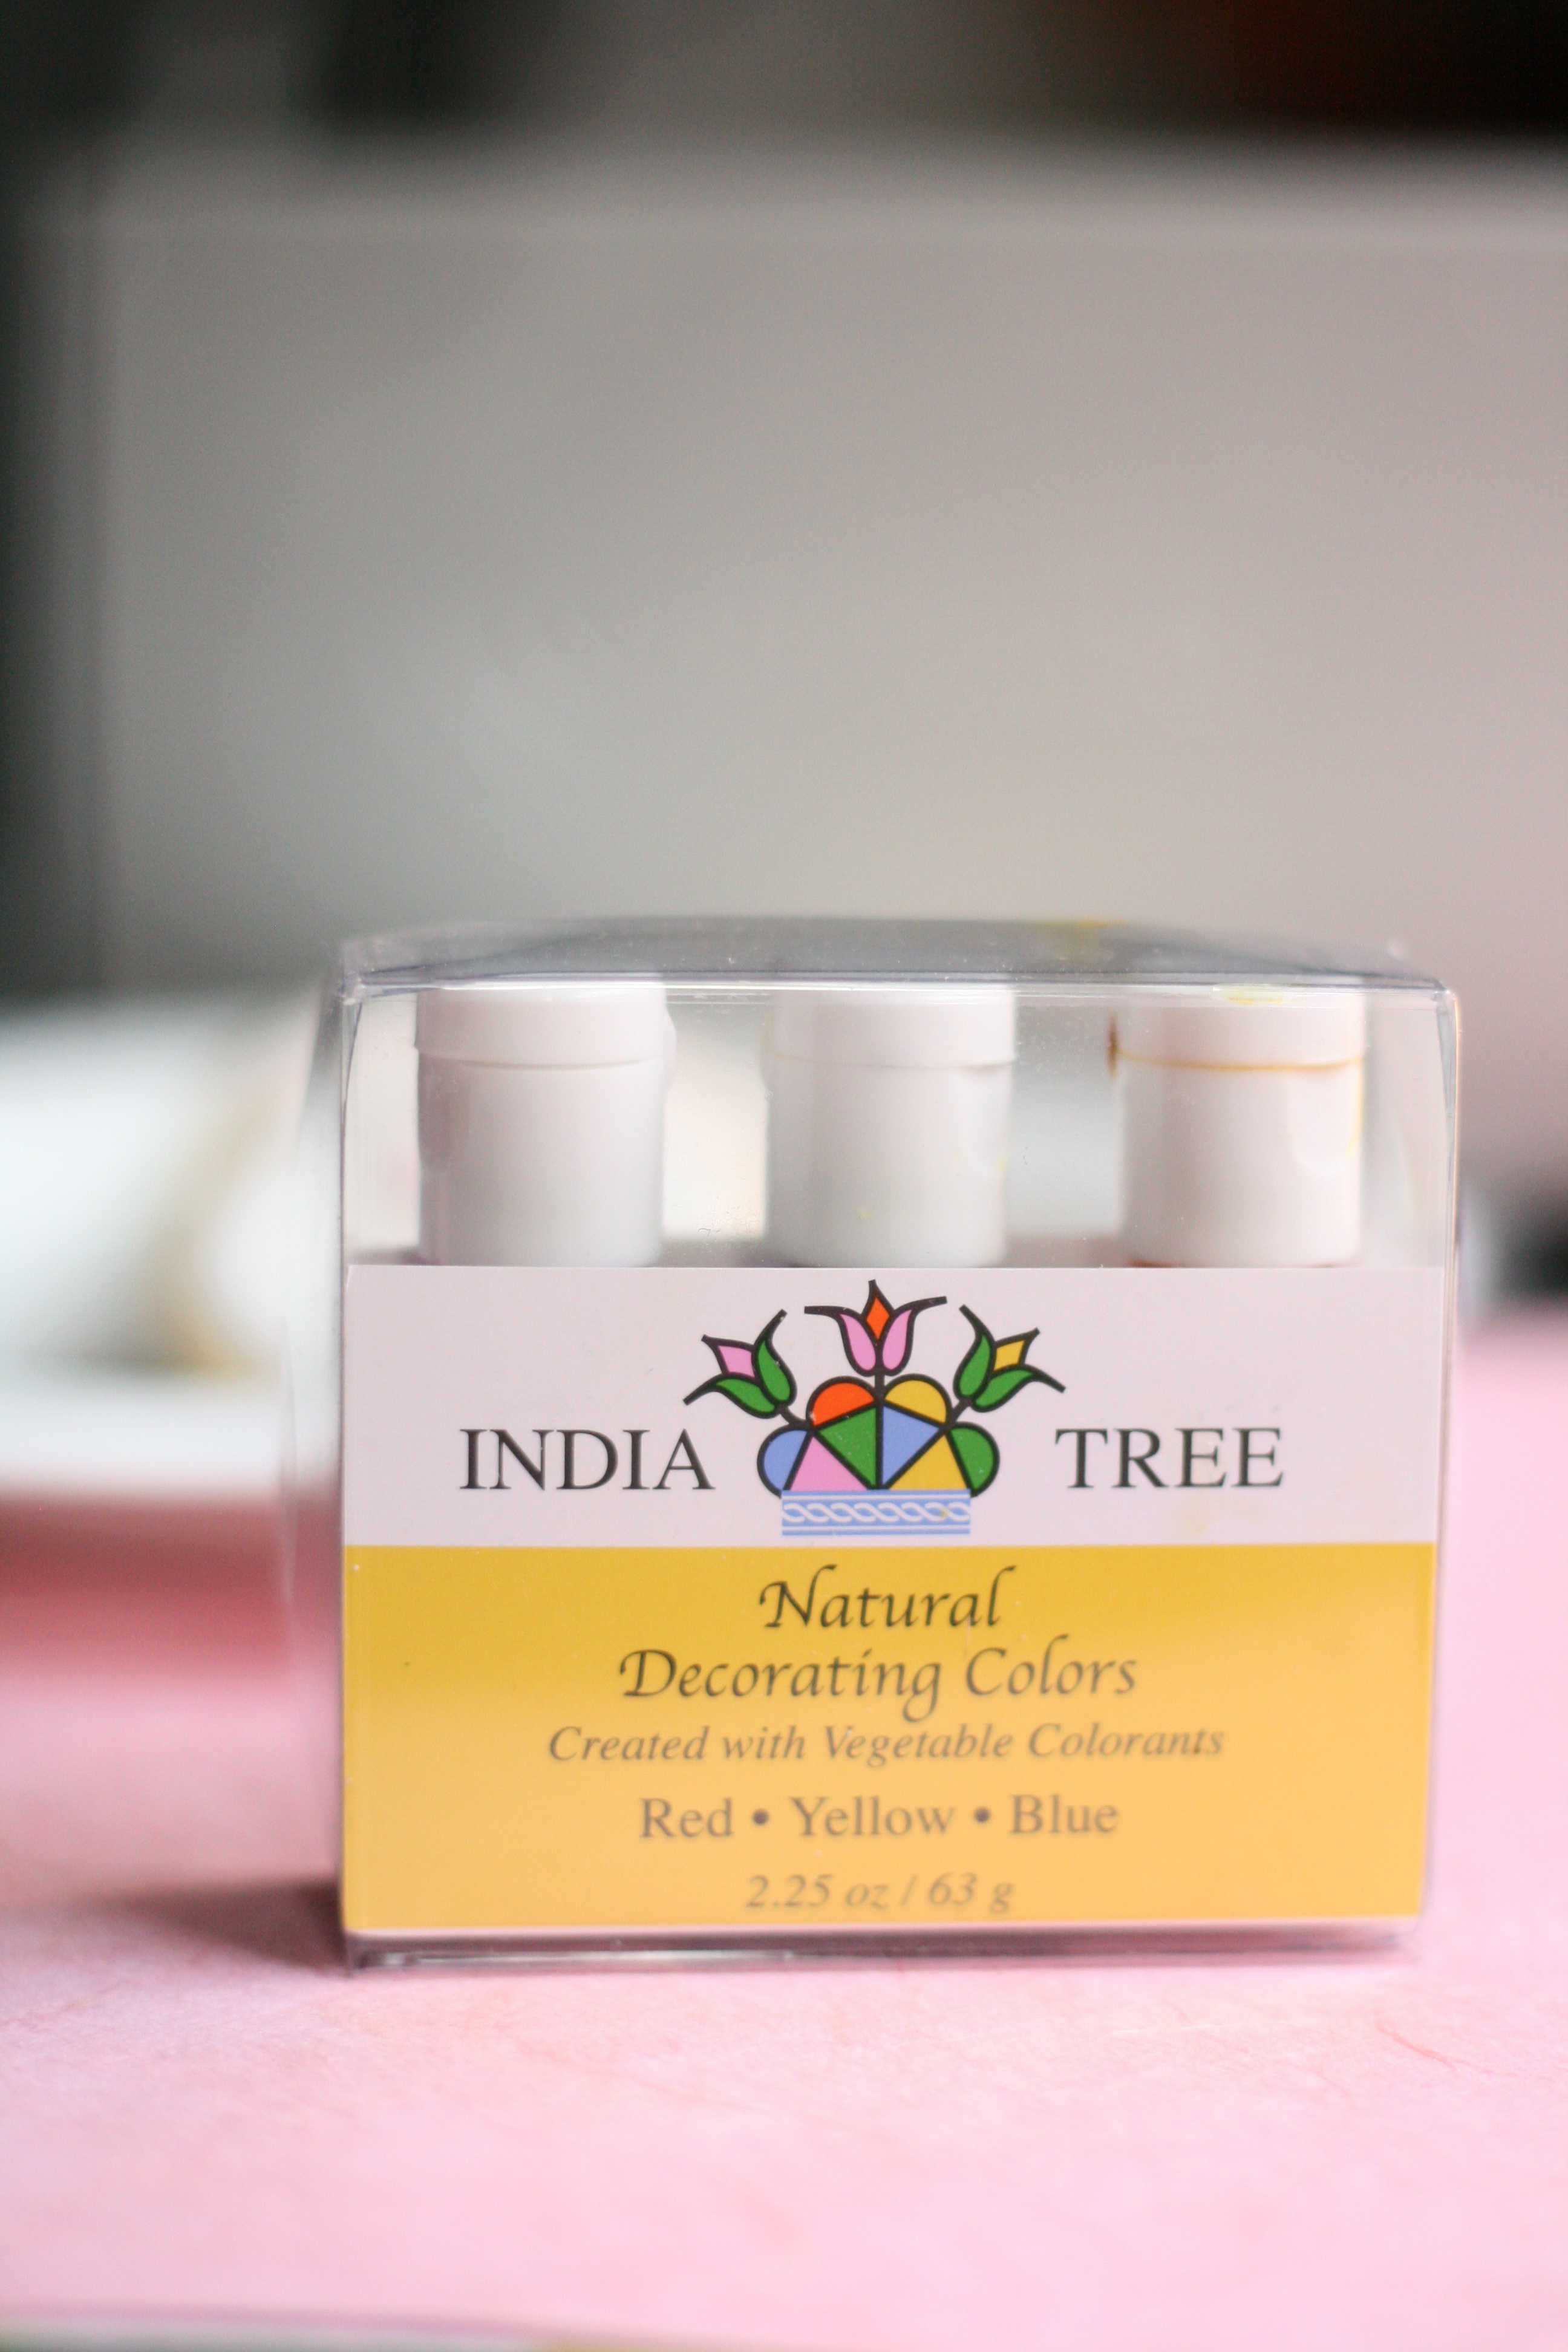
Food coloring is a must. I recommend investing in the all-natural kind although it is a couple dollars more. I went with India Tree (sold at Whole Foods). They make their food coloring out of vegetable pigments. You can still achieve beautiful colors with it, and it doesn’t pepper your icing with a bad aftertaste like so many do.
Now on to the good stuff—the recipes! I made these cookies as all-natural as possible. Usually these types of cookies scream fake and over processed to me. But it doesn’t have to be the case, especially if you make them yourself.
Vanilla-Almond Sugar Cookies
recipe from Bake at 350, with slight changes
amount of cookies will vary based on size
3 c. unbleached, all-purpose flour
2 tsp. baking powder
1/2 tsp. sea salt
1 c. cane sugar
2 sticks unsalted butter, cold
1 egg
1/2 tsp. pure vanilla extract
3/4 tsp. pure almond extract
1. Preheat oven to 350°.
2. Combine the flour, baking powder and salt. Set aside.
3. Cream the sugar and butter. Add the egg and extracts, and mix.
4. Gradually add the flour mixture, and beat just until combined, scraping down the sides of the bowl.
5. Knead dough together with hands as it will be crumbly.
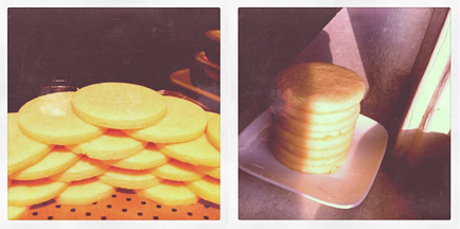
6. Place dough on floured surface and using a rolling pin, roll out to 1/4″ thickness or thicker. Cut into desired shapes.
7. Place cookies on parchment lined baking sheets or Silpat and freeze for 10 minutes before baking.
8. Bake for 9 minutes. (I pull the cookies out before they begin to golden for a softer texture.) Let sit for a few minutes on the baking sheet, then transfer to a cooling rack. (Make sure cookies are completely cool before icing. I usually wait overnight.)
Royal Icing
recipe from Dani Fiore via Martha Stewart, with slight changes
makes about 2 1/2 cups
1/4 c. meringue powder
1 pound confectioners’ sugar (about 3 1/2 to 4 c.)
1/2 c. water
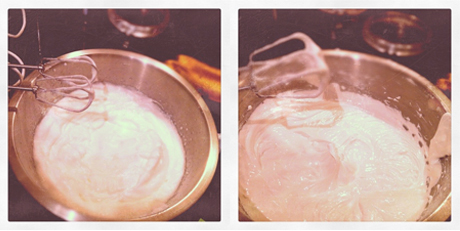
1. Using a hand mixer with the whisk attachment, mix together meringue powder with 1/2 cup water until soft peaks form, about 1 minute. Using the beater attachments, add sugar one cup at a time; continue mixing until well combined, scraping down the sides of the bowl as necessary. Icing will become thick and glossy in appearance.
2. Ice cookies.* (Do not cover or stack until completely dry. I usually wait overnight.)
*Throughout the decorating process, you will need different consistencies of royal icing. Writing icing will need to be thick while “flooding” icing will need to be a bit thinner. To do this, add more water. If frosting becomes to thin, add more powdered sugar.
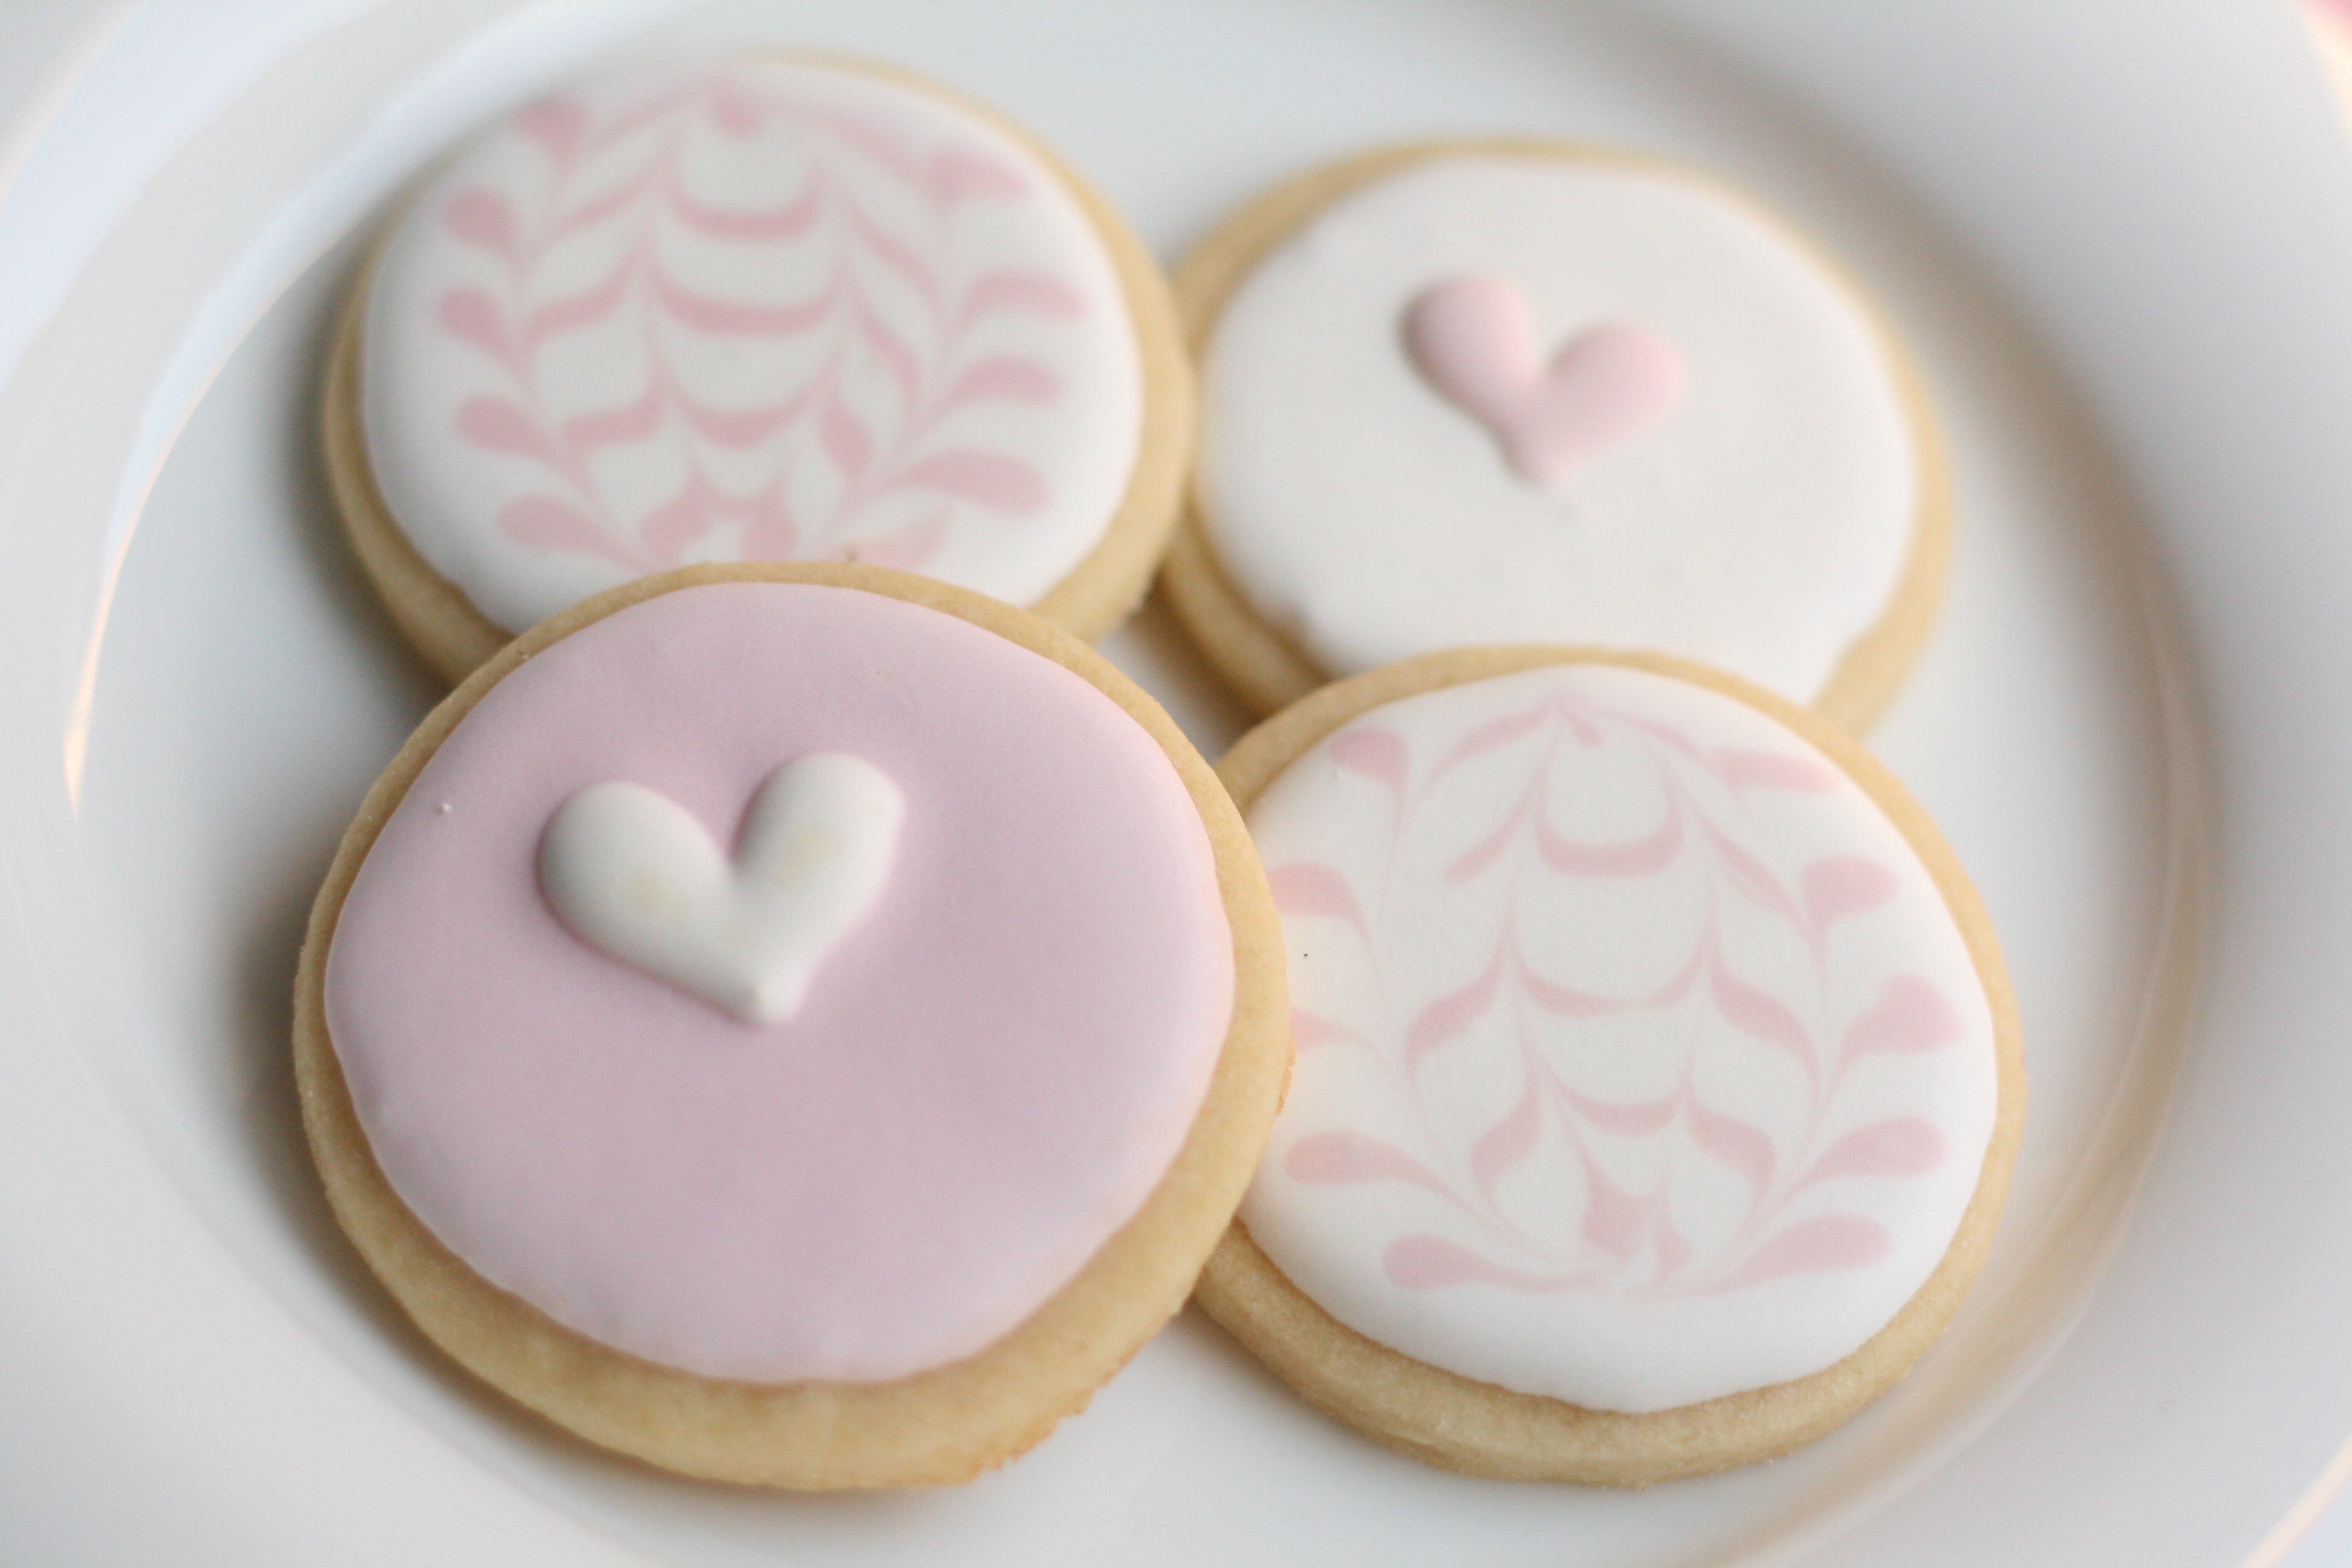
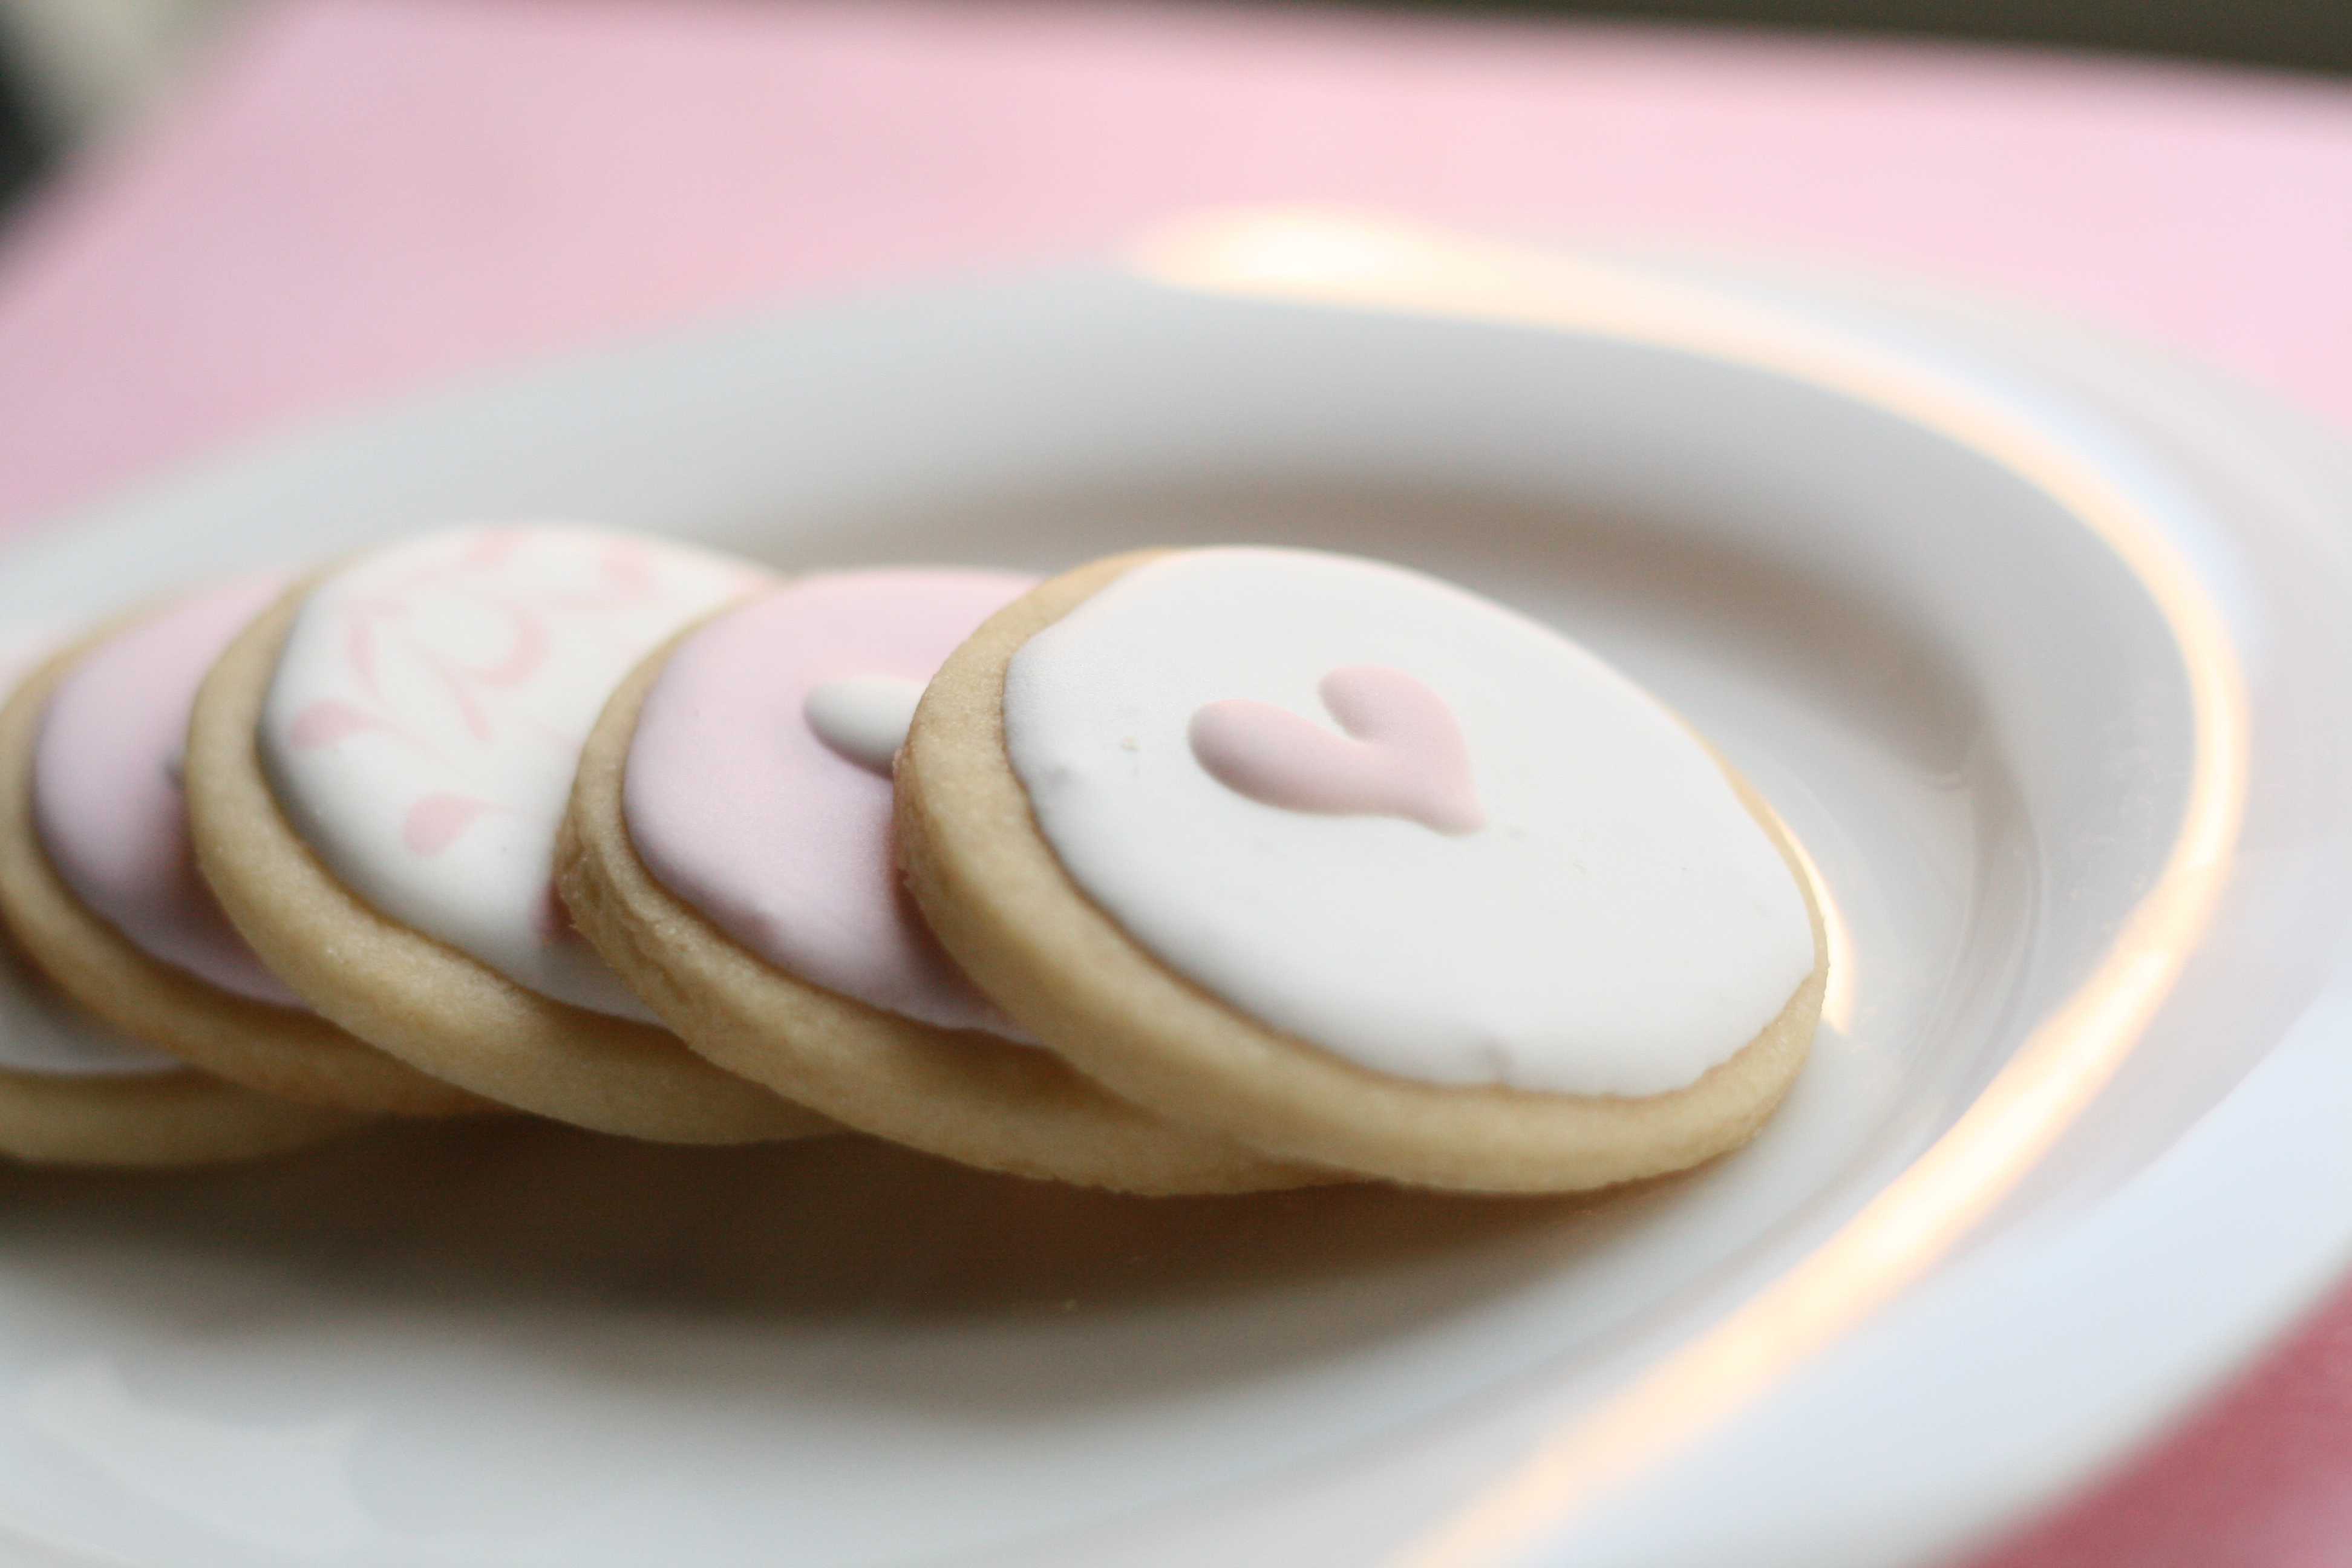
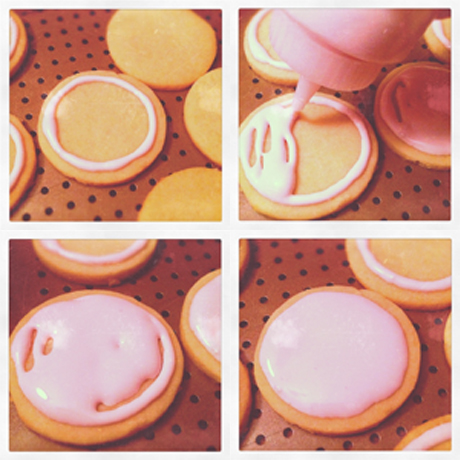
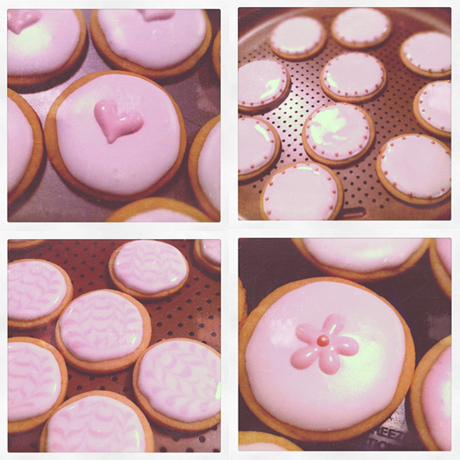
Below are pictures of the process with a couple decorating how-to’s.
Royal icing: When beating, it will go from soft peaks, to stiff glossy peaks as you add in the sugar.
Applying Icing: In a seperate bowl, add a tiny bit of water to icing. Add food coloring if necessary. Dam, flood, watch it flood, fill in any blank areas, let dry.
Decorating: HEARTS—use original icing (not thinned icing). Pipe 2 circles. Pull the icing down with tip to form a heart. DOTS—while icing is wet, place nonpareils on cookie using tweezers. CHEVRON PATTERN—while the base icing is still wet, draw horizontal lines with original icing (not thinned). Using a toothpick, lightly pull icing down in a vertical manner. Make sure to wipe off toothpick each time. Pull up to create zig-zag effect. FLOWER—much like the heart, use original icing and pipe 5 circles. Using the tip, pull in to center. Place nonpareil in center with tweezers.
They are hard work. Back breaking work. And they take tons of practice. But, you can do it. It will be so rewarding. I promise.


The dough came out moist squishy and alil sticky not crumbly they baked nicely but are cracked on top is that normal???
Just made these cookies for my youngest boy’s birthday school treats. I’m going to decorate them as snowman faces. Thanks for another delicious, easy recipe Melissa!
such cute cookies…and a great post! You’re right…it does take some time and practice, but once you get the hang of it, it’s fun! 🙂
120! That’s a LOT of work! 🙂 Next time you make just a dozen, you’ll think….that was NOTHING!
Thanks for sharing the great recipe!! I love looking through your blog! I have much to aspire in the cookie decorating world after seeing your work. You are a cookie decorator goddess 🙂
Lovely! I haven’t yet tackled royal icing & fancy cookies….it’s so intimidating!
Gina, you could totally do it! You seem adventurous and successful in your baking. I have 100% confidence!
Melissa, you are AMAZING!!! These were a HUGE hit at my sister’s shower. We placed the monogram cookies in clear party bags, fastened with pink bow, and sent home as favors. The others were scattered on a two-tier silver tower, and guests commented on both how BEAUTIFUL and DELICIOUS they were! I think our guests were pleasantly surprised to depart with yet another cookie (which I’m sure several of them ate on their drive home, as we all know we are more modest when it comes to eating in front of others we might not know so well). THANK YOU from the bottom of my, and the bride-to-be Amy’s, heart. You are so incredibly talented, and mighty generous with your precious time. ♥
Thank you for the opportunity to make the cookies! I loved every second of it and I’m so glad they were well received! Thanks also for helping me to figure out what I want to do with myself. Your encouragement means a ton!!
your cookies are sooo cute! i love the pink and white ones you did with the toothpick.
after i tried to make the cookies for our gender reveal party, i decided that ordering cookies is soooo much easier than making them! plus i there is a local girl who does suchhhh a great job for not much money.
hope the shower went well!!
Thanks Silvy!! Ordering cookies definitely is easier. These little guys are work, but I’m crazy, and loved it! But you were making them when pregnant (CONGRATS!!!). That’s incredible. I don’t know if I would have the wherewithal to do that! They wore me out.