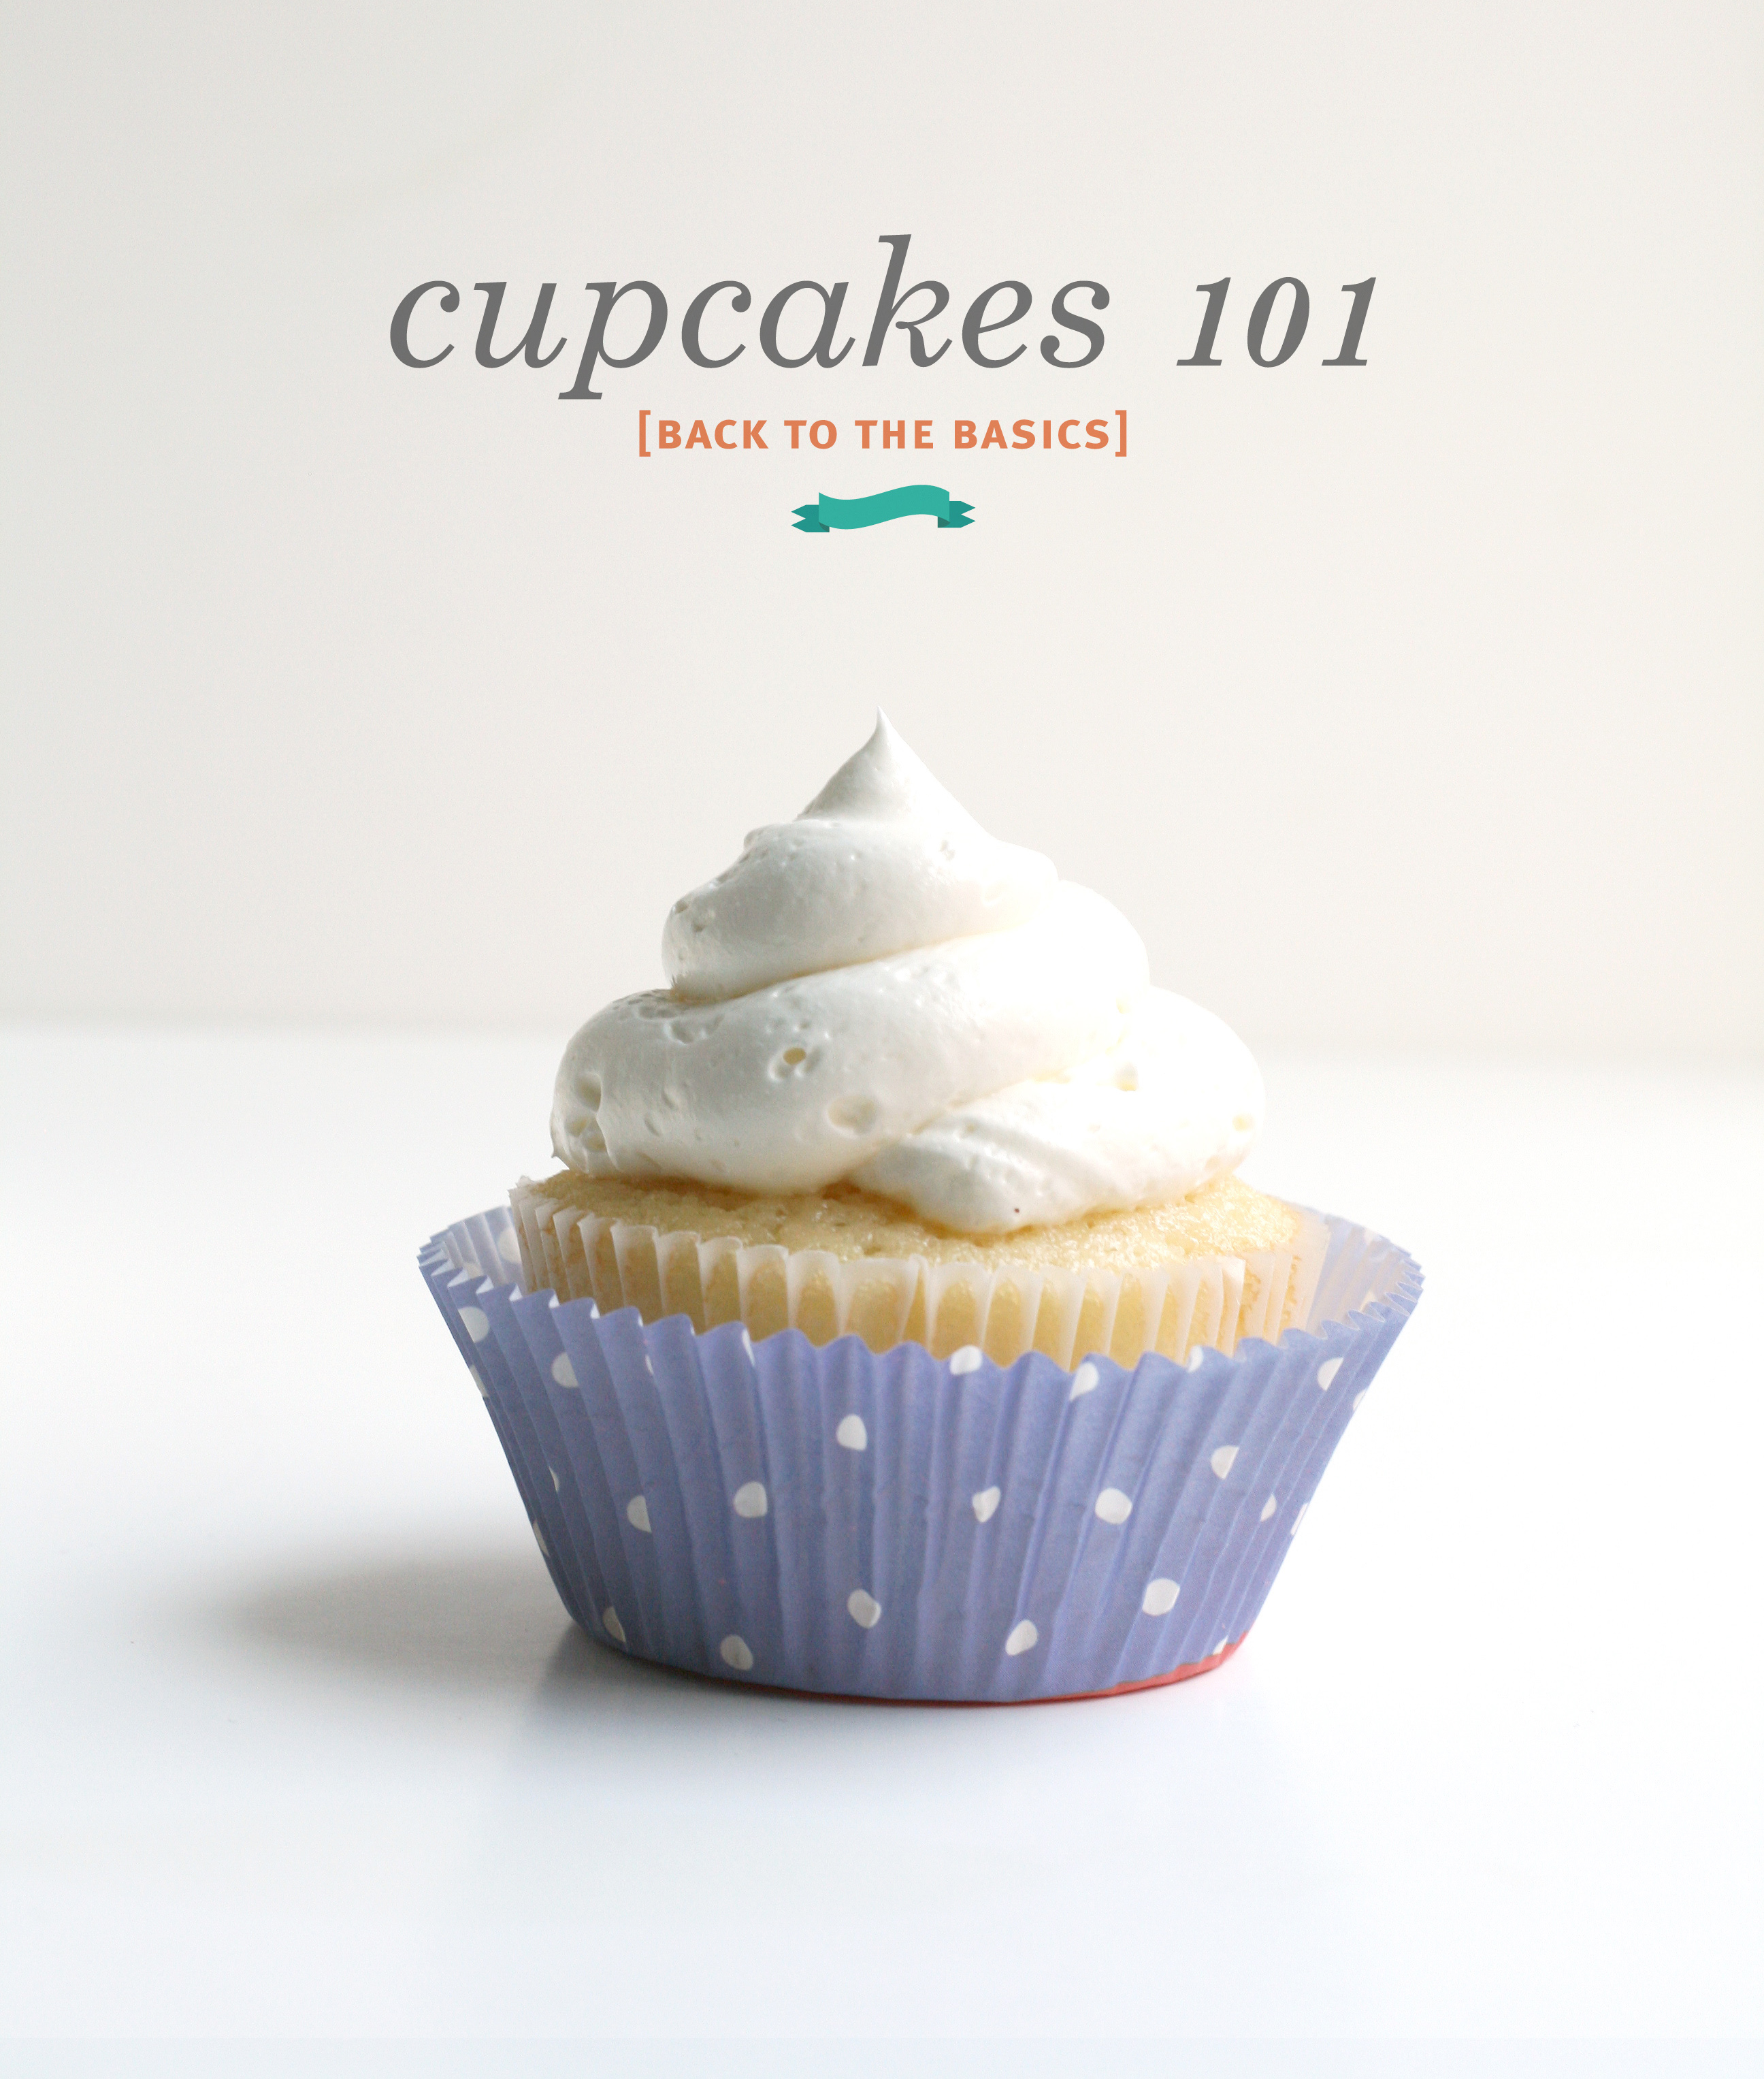
I’m not sure if I should title this Cupcakes 101, Baking 101, or Melissa’s Baking Philosophy. I did a presentation on this a couple weeks ago and called it Cupcakes 101. So we’ll stick with that. Just know—this isn’t your ordinary cupcake talk. I apologize.
I mentioned doing a presentation. On food. First time ever. Yes, I was nervous. Nail biting nervous. I’m used to presenting logos, brochures, and ideas, but food…I love food. It’s got an extra soft spot in my heart and in my stomach. But I’m no expert. I’m self taught. I guess you could say Martha taught me everything I know via daytime television. That gives me some credibility. But it ends there. Most days, it’s just me, my kitchen, trial, and error. Read more
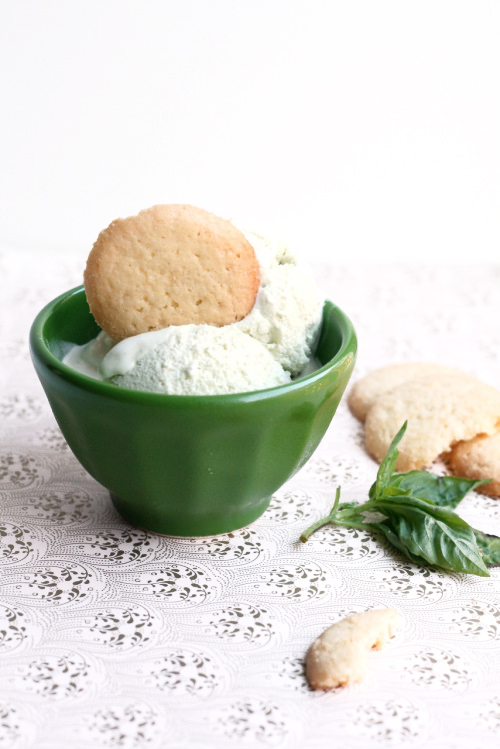
So excited to finally share what I’ve been concocting this week! Trust me when I say basil in your ice cream is a very good thing. It is! Though it might sound unusual, it’s floral and sweet and creamy and delicious. And the lemon wafer cookie just puts it over the top. The base of this ice cream pulls from our very favorite homemade vanilla ice cream. Bon Appetit!
This creamy ice cream is made with the addition of basil. It’s pale green naturally and so delicious. Just blend the basil into the milk ahead of time and voila!
Ingredients
Scale
2 1/2 c. whole milk
1/2 c. basil leaves, lightly packed
2 c. heavy cream
1 1/4 c. sugar
1/2 tsp. coarse kosher salt
3 egg yolks
1 tsp. pure vanilla extract
Garnish
Lemon wafter cookie
Instructions
In a blender, puree the milk and basil leaves.
In a heavy-bottomed saucepan or dutch oven, large enough to hold the liquids if they were to double in size, combine the whole milk, heavy cream, 1 cup of the sugar, and salt. Whisk to combine.
Heat over medium-high heat until the sugar dissolves and begins to simmer, whisking occasionally so as not to scald the mixture. Turn down the heat as necessary.
Meanwhile, in a small bowl whisk together the egg yolks and remaining 1/4 cup of sugar until creamy and slightly more pale than when you began, about 1 minute. Set aside.
Once the milk mixture comes to a low simmer, carefully measure out about one cup. Pour about 1/3 of it into the egg mixture, whisking constantly to temper the eggs. (You’ll want to work quickly and constantly here so that you don’t curdle/scramble the egg as you temper them.) Whisk in the remaining milk, whisking constantly to combine. Now add the egg mixture into the saucepan, whisking continually. Cook for about 1-2 minutes more until the mixture begins to thicken enough to coat the back of a spoon. Remove from heat. Stir in the vanilla extract.
Pour mixture in a large bowl over a fine-mesh sieve to catch any egg clumps. Cover and place in the fridge to cool, about 3 hours. To speed up the cooling process, place a bowl in an ice bath or place in the freezer sans ice bath for 30 minutes.
Once the mixture is cold, make ice cream according to your machine’s instructions. Ice cream is best after an overnight freeze post churning.
Serve with a lemon wafer cookie (purchased at Whole Foods or Trader Joe’s) and a sprig of basil if you wish.
Just warning you—I’m coming off a migraine while writing this post. Please attribute poor grammar, crazy talk, or confusing sentences to this.
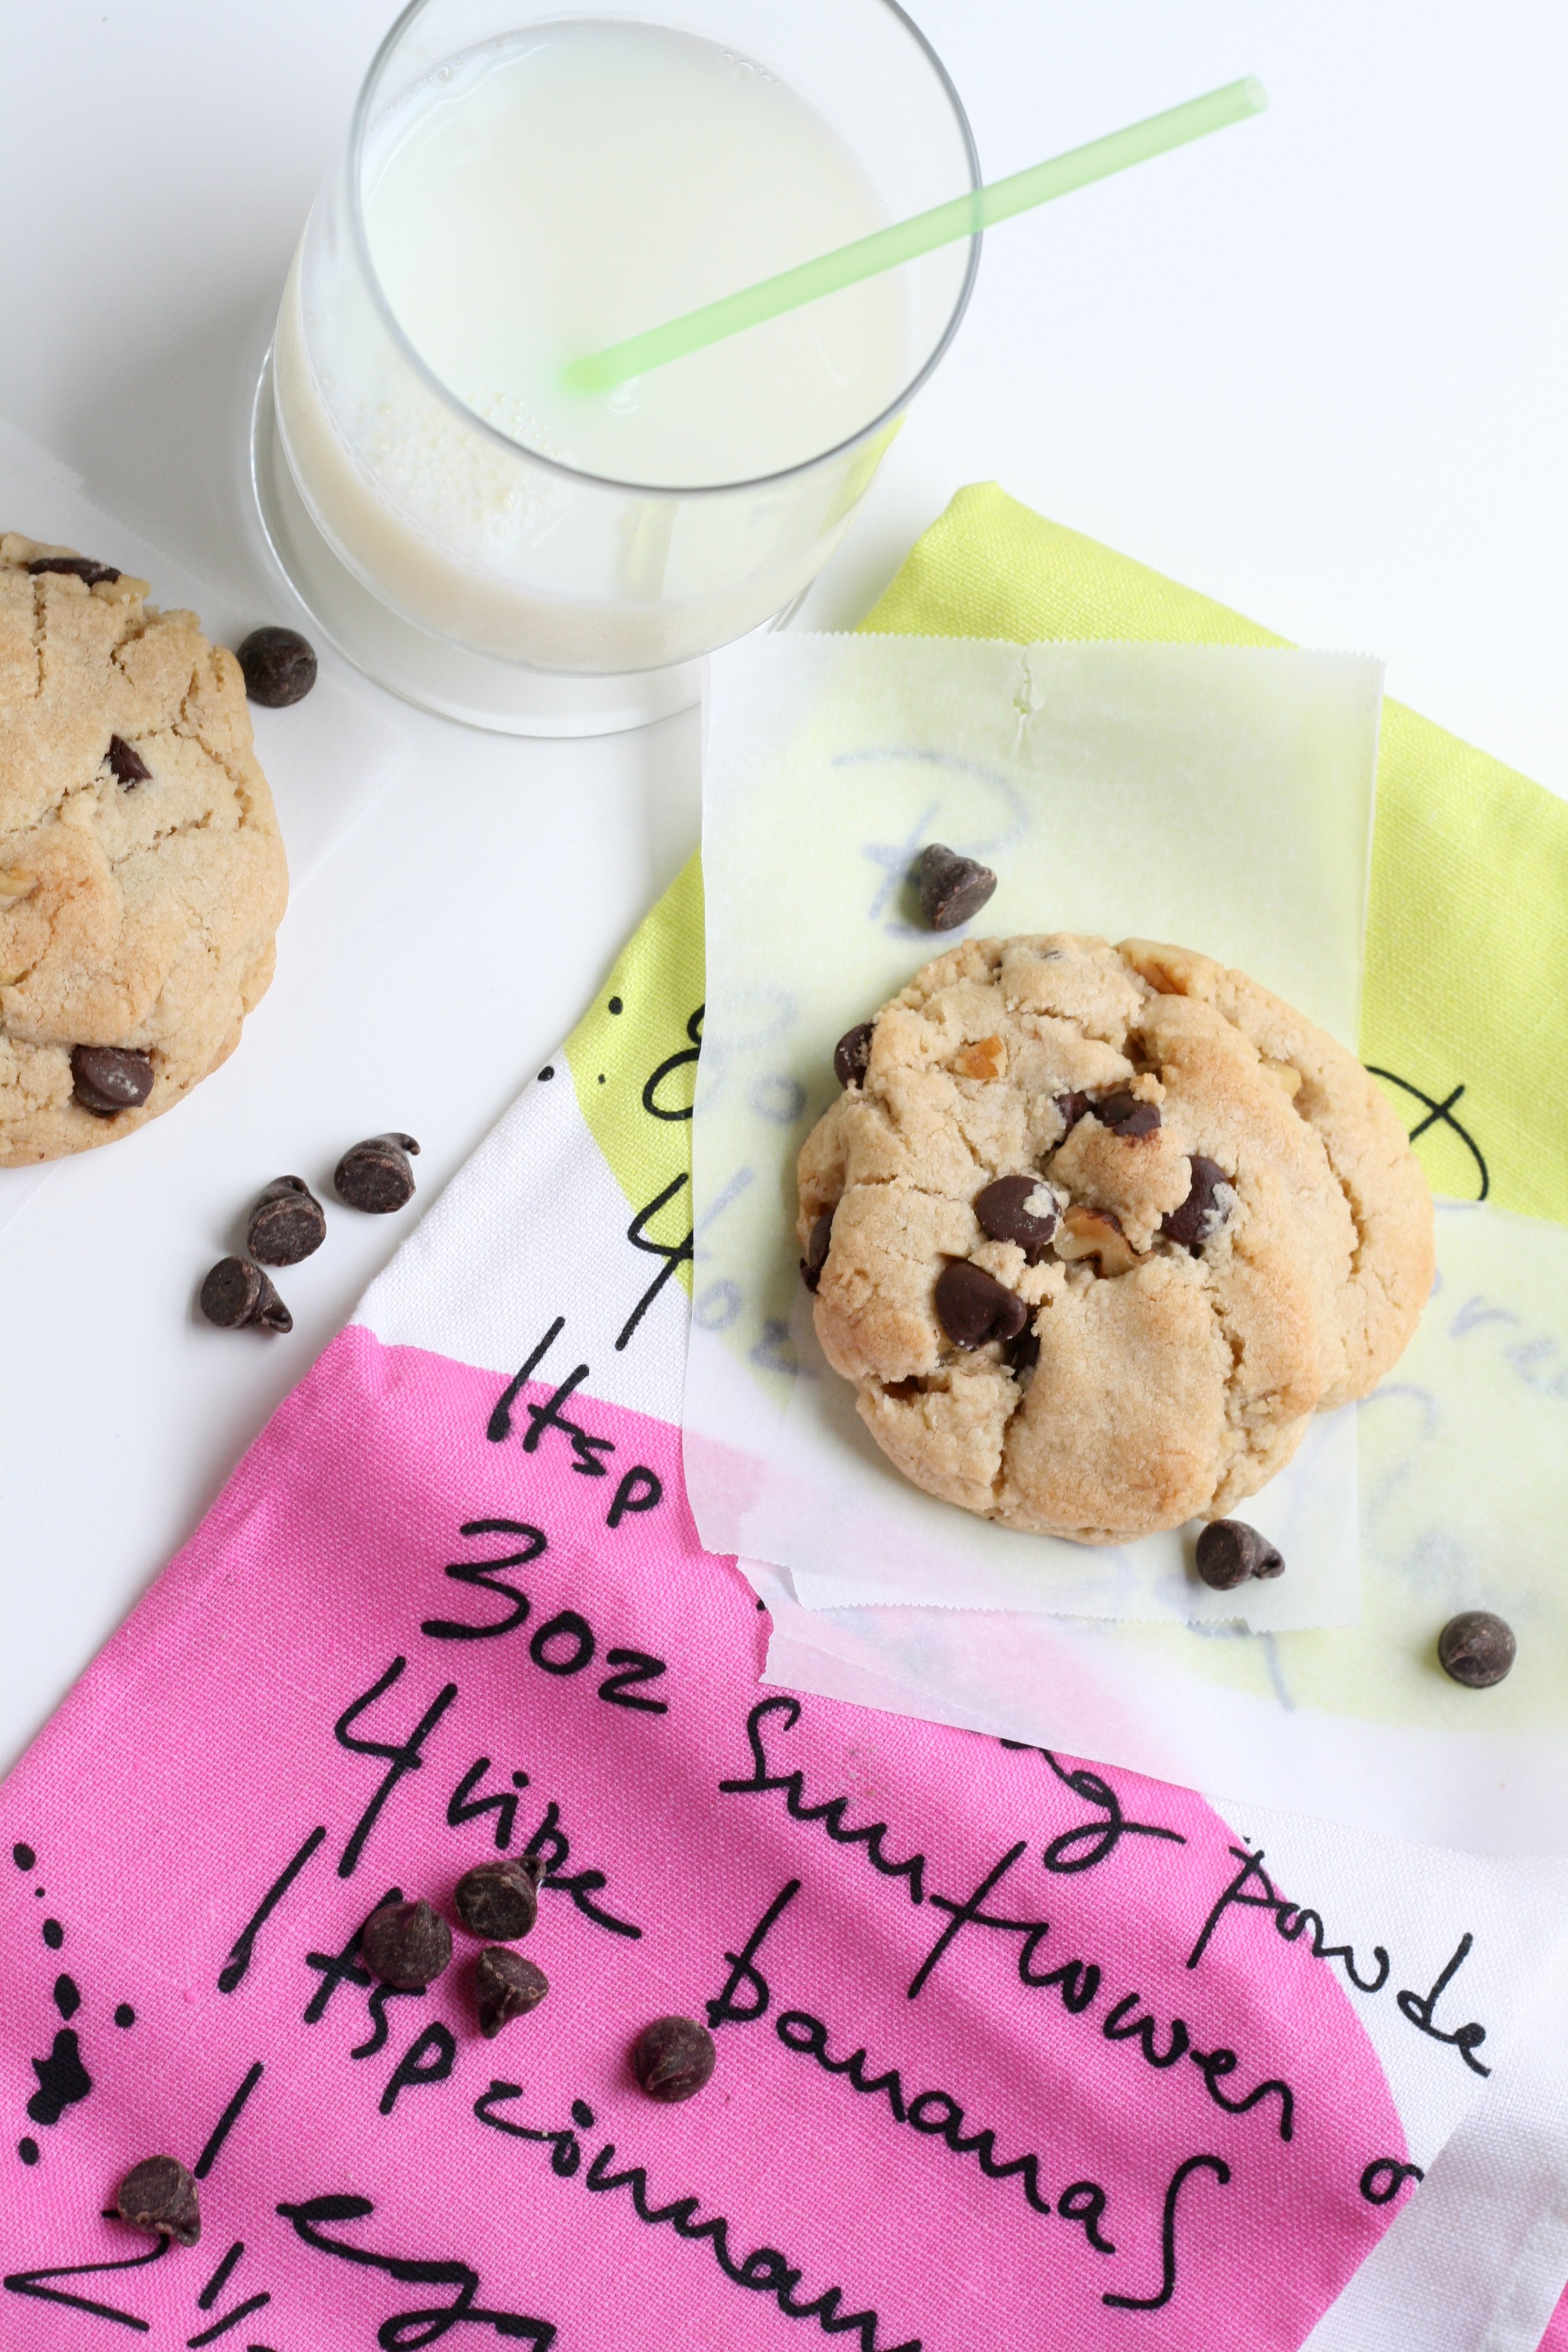
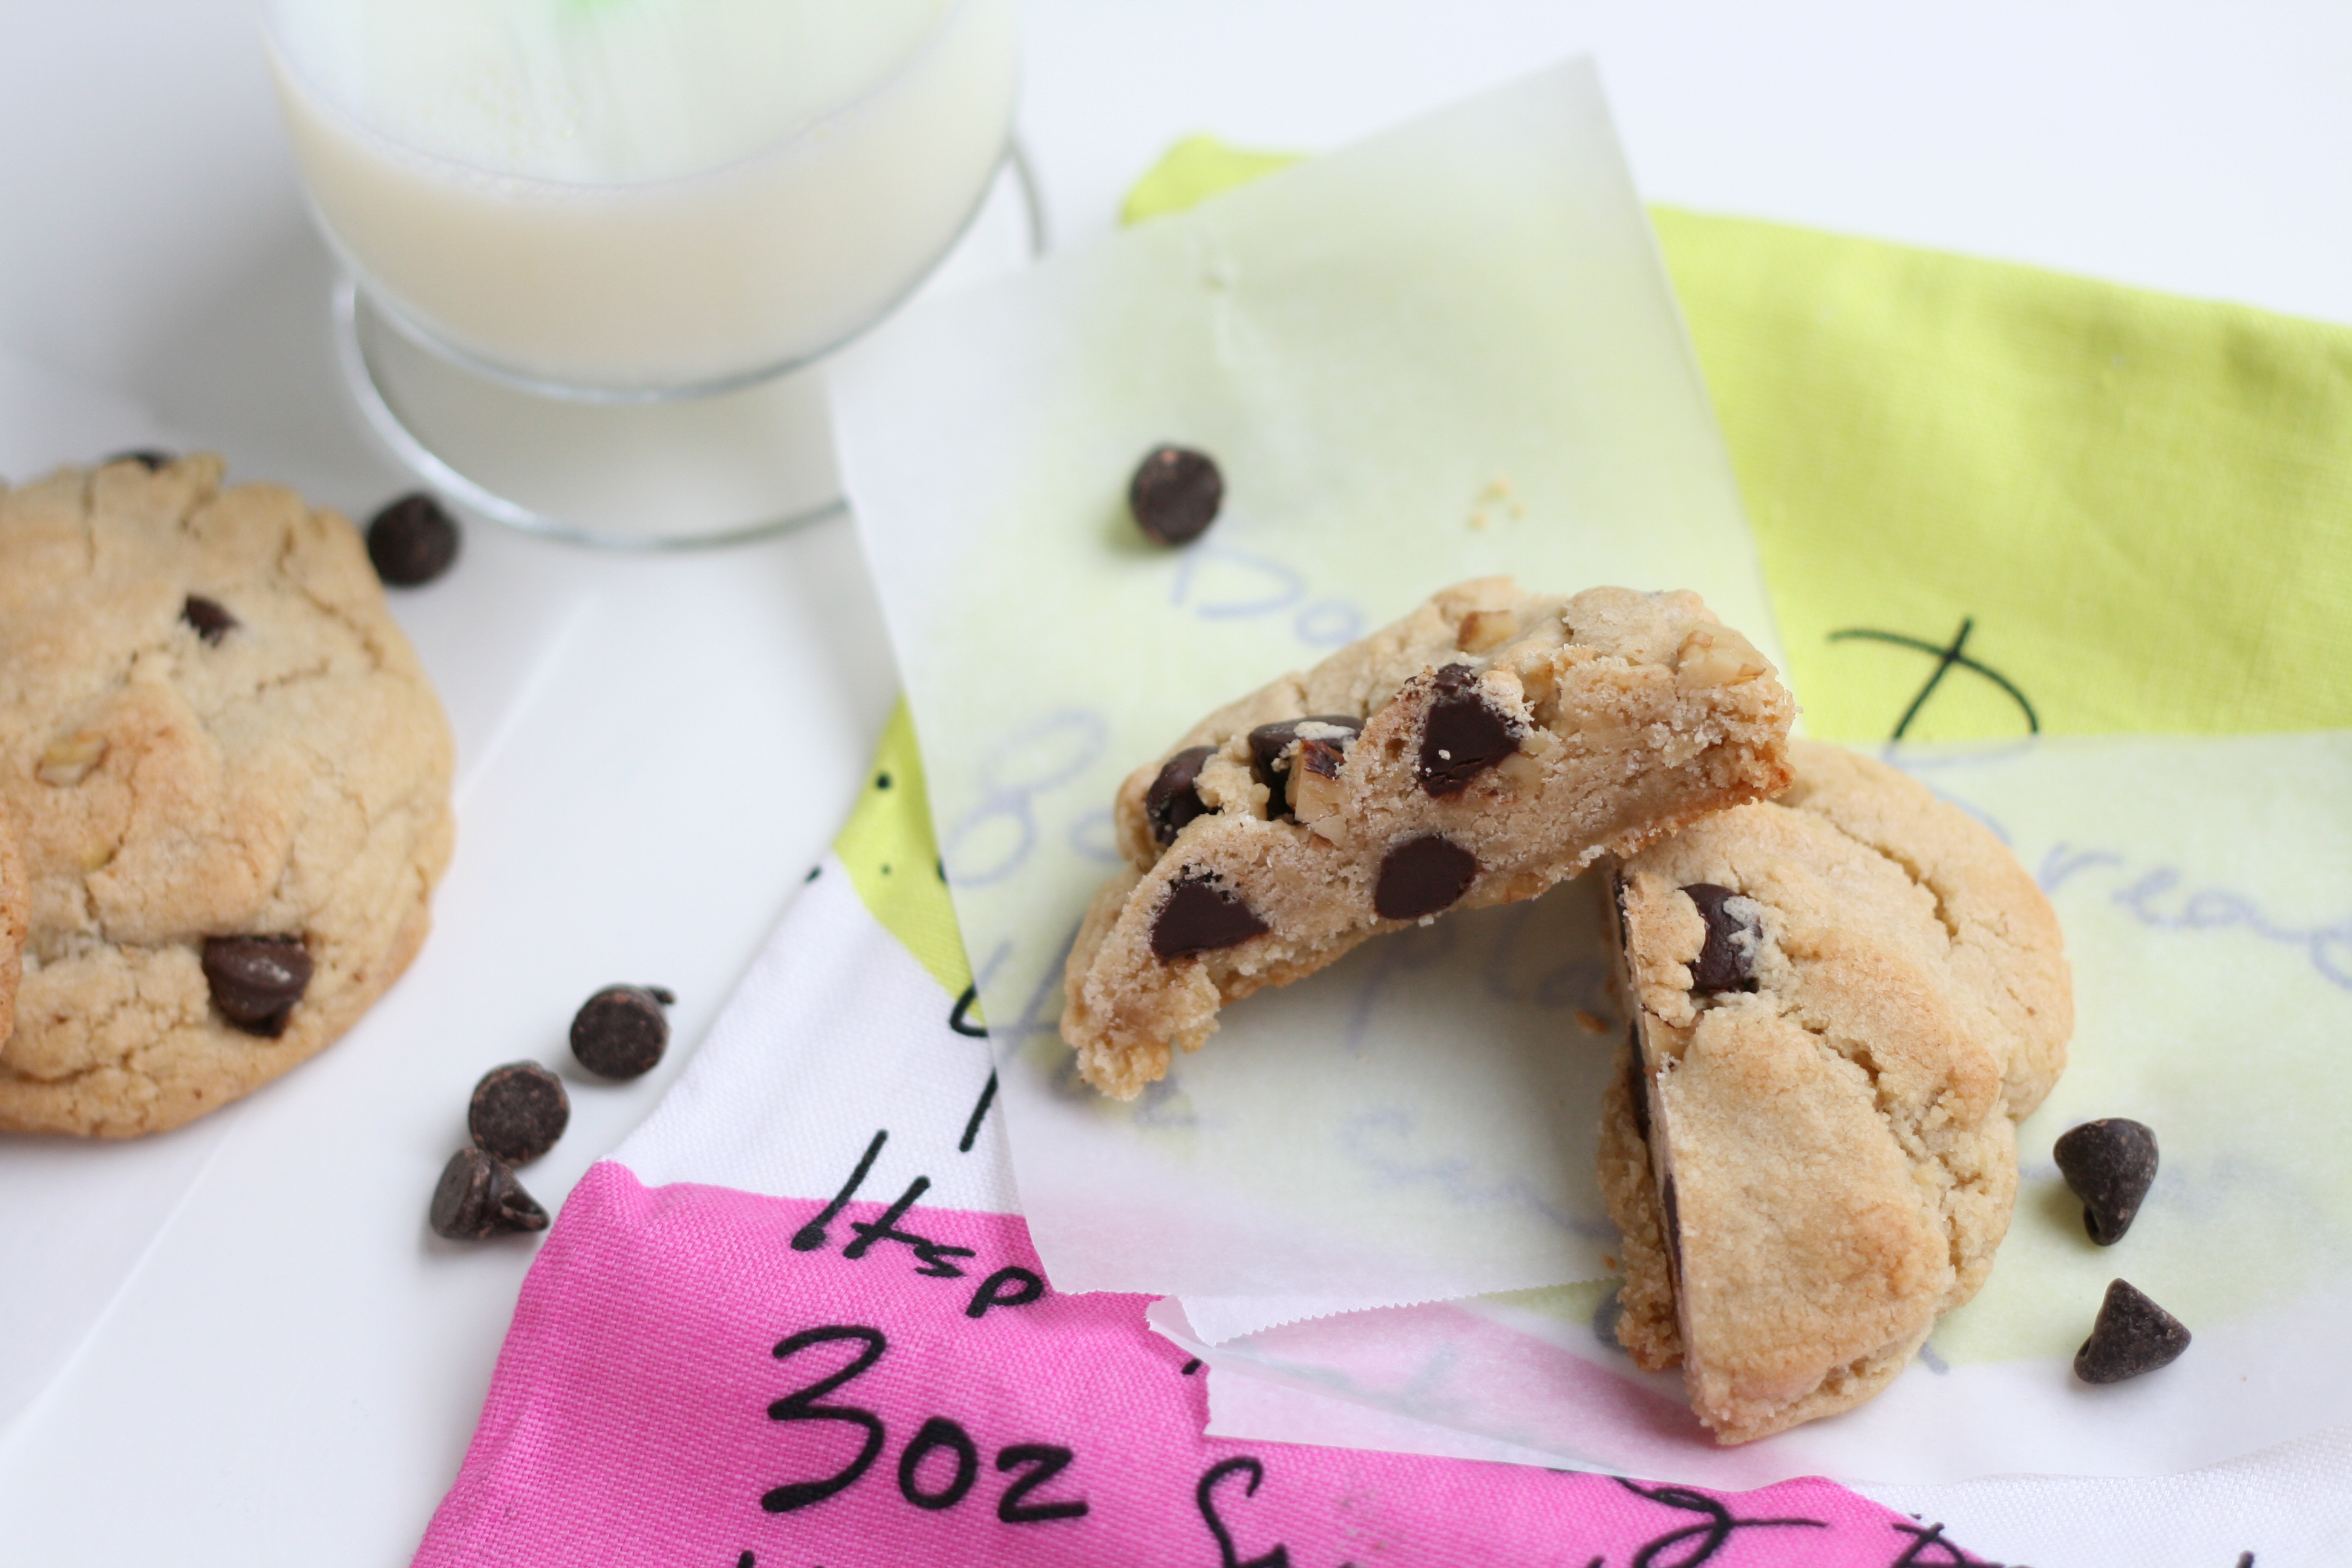
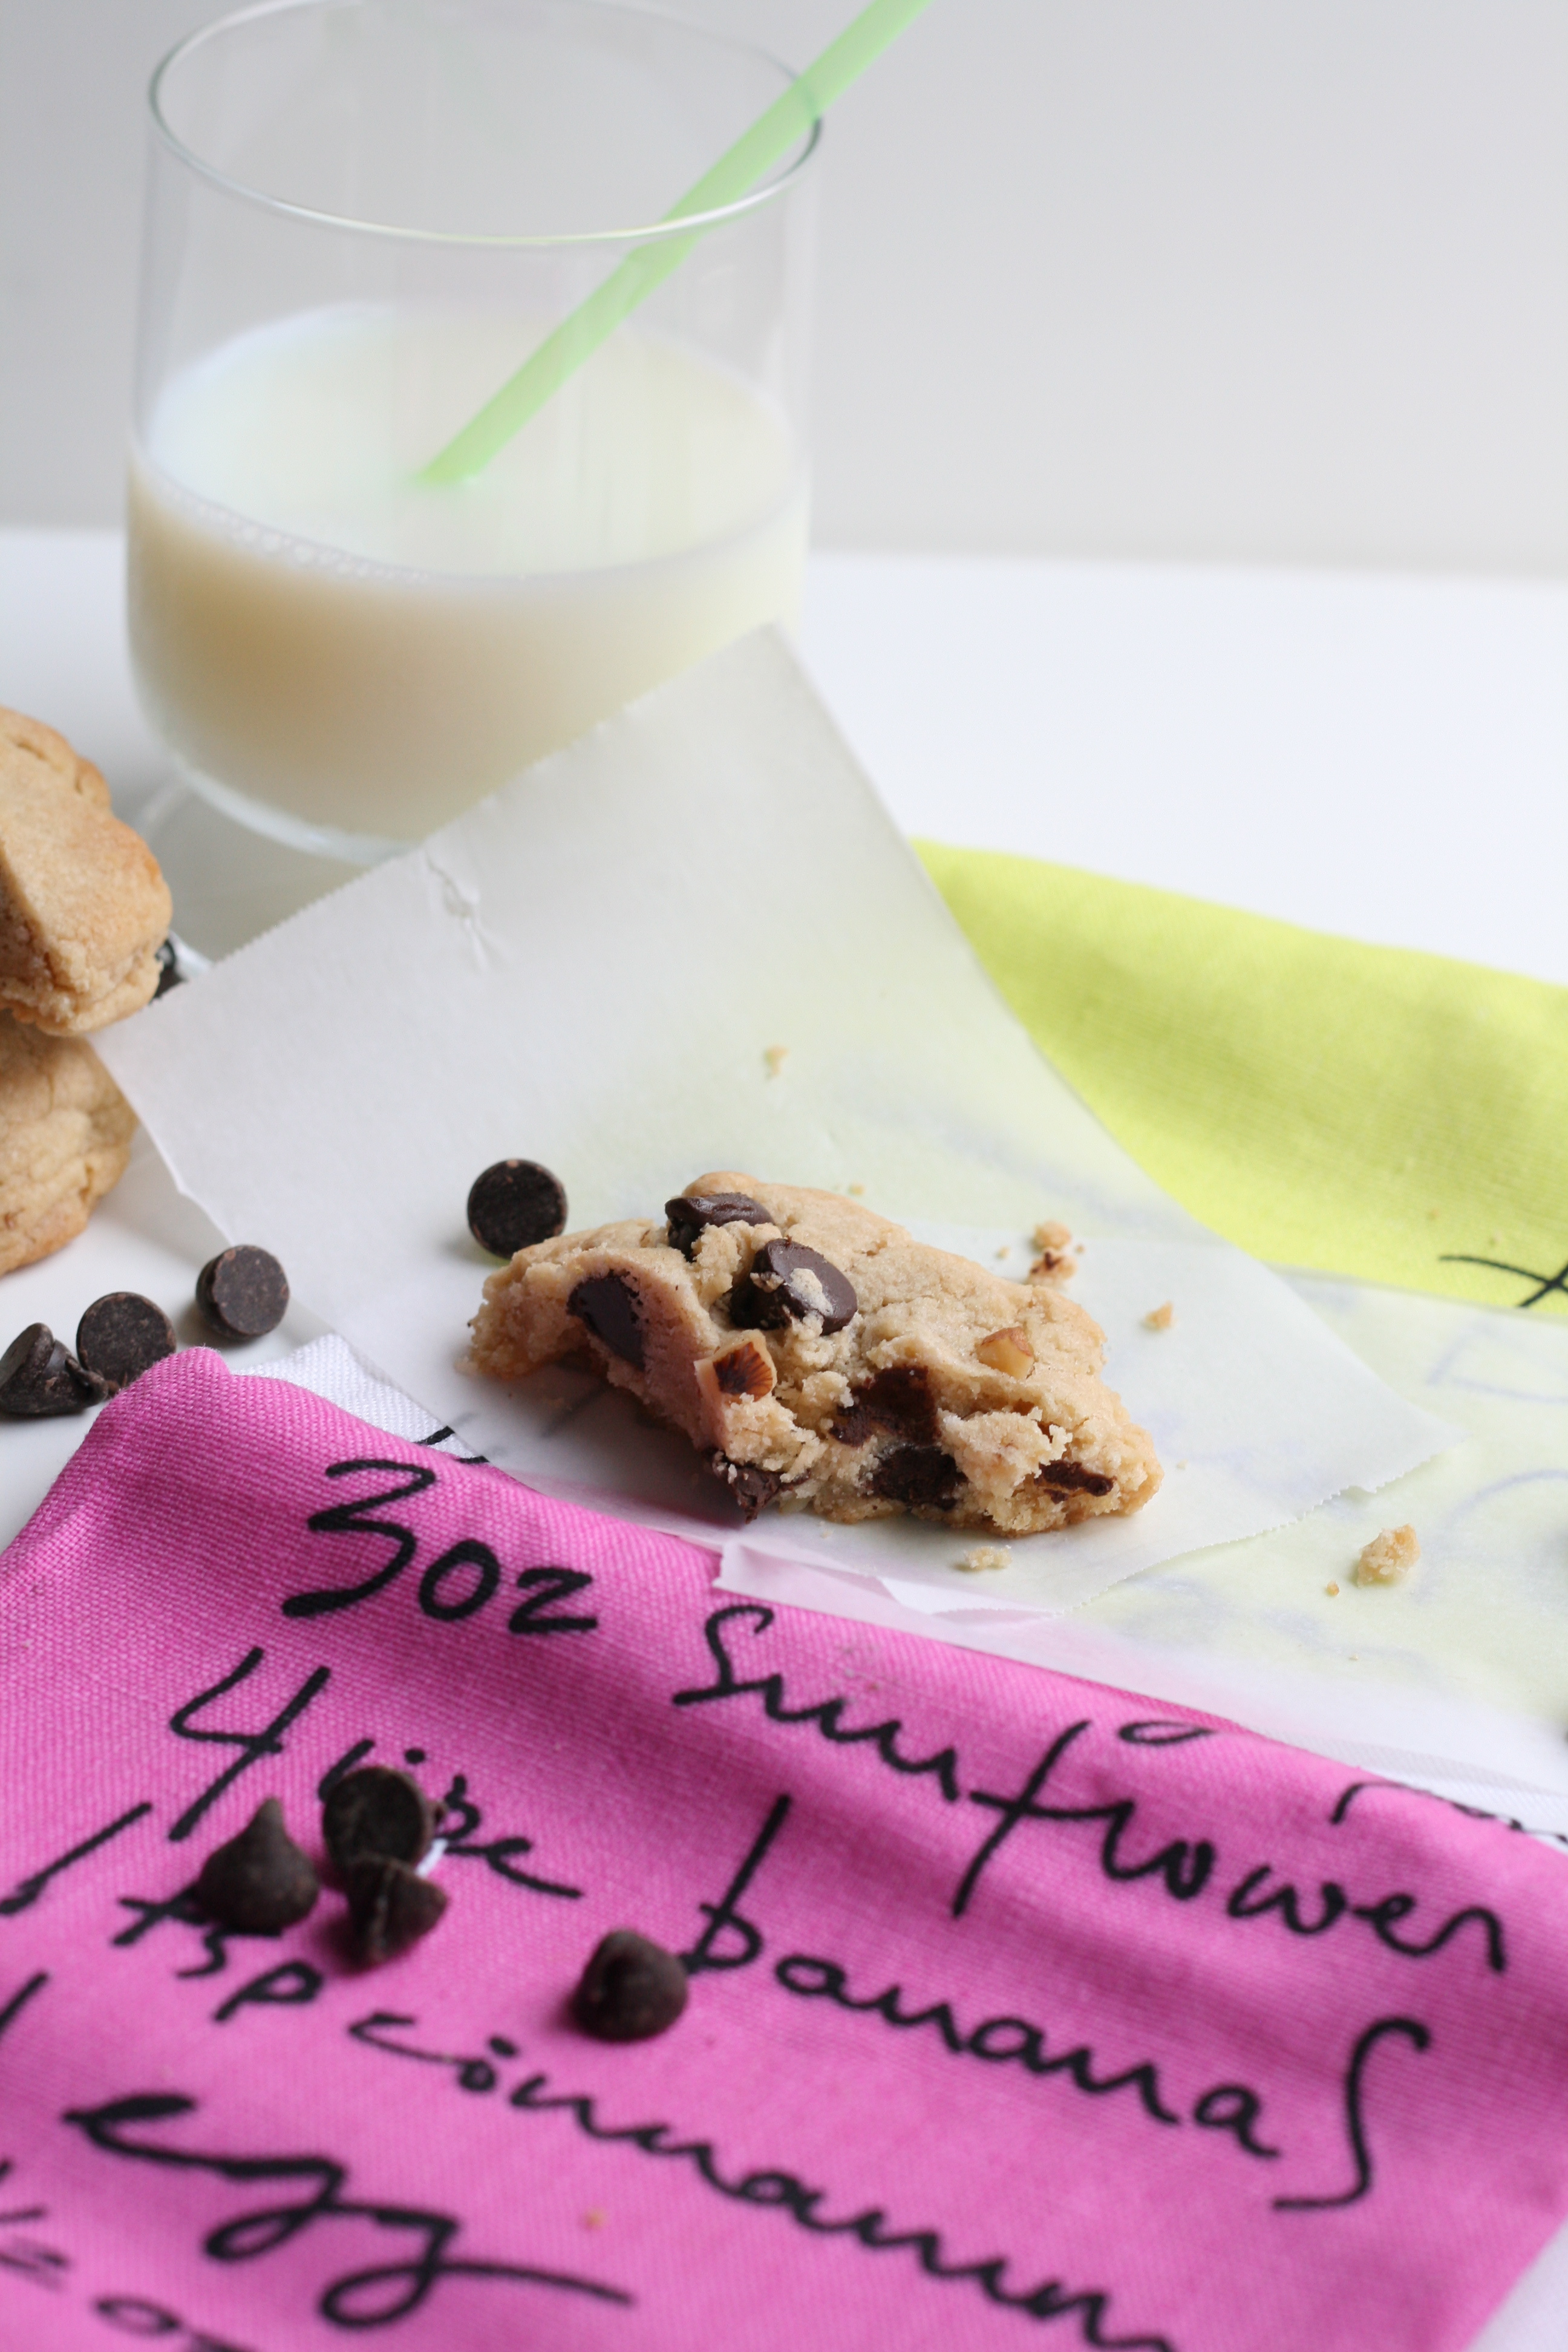
Apple does it. They make revisions. My Mac is on version 10.6.6. So I’m gonna do it too. I’m revising my Not Your Mom’s Chocolate Chip Cookie recipe. 2.0 here we go. It’s not that the last recipe was bad, but I thought it could use a little improving. I’m my own worst critic. You know how it goes.
The last recipe wasn’t sweet enough for me. But I fought and fought adding more sugar. 2 cups is kinda a lot. Eventually, I caved and gave it a try. 2 1/2 cups later, I’m not turning back. Sweeter is definitely better! And with that, my brain is spent. Sorry for the short post. The fog is just too thick. But not as thick as these delish 2.0 cookies!
12 ounces (2 c.) good quality semisweet chocolate chips
1 c. crushed walnuts
Instructions
Using a grater, grate chilled butter into a large bowl. Make sure to scrape out butter left on grater. If butter is too warm, stick it in the freezer for 5 minutes.
Add sugars to the butter. Using a mixer, mix until just combined. Do not over beat.
Add vanilla and eggs, and mix until just combined. Again, do not over beat.
In a separate bowl, whisk together flour, salt, baking powder, and baking soda.
Add flour mixture to butter mixture, and mix until just combined. Dough will look crumbly. You are right on track.
Stir in chocolate and crushed walnuts.
Take off your rings—you’re gonna need your hands for this. Gather dough into a large ball, as you would if you were making a snow ball. Place on pan lined with a Silpat or parchment paper. Only bake 6 cookies at a time, trust me on this. When I baked 12 at a time, they seemed to flatten out a bit more.
Preheat oven to 375°. Meanwhile, place cookies in the fridge.
Bake for 18 minutes or until slightly browned around edges. Cookies will still be doughy in the middle.
Allow to cool completely before eating. They taste so much better with a rest. The doughy center will stiffen up.
Notes
• You can make smaller versions of these cookies (or rather normal-sized cookies). It will yield double the amount. Bake 8 up at a time and reduce the cook time to 13-15 minutes.
• If you’re a flour sifter, skip it for this recipe.
• Skipping the walnuts will yield a flatter cookie. Additional flour is needed. (I haven’t tested it yet without. If you do, please let me know!)
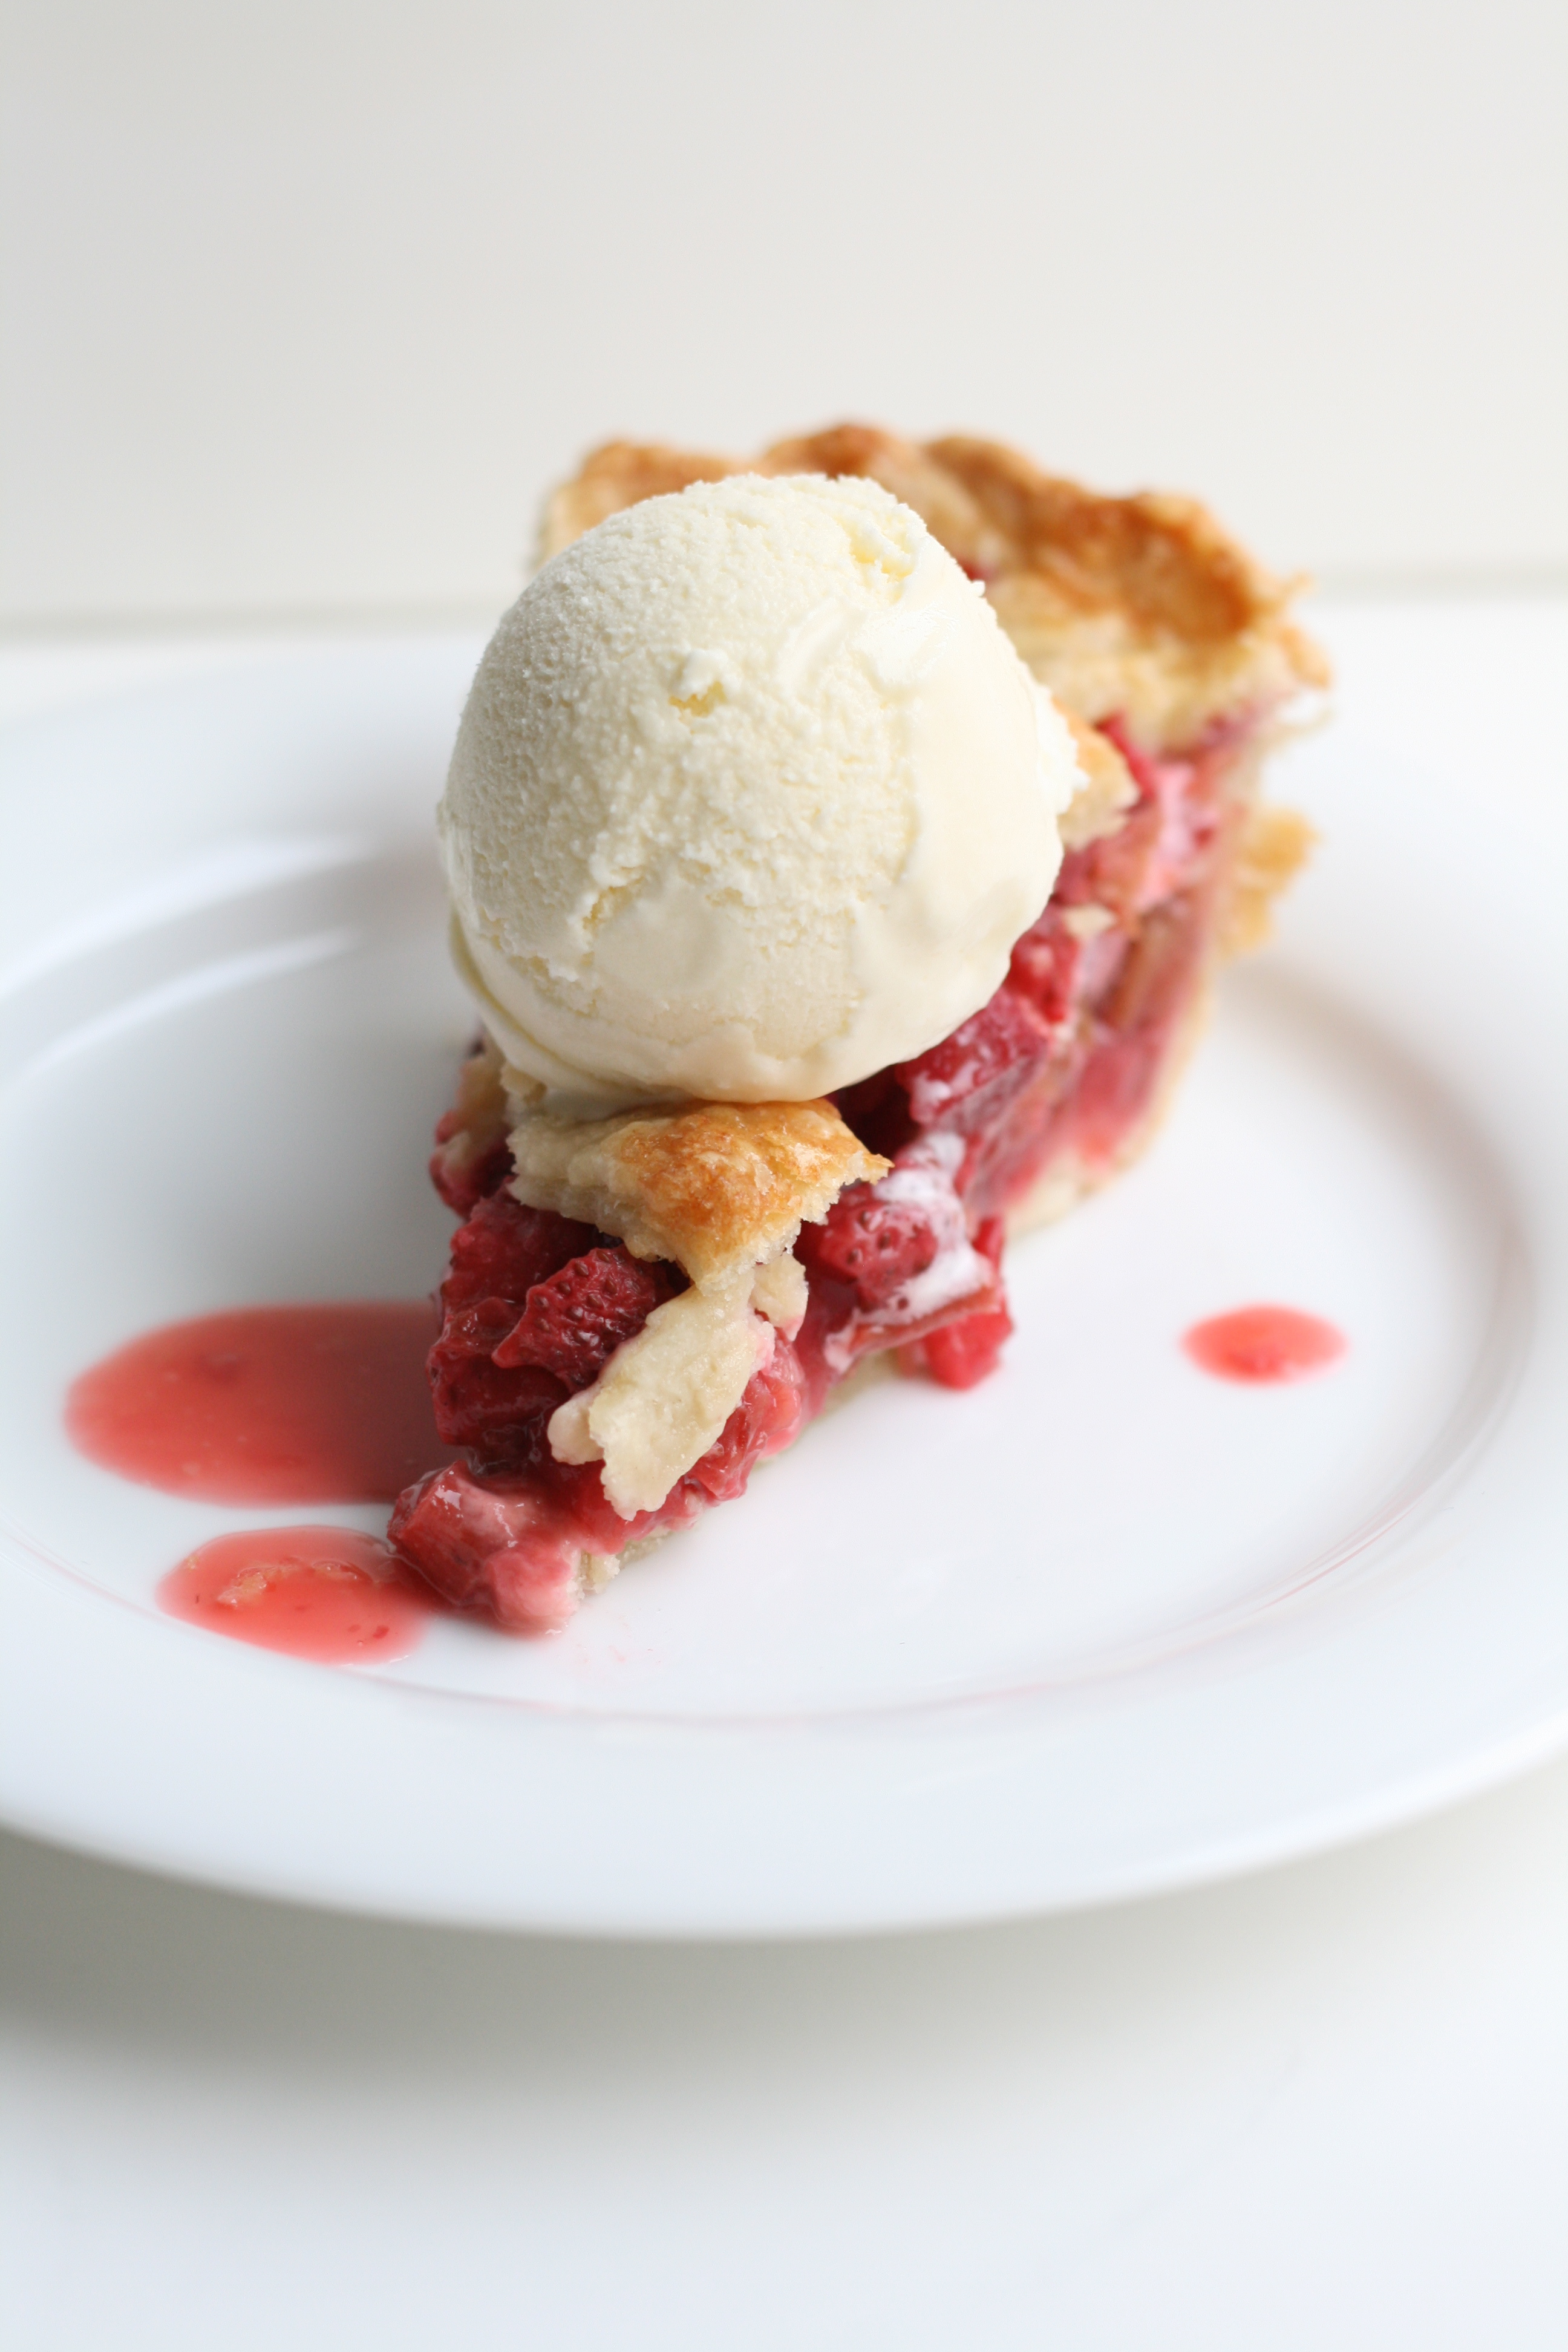
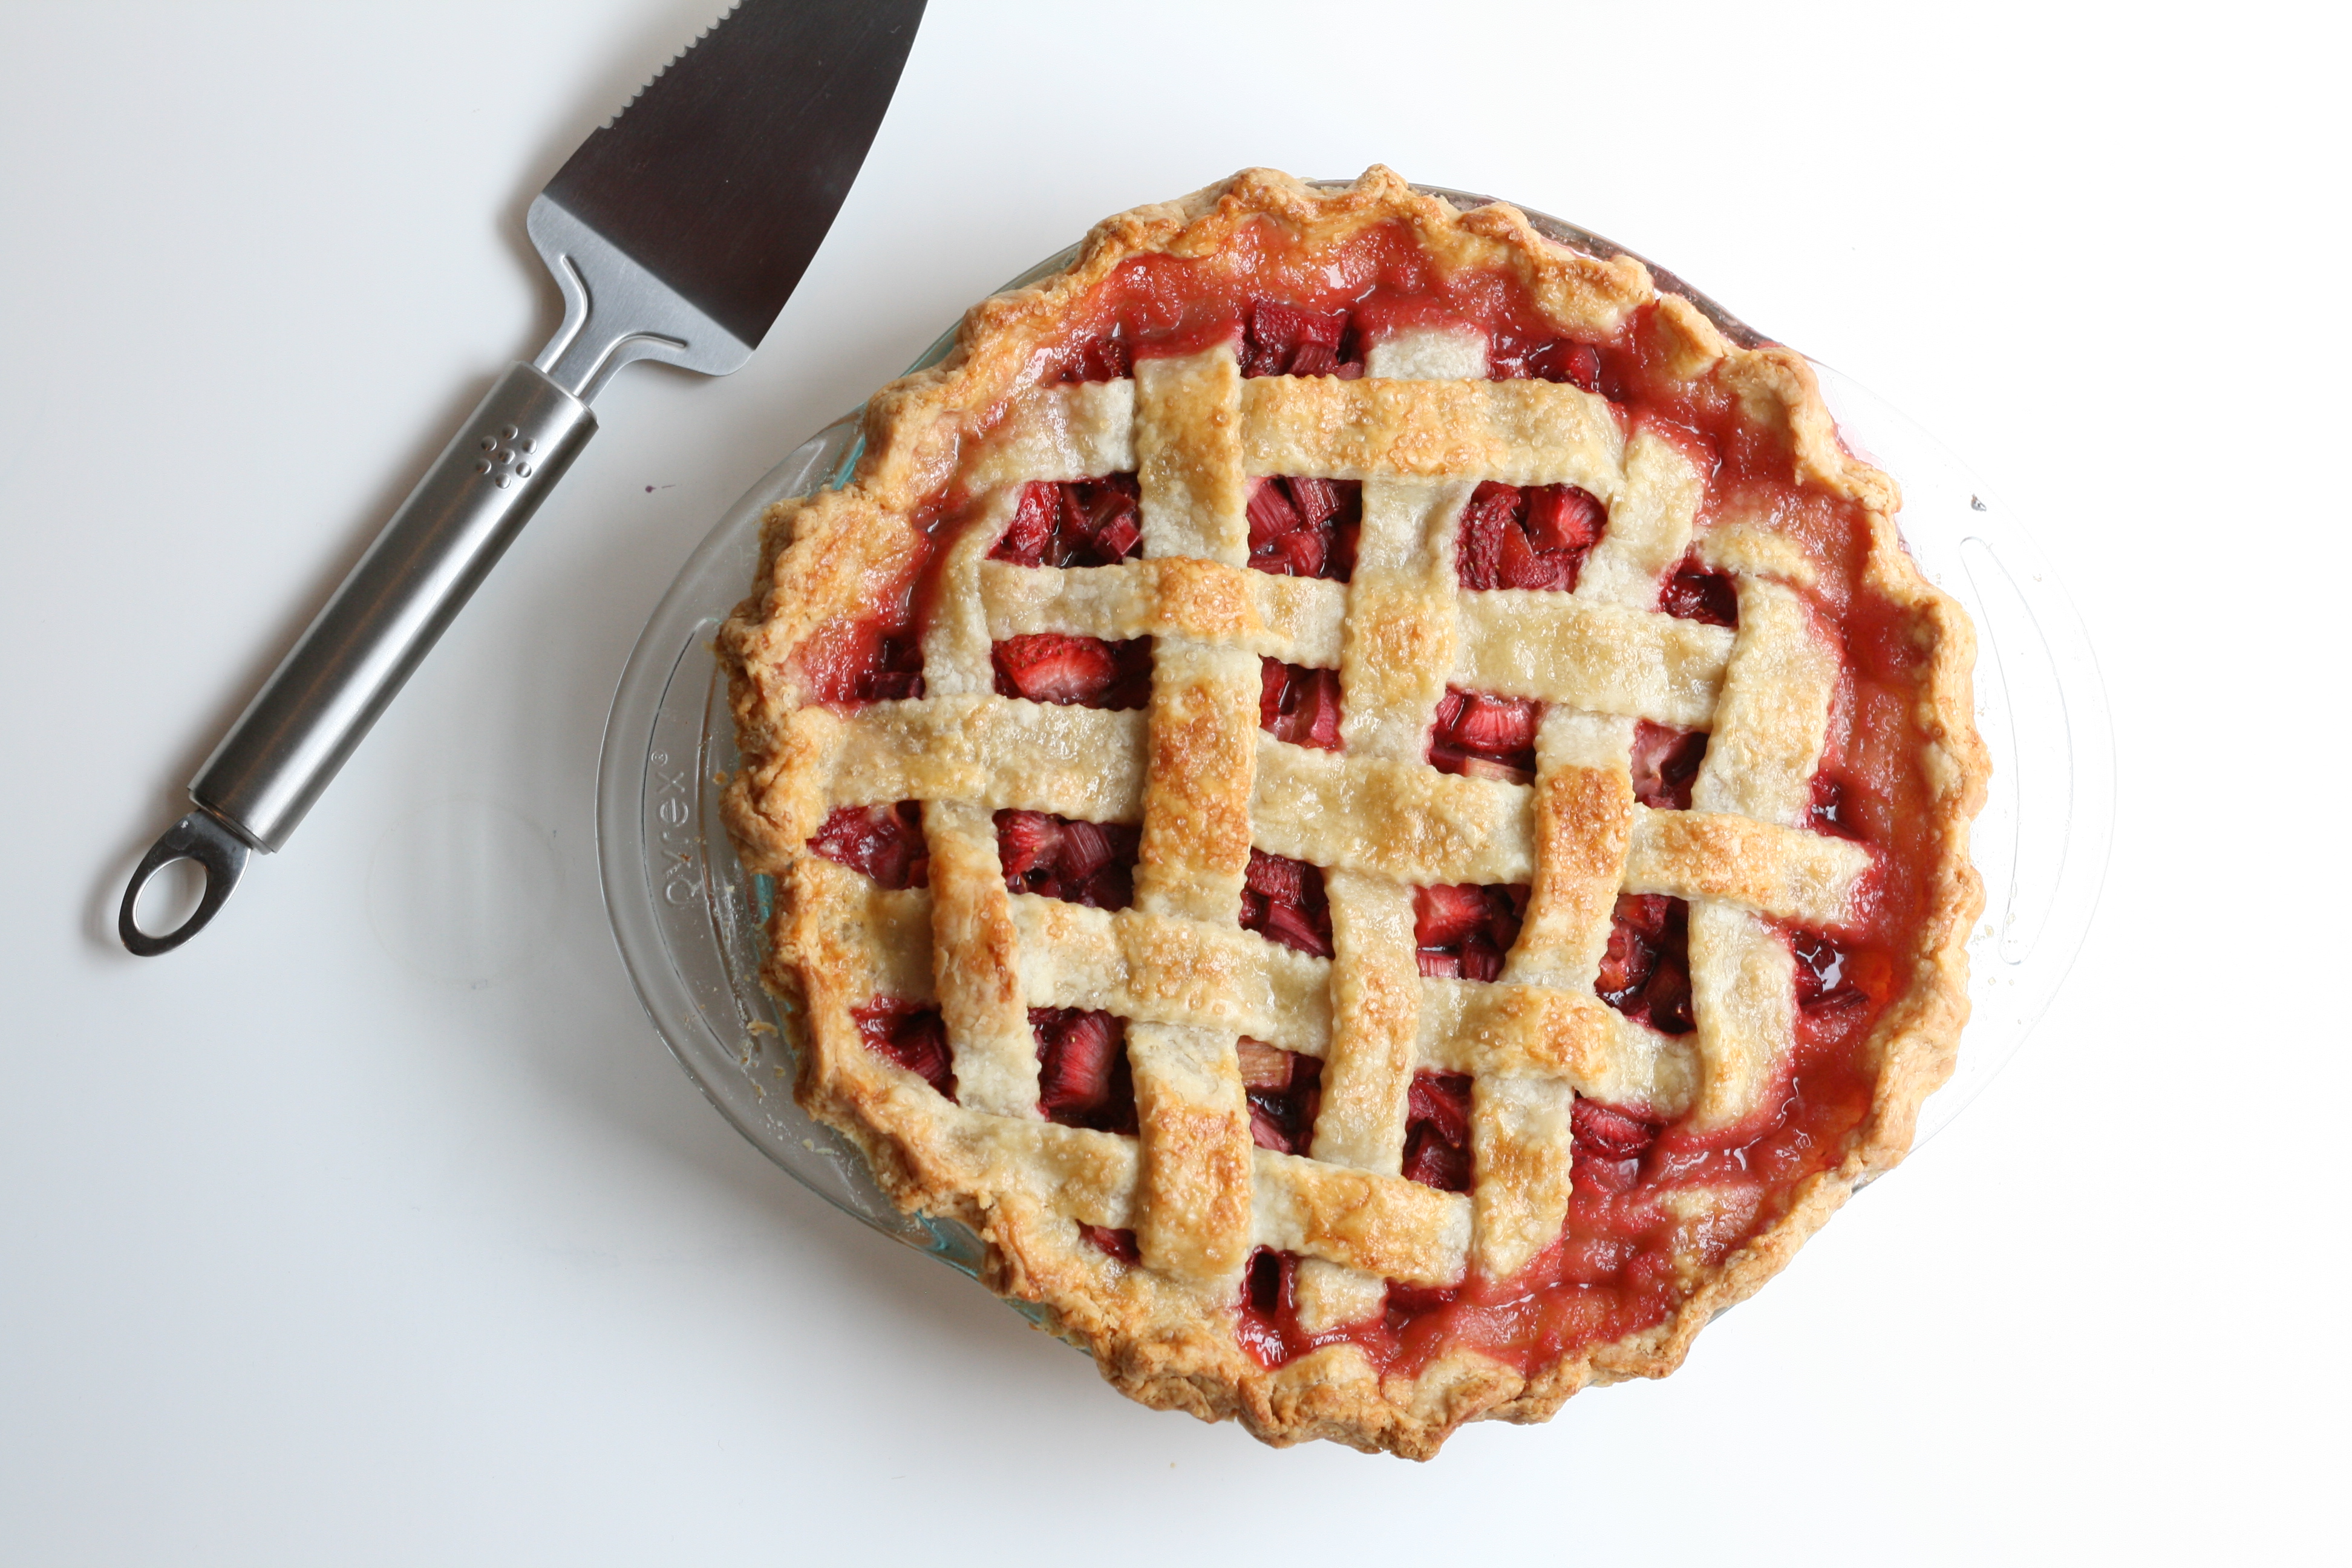
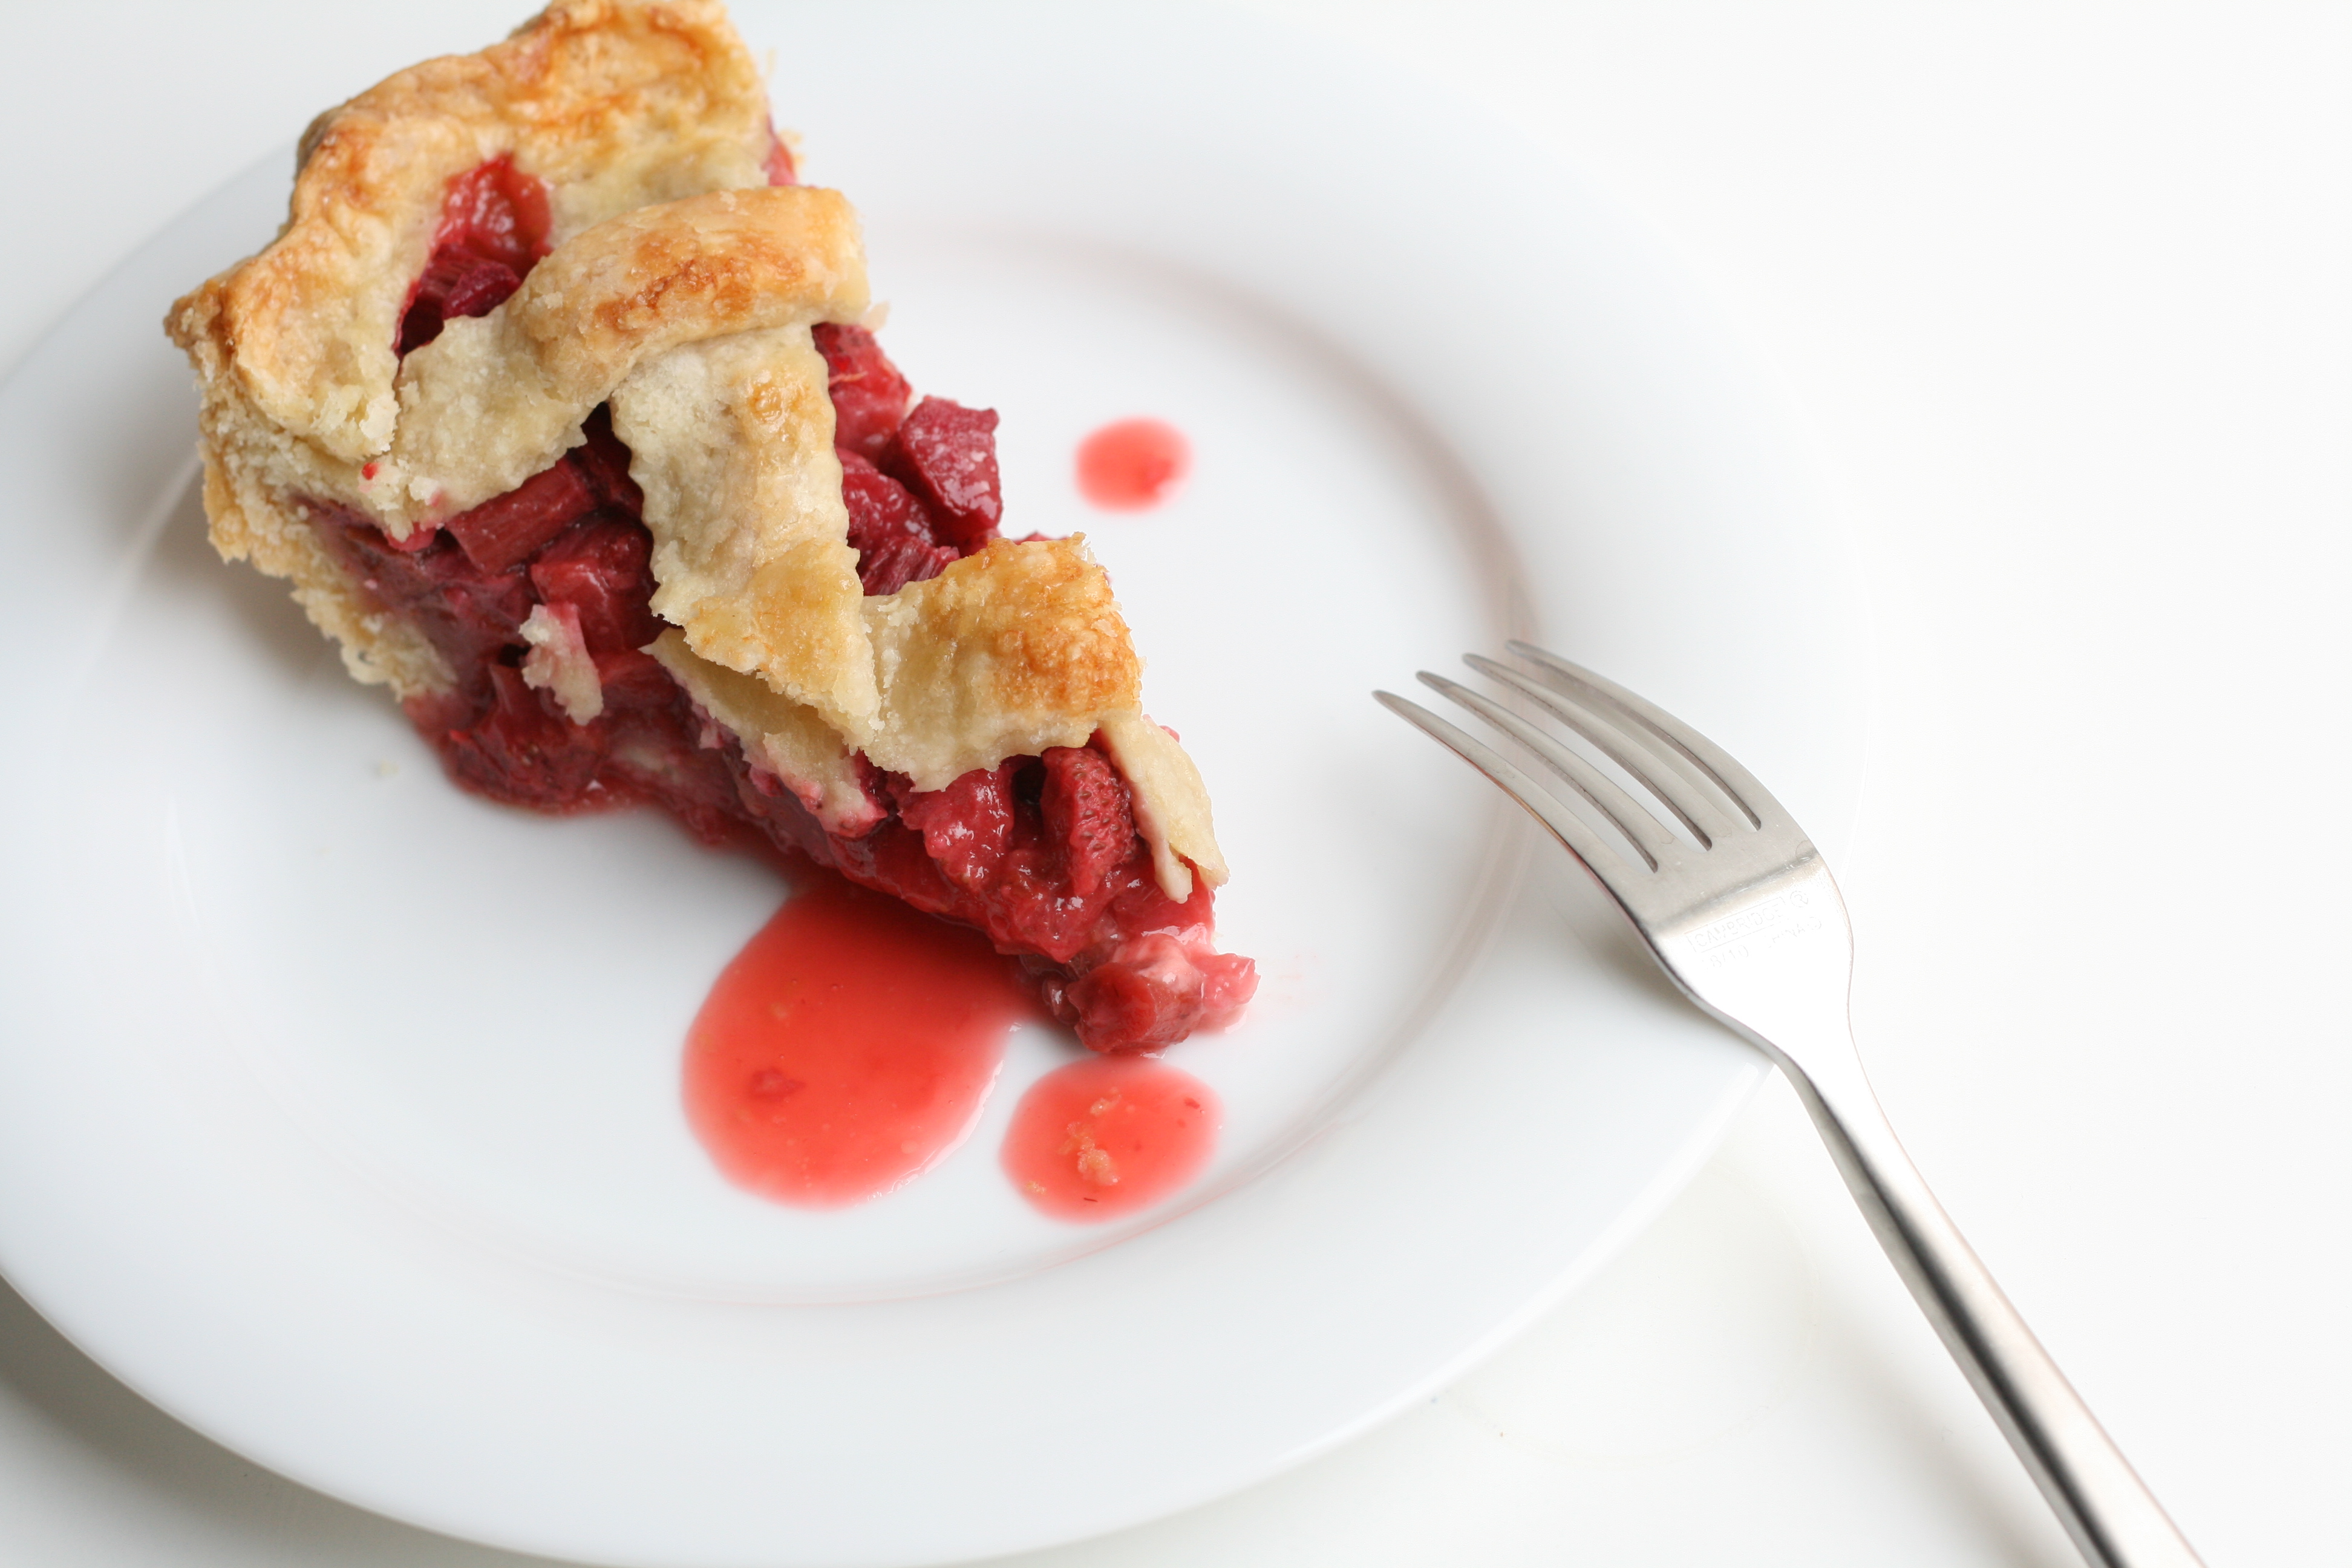
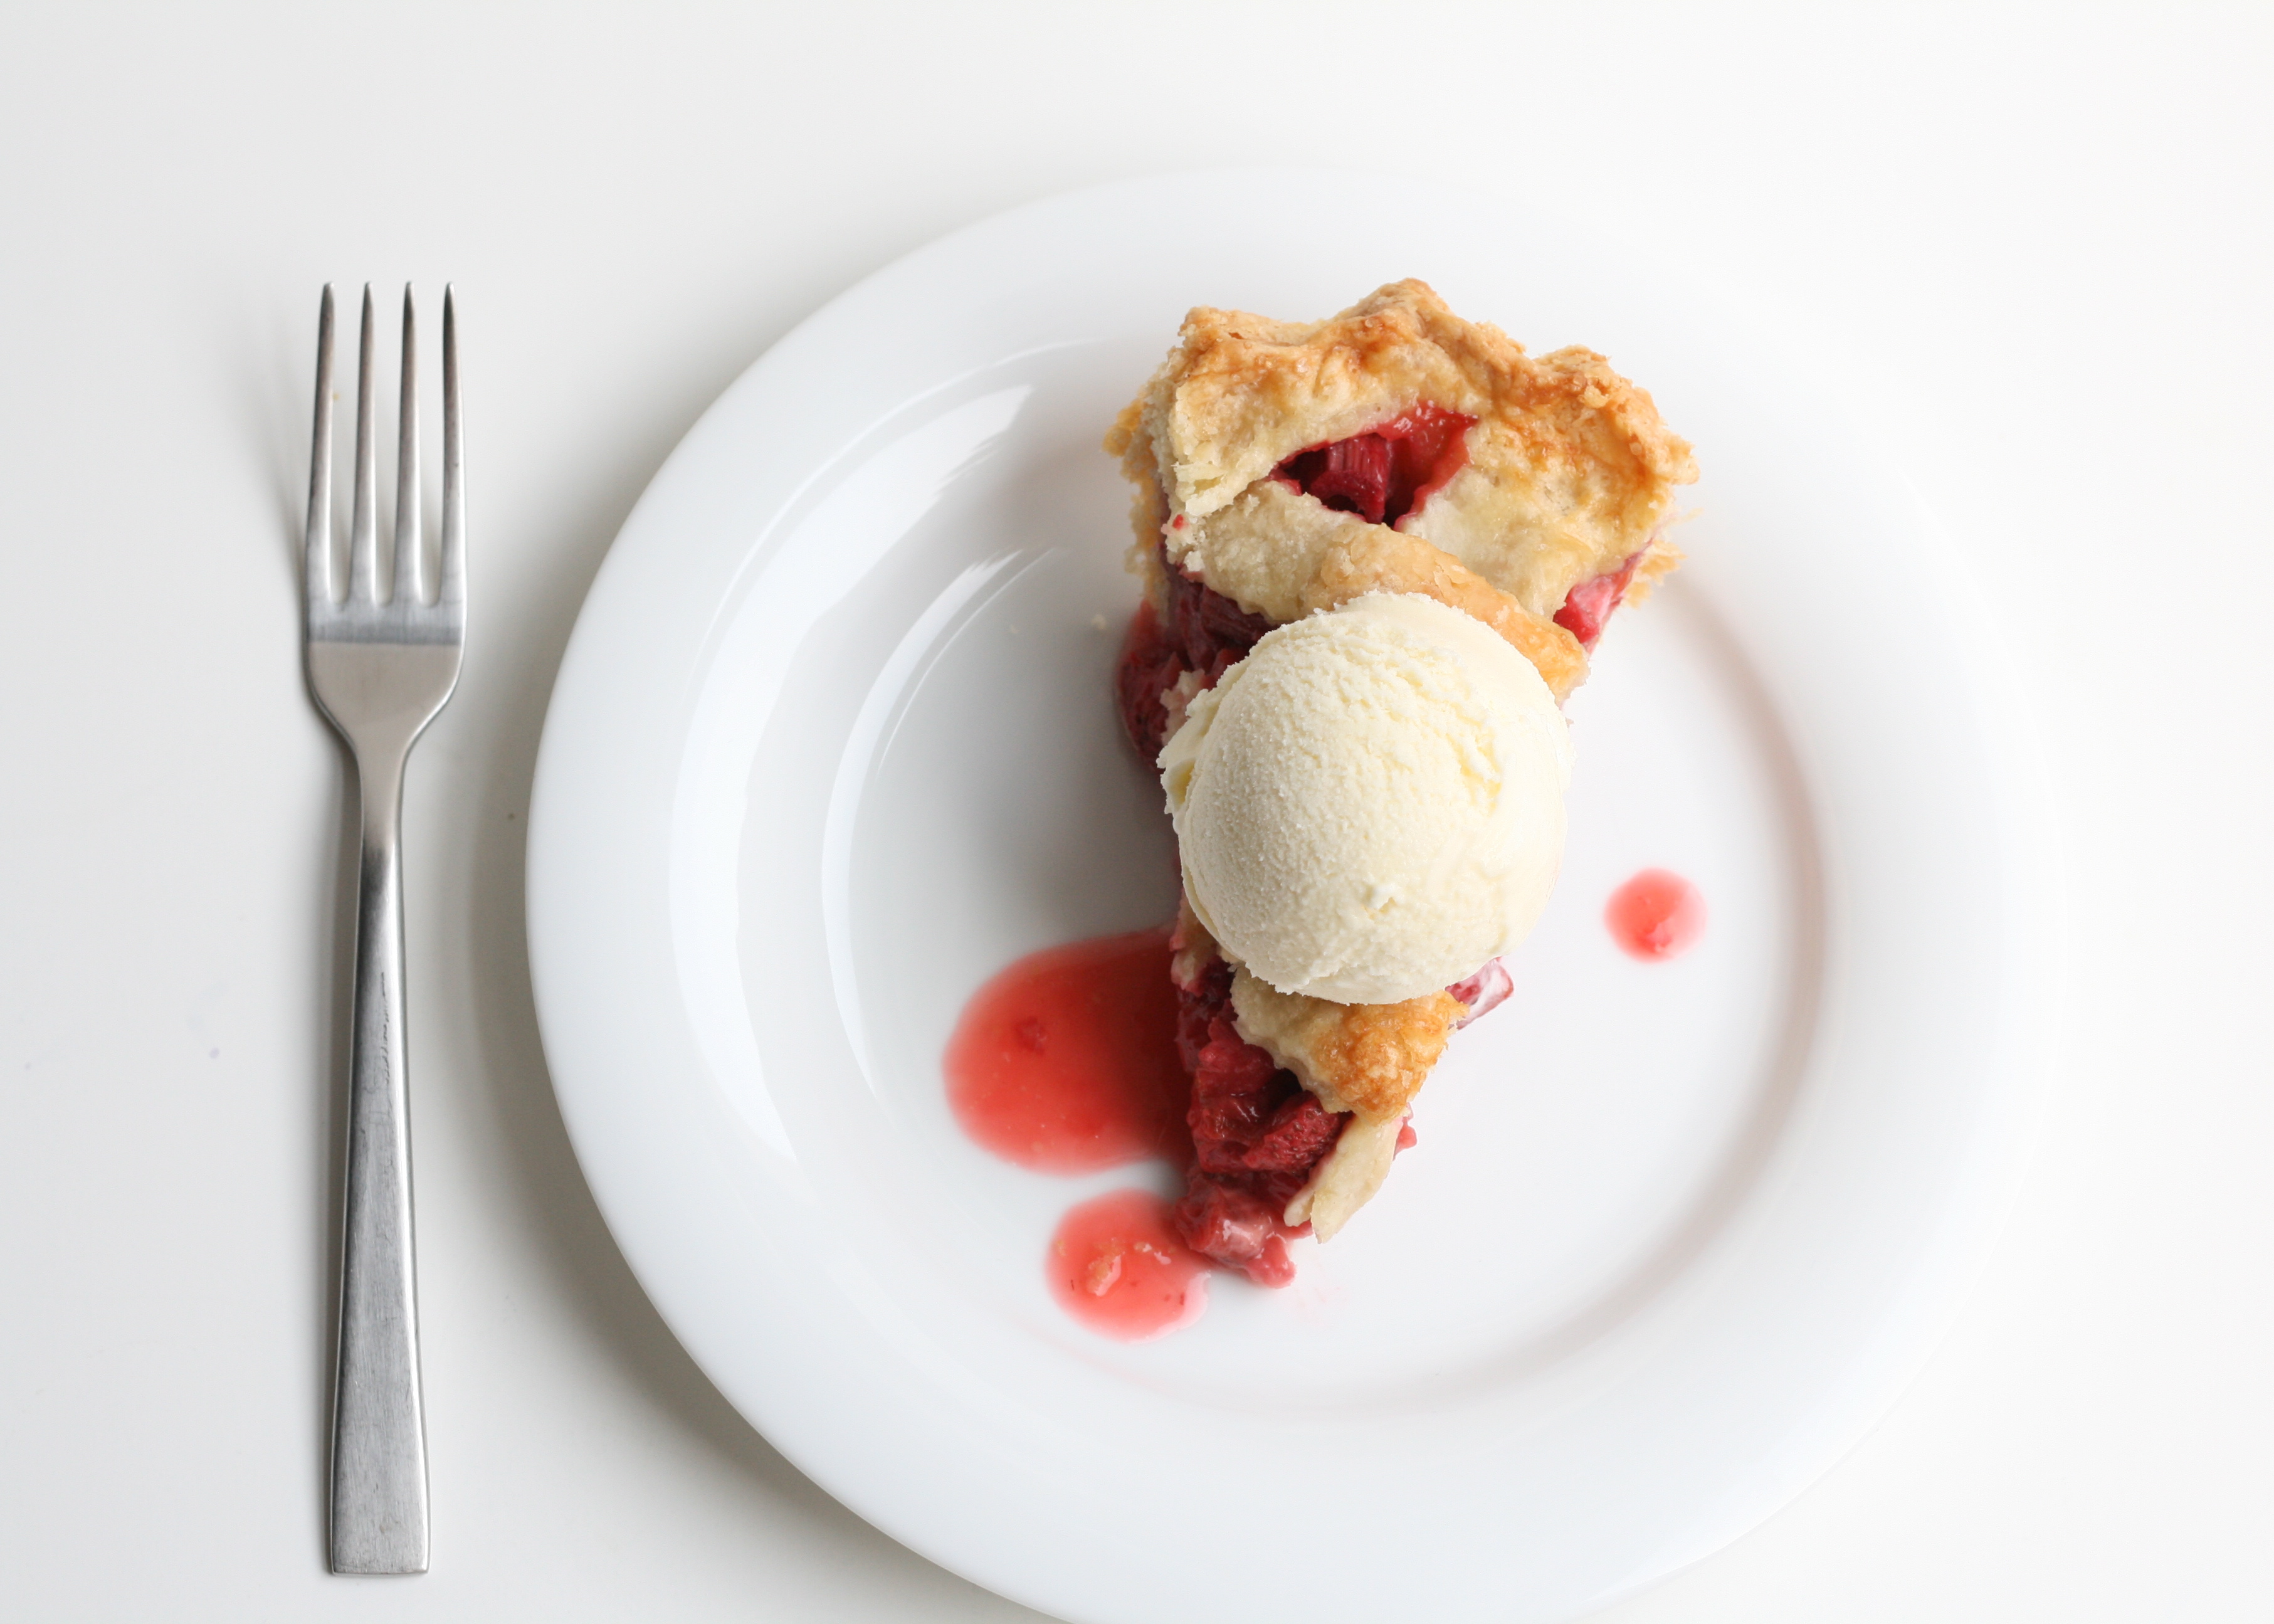
While you’re reading this, I’m in my favorite place in the world with my favorite people. Graduate school husband and I are on vacation with my family in the mountains of Colorado. Also known as heaven. I didn’t want to go AWOL on you though, so I made a pie and stuck it in the cyber space freezer until now. I hope you are well fed even while I’m away.
I think I’m gonna be one of those wives/moms who make their family a weeks worth of dinner when they go out of town. It’s because I care. And I care about you! So without further adieu, I give you Strawberry Rhubarb Pie. Happy 4th everyone!
PIE CRUST makes enough for 2 single pies or 1 double crust (This is my go-to recipe) 2 1/2 c. AP unbleached flour 2 tbsp. sugar 1 tsp. sea salt 2 sticks (8 ounces) unsalted butter, very cold 1 c. water with ice
STRAWBERRY RHUBARB MIXTURE 3 1/2 c. sliced rhubarb 1 16 oz. container strawberries, hulled, halved (about 3 1/2 c.) 1/2 c. packed brown sugar 1/2 c. sugar 1/4 c. cornstarch 2 tbsp. fresh squeezed orange juice 1/4 tsp. sea salt
TOPPING 1 egg 1 tsp. cream turbinado
Note: I like to make my dough by hand so that I can control the size of the butter. Flaky crust = chunks of butter.
1. Make crust. Place flour, sugar, and salt in bowl. Whisk together. 2. Dice butter and place into flour mixture. Using a pastry knife, cut butter into flour until it resembles coarse meal. 3. Using a pastry fork (or continue using the pastry knife) add 1/2 c. of the ice cold water into mixture and combine. Continue adding water 1 tablespoon at a time until dough just comes together. You may not need the full cup of water. 4. Cut in half and cover the 2 disks in plastic wrap. Before rolling out, place in fridge for 1 hour, or place in freezer for 15 minutes to chill. This will make the dough easier to work with. 5. Make strawberry rhubarb mixture. Combine all ingredients in bowl, mix, and set aside. 6. Roll the dough out on a well floured surface large enough to overhang in a pie dish. Fold the dough in fourths and transfer to pie dish. Place in freezer for 5 minutes if too warm. 7. Pour strawberry/rhubarb mixture into pie dish. 8. On a well floured surface, roll out second disk. Using a pastry wheel, cut dough in the same direction, about 3/4″ wide. Place 5 strips across, using the longer strips in the middle and the shorter strips on the end. Think back to your childhood craft days, and create a lattice with the dough placing 5 more strips in the opposite direction. Over, under, over, under. 9. Seal the edges of the dough by folding over. I use a bit of cold water to help smooth things out. Create a decorative edge with your pointer finger and thumb held together pushing the dough in with your thumb. And repeat. Clear as mud? A forked edge works nicely as well. 10. Whisk together one egg and a teaspoon of cream. Brush over the top and sprinkle with turbinado. 11. Place in freezer for 20 minutes. This helps the dough to hold its shape when it goes in the oven. Preheat oven to 400°. Bake for 2o minutes. Lower the temp to 335° and continue baking for 40 minutes. Once crust begins to brown, cover with foil. 12. Allow pie to set up for at least an hour before serving.
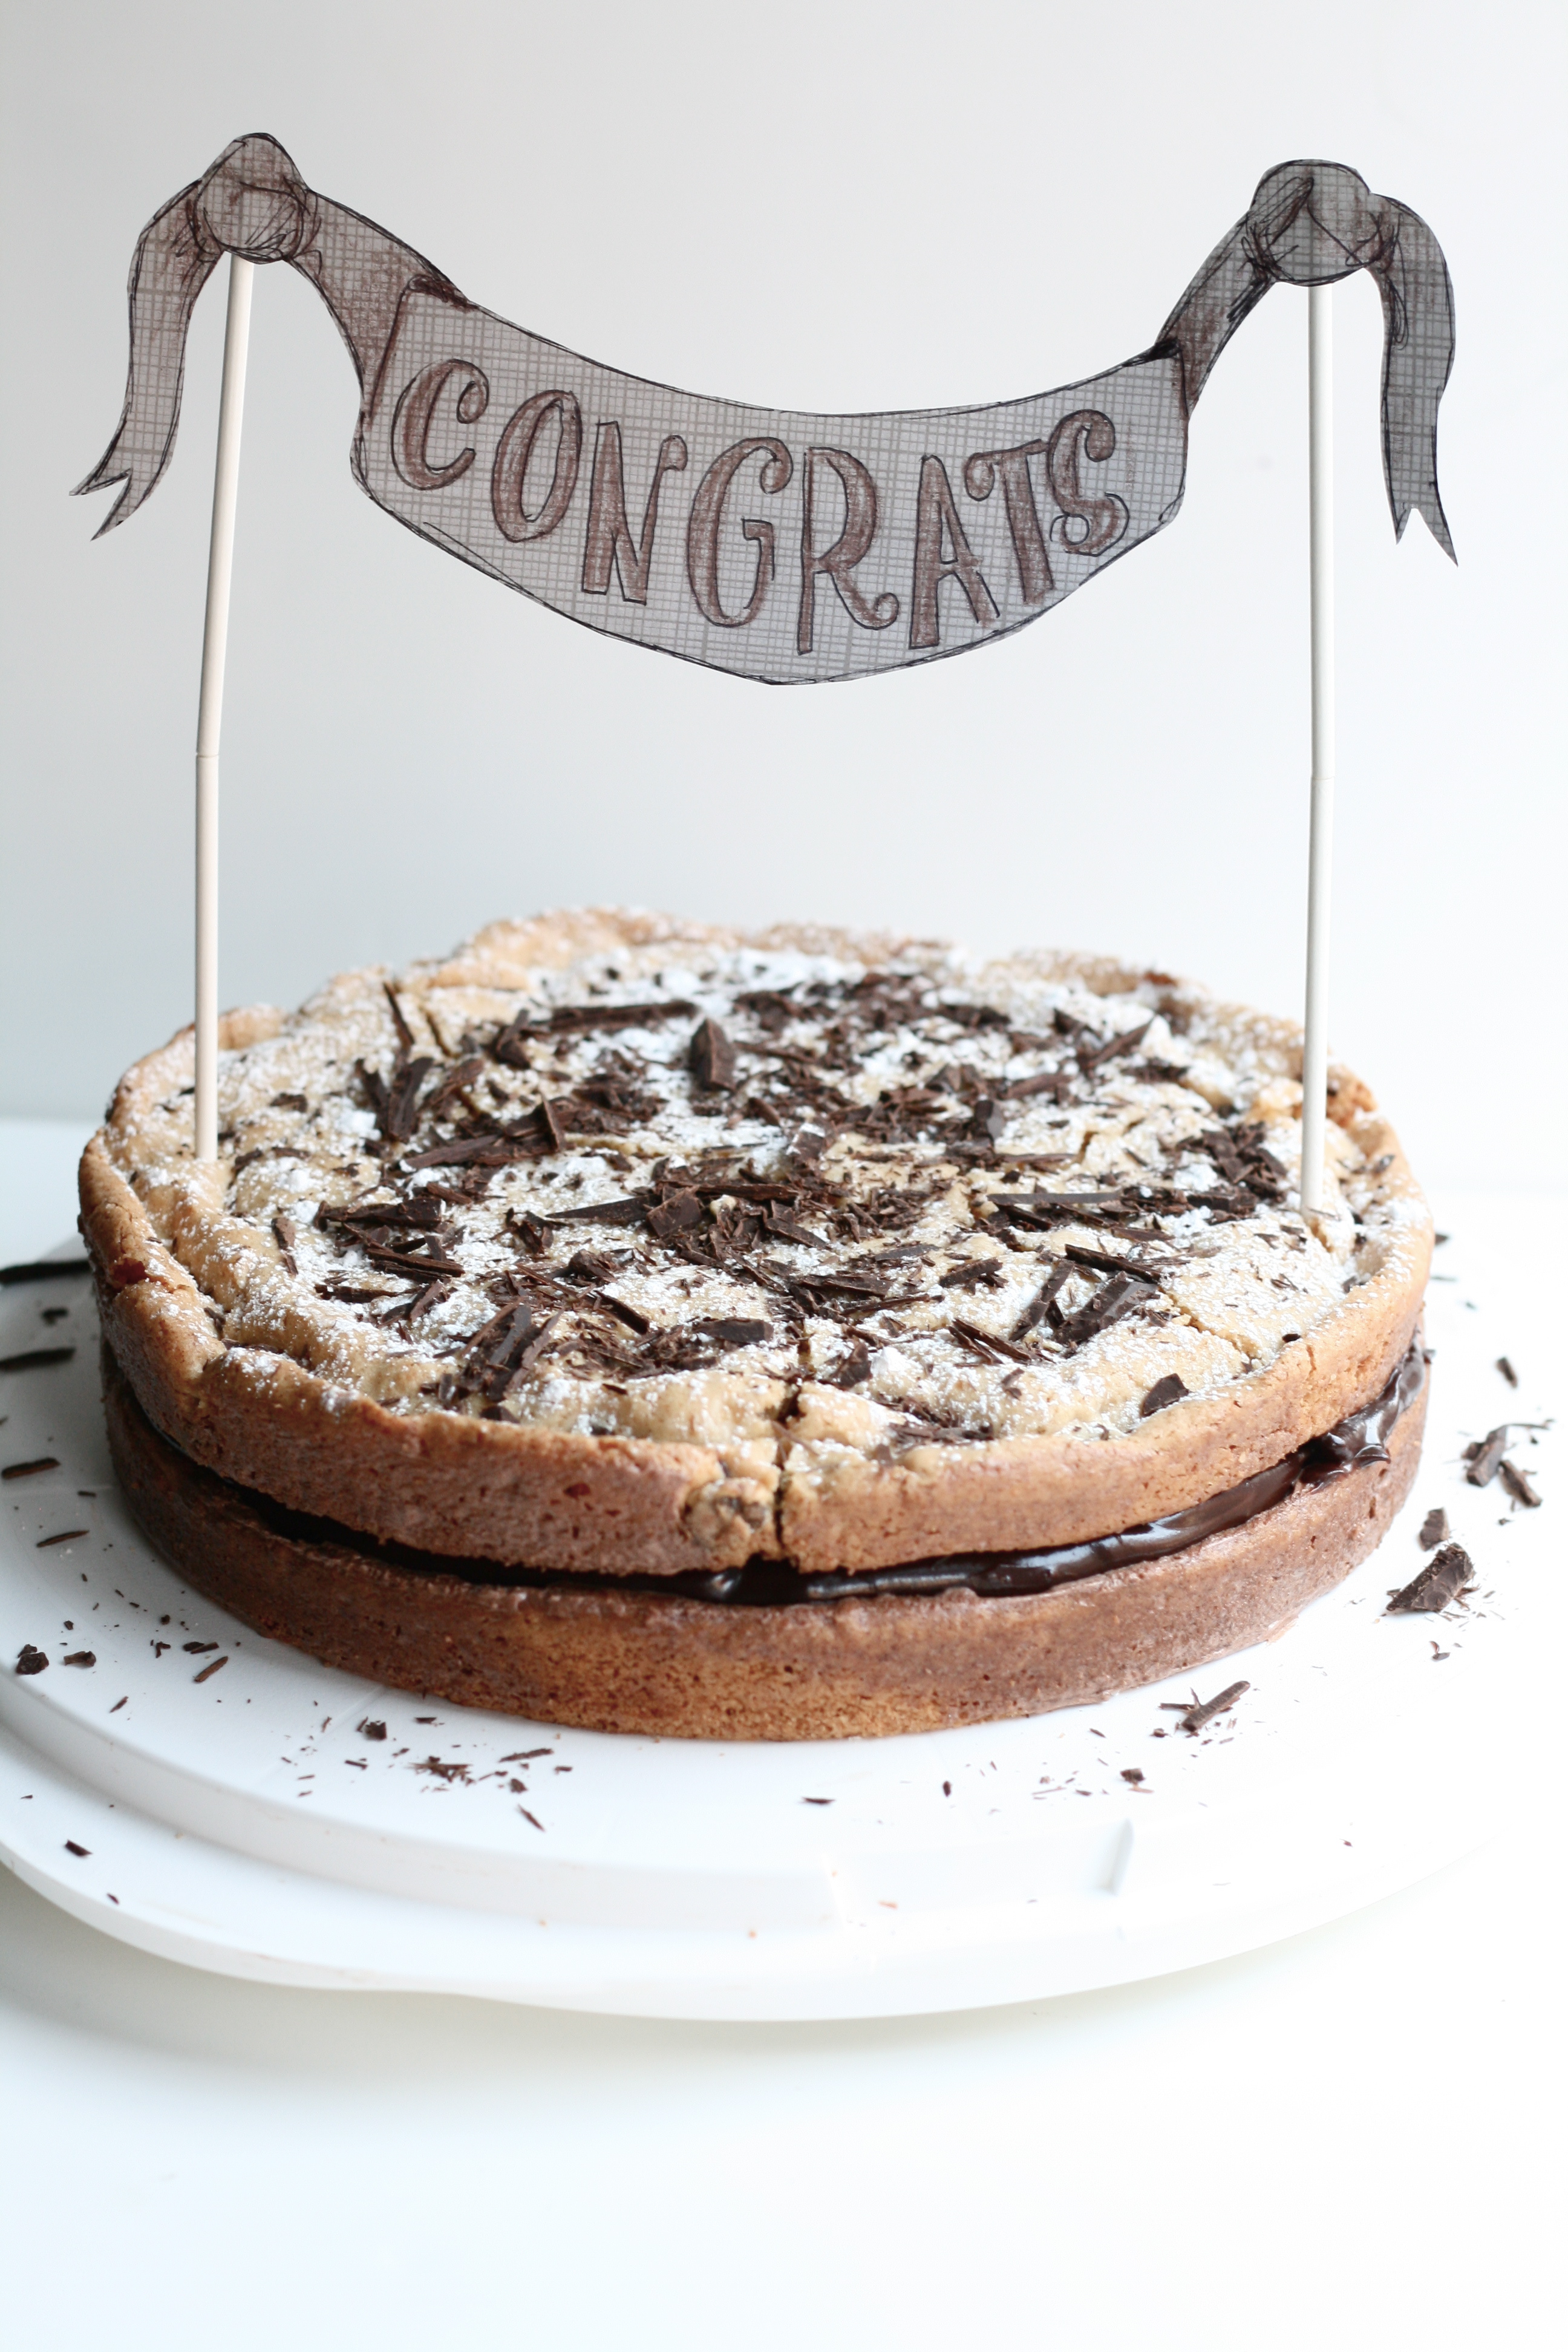
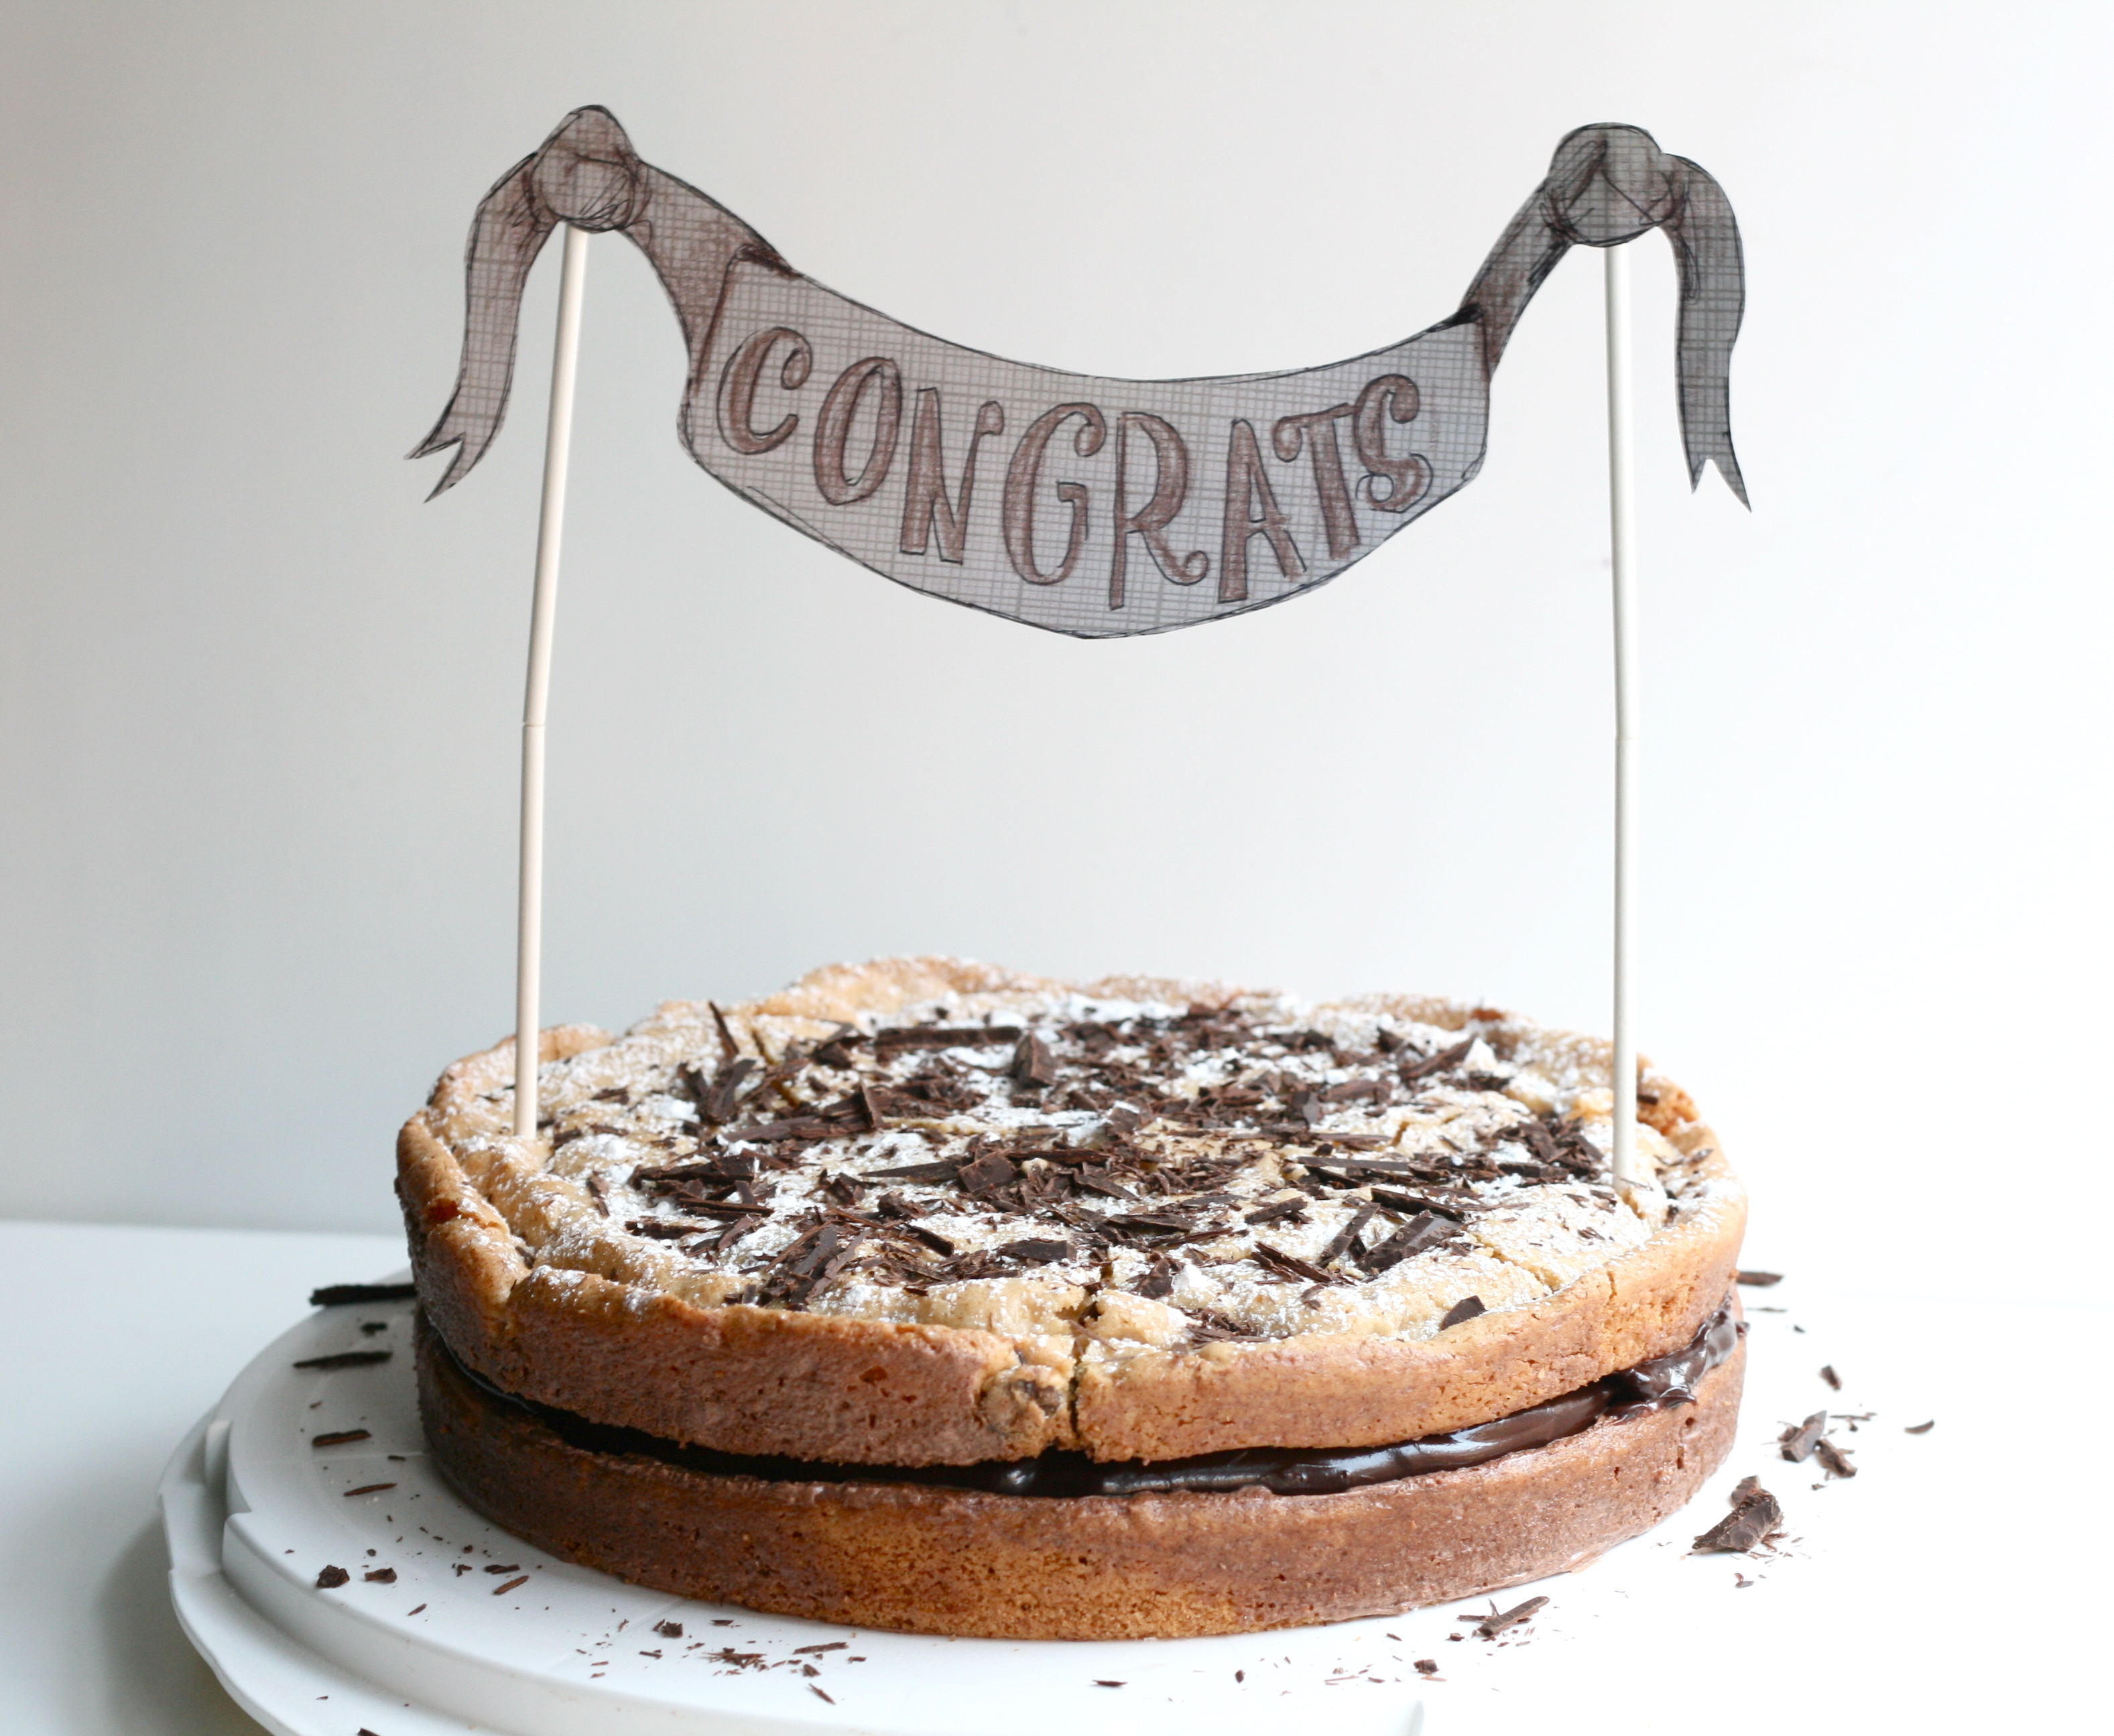
This cake was supposed to be easy. I was going to brag about how fast I whipped it out. Ha Ha Ha. Oh the irony. One thing got in the way. That stupid virtue. You know the one. Patience. I’m scowling at the word as I type.
This recipe is easy. You just have to be patient. Don’t worry—I was impatient for you. I’ll let you know when you’re about to derail this simple recipe, making it complicated.
I really needed this cake to be simple. I got home from work at 5:30 pm, and had to be somewhere by 7:43 pm—leaving me a little over 2 hours to make a cake. Not bad. So while I made the cake, graduate school husband went to the grocery store to pick up the goods for the icing. Made the cake, no problem. I was home by 11 and ready to whip up a quick icing. In my defense, the word ‘icing’ was deceiving. Ganache would have been a better word choice. Needless to say, I exercised impatience. The icing wasn’t thickening as fast as I wanted to go to bed. So, I whipped up a meringue and added it to the icing thinking it would help it to stabilize. It was a runny mess. However, I proceeded to pour it all over the cake. What was I thinking? Meanwhile I looked at the remnants of the bowl with the orignal chocolate icing. Guess what. It had thickened up. In an abnormally calm manner, I directed graduate school husband to make another batch of ganache. He normally doesn’t involve himself in my baking adventures, but he was so helpful. I proceeded to scrape the cake of the runny chocolate mess. No lie, I wiped it down with a wet paper towel. We let the ganache set overnight and went to bed. 12:30pm. By morning, the ganache was perfect, so I re-iced the cake. Sprinkled with powdered sugar and shaved dark chocolate.
I was so thankful the cake was still salvageable. I’m not sure if this congrats sign ended up being for me or for my graduate school husband, although it was intended for him. He and his coworkers just finished up their practicum for the year and had a BBQ to celebrate/say goodbye. I’m going to miss those guys. They welcomed me into the group as if I were one of them. They gave me a nickname. They ate my food.
And they devoured this cake. Thank the Lord it turned out. I promise to be more virtuous.
WET INGREDIENTS 1/4 c. milk 2 tsp. vanilla extract
DRY INGREDIENTS 2 c. AP unbleached flour 1 tsp. baking powder 1/2 tsp. sea salt 1/2 c. semi-sweet chocolate chips
CREAMING INGREDIENTS 10 tbsp. unsalted butter, room temp 1 1/4 c. sugar 3/4 c. lightly packed brown sugar 1 large egg 1 egg yolk
1. Preheat oven to 335° and place rack in middle position. Line the bottom of two 9-inch round pans with parchment paper. 2. Combine wet ingredients in a bowl. Combine dry ingredients, except the chocolate chips, in separate bowl. Set aside. 3. Using a spatula, toss 2 tablespoons of the wet ingredients with the chocolate chips in a small bowl. Add 1/4 cup of the dry ingredients. Toss again to coat evenly. This will keep the chocolate chips from sinking to the bottom of the cake. 4. Mix butter and sugars in the bowl of a standing mixer fitted with paddle attachment until well creamed, about 3 minutes. 5. Add egg and egg yolk one at a time. 6. Alternately add dry and wet mixtures about a quarter at a time without pausing between additions. 7. Removed the bowl and fold in the chocolate chips with a spatula. The dough will be thick—more like cookie dough than cake batter. 8. Divide dough into prepared pans. It will be too thick to fill the pan to the edges, but will spread under the heat of the oven. Bake for 30-35 minutes or until edges crown and surface is browned. 9. Cool the cakes in pans to room temperature, then invert them using a small offset spatula to release edges. 10. Make ganache. Spread thick layer between the two cakes. Dust the top with confectioners sugar. Shave dark chocolate and sprinkle on top.
Chocolate Icing/Ganache
1 c. heavy cream 1/4 c. sugar 1 stick unsalted butter, softened 10 oz. bittersweet chocolate 2 tsp. vanilla extract dash of sea salt
1. In a saucepan over medium heat, bring cream and sugar to a light simmer, stirring occasionally. Place the butter, chocolate, vanilla, and sea salt in a large bowl. 2. Pour hot cream over ingredients in the bowl and let stand for a few minutes to melt the chocolate. Whisk until smooth and set aside to cool, but do not refrigerate. Here’s the part where you may derail if you neglect that virtue. Be patient. It will set up. 3. Once the icing has thickened, stir it with a flexible spatula to a spreadable consistency.
For a downloadable PDF of the cake banner and instructions, click here.
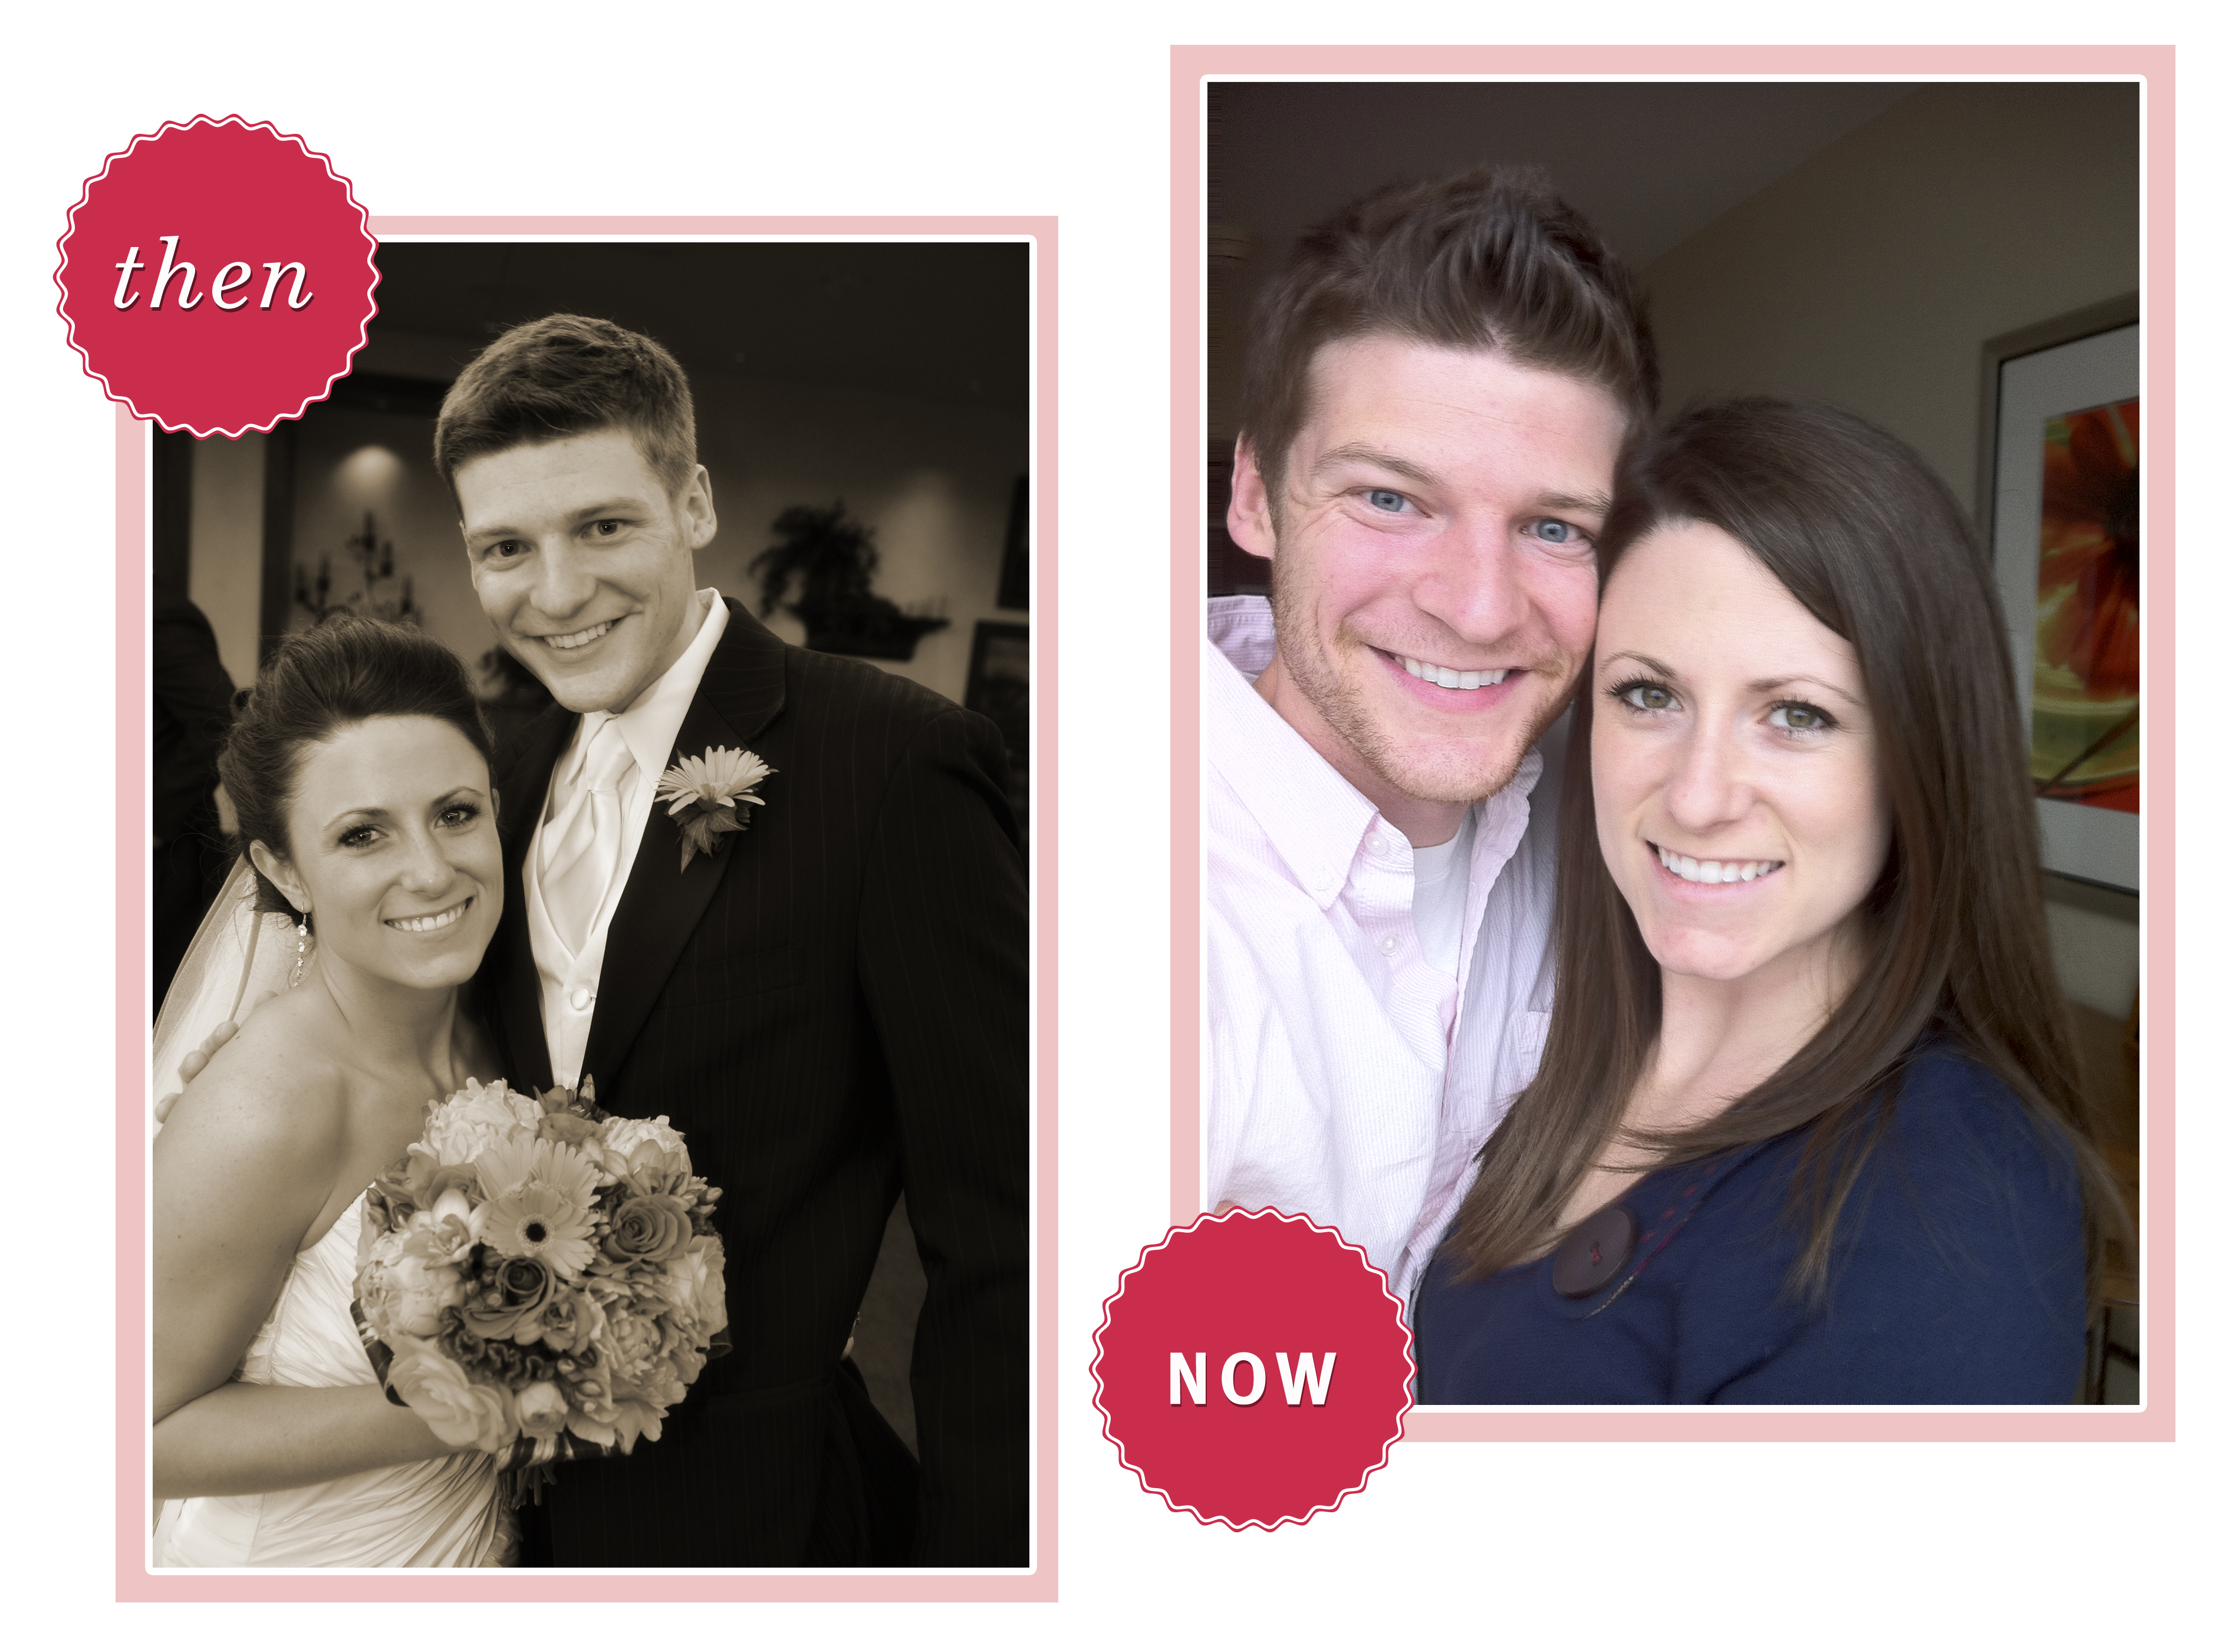
Three years ago today, we said I do. Three years! I guess we’re not newlyweds anymore. And I’m not so sad about that. I love that I know my husband 3 years better than I did when we got married. I love that I love my husband 3 years more than I did when we got married. The path hasn’t always been straight or easy, but it has been rewarding. So thankful to share this journey with Kevin, my sweet graduate school husband. To many decades more!
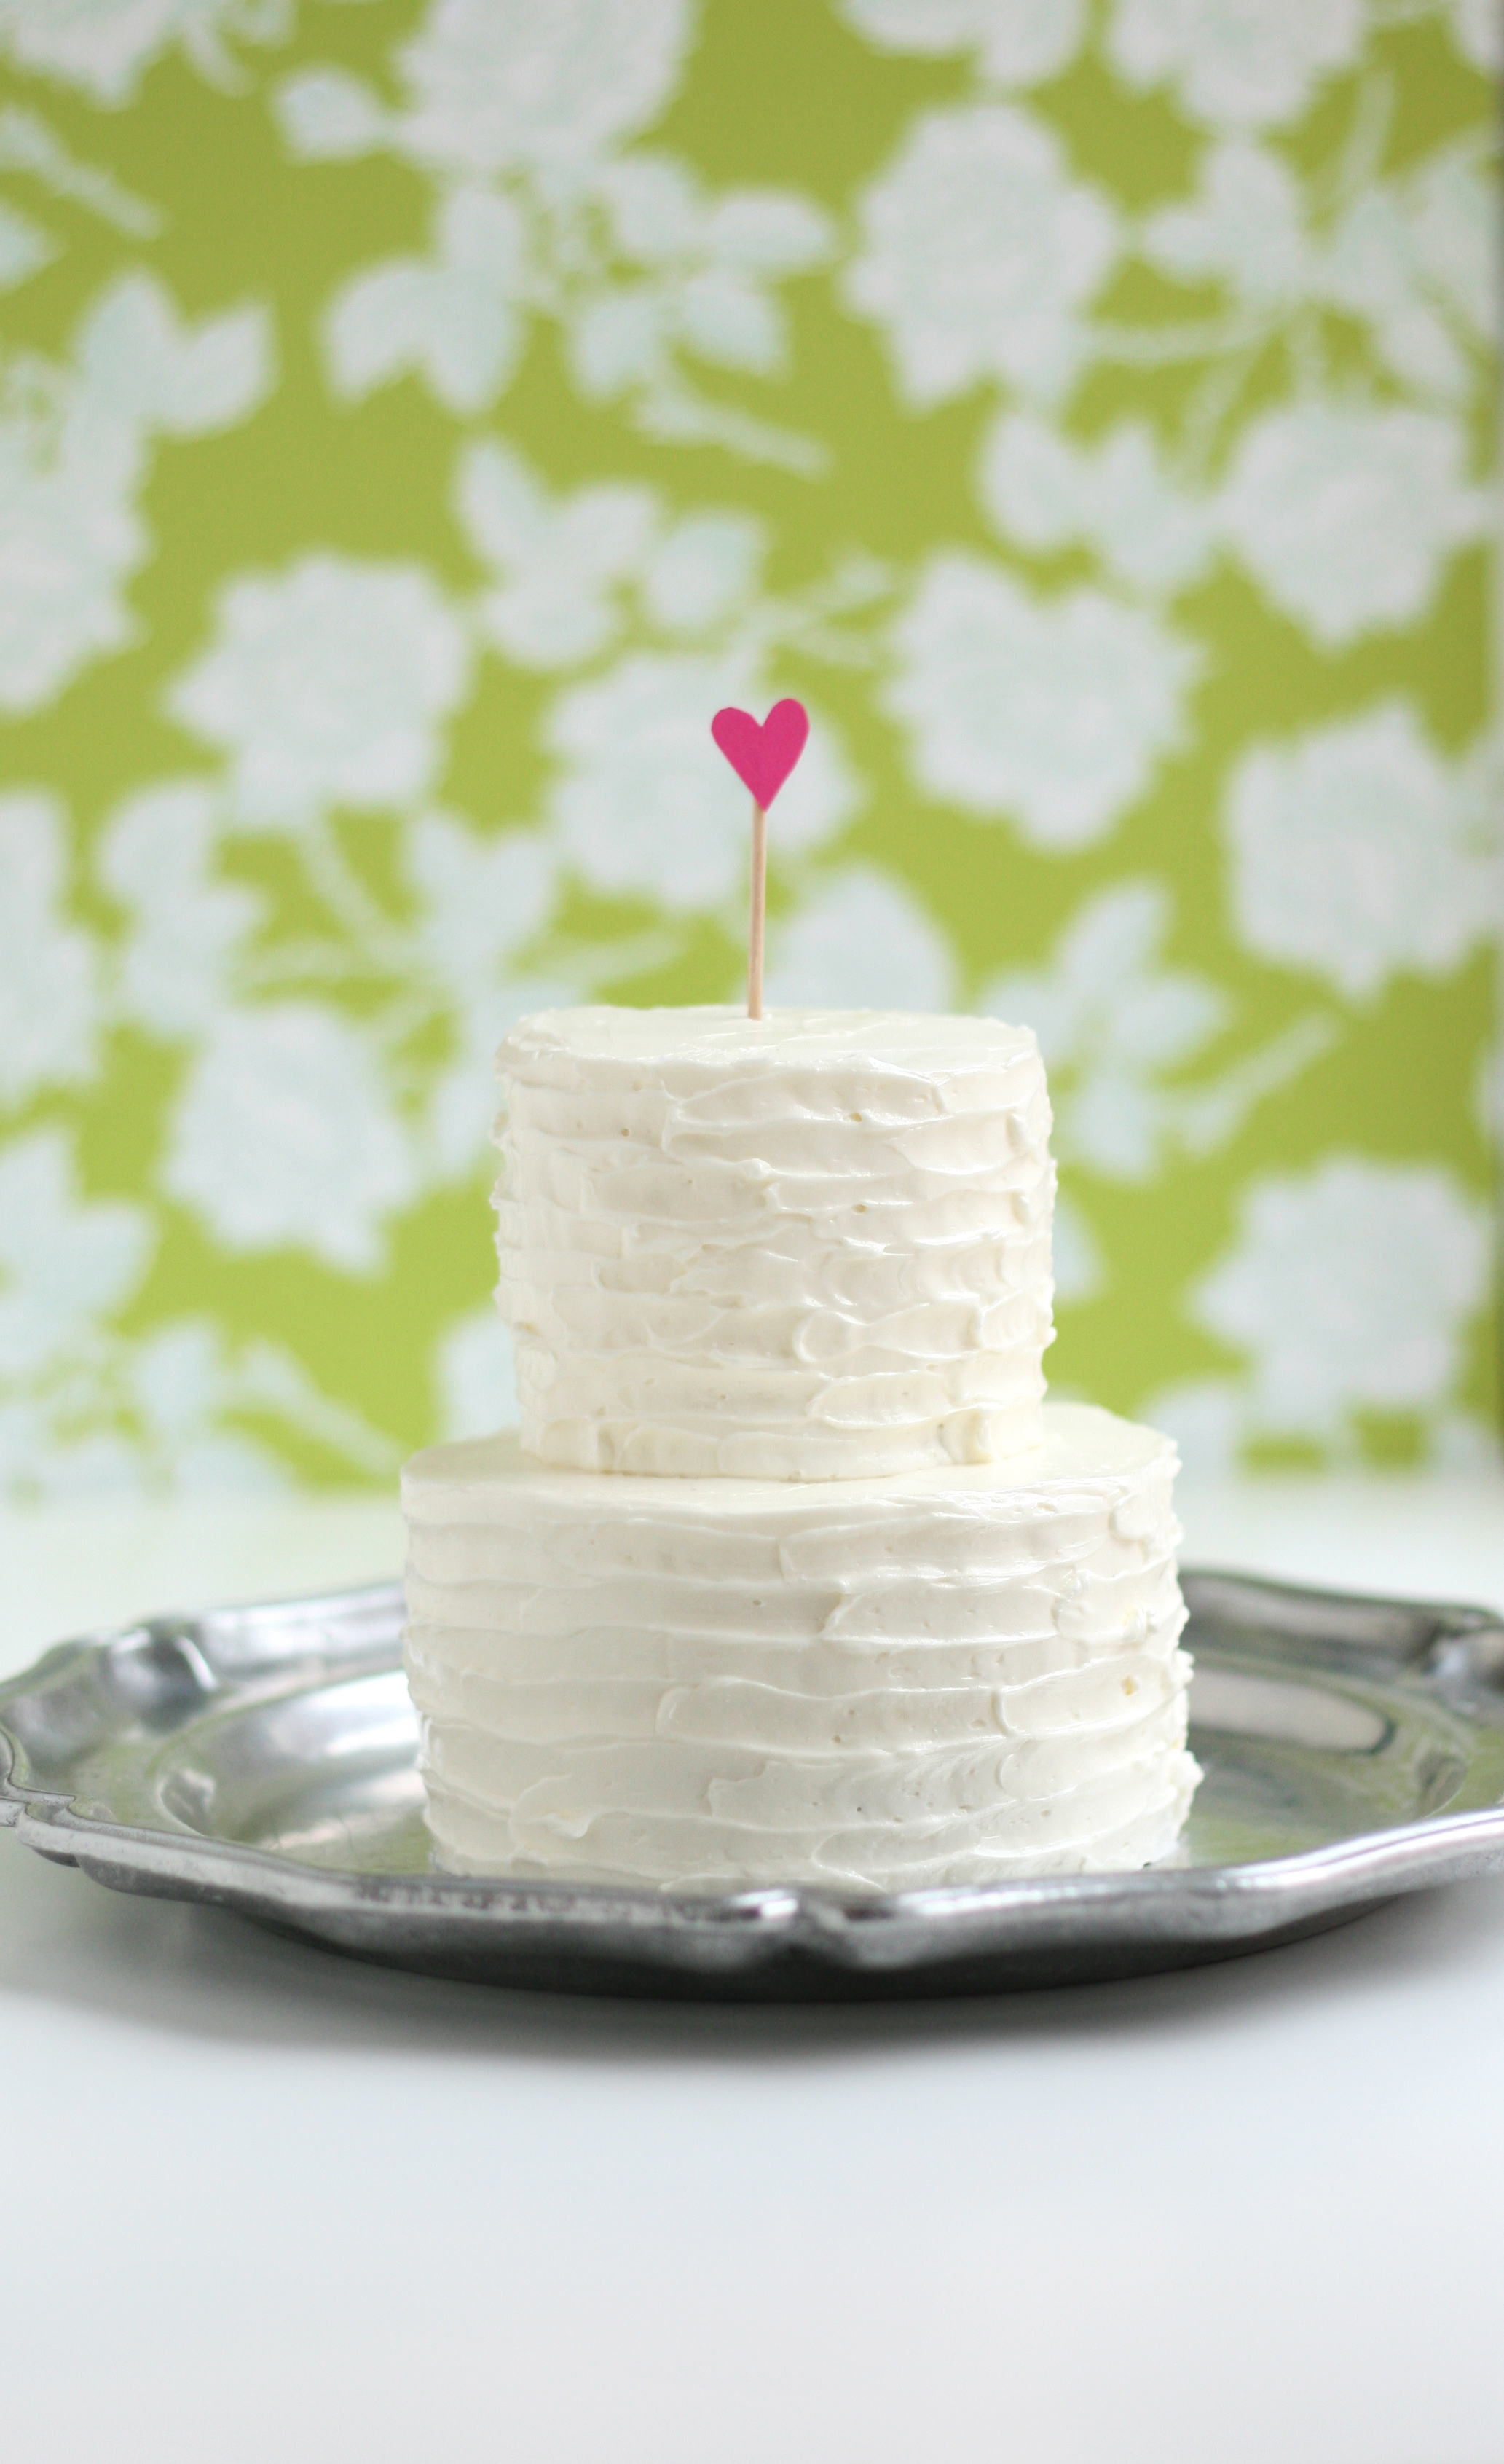
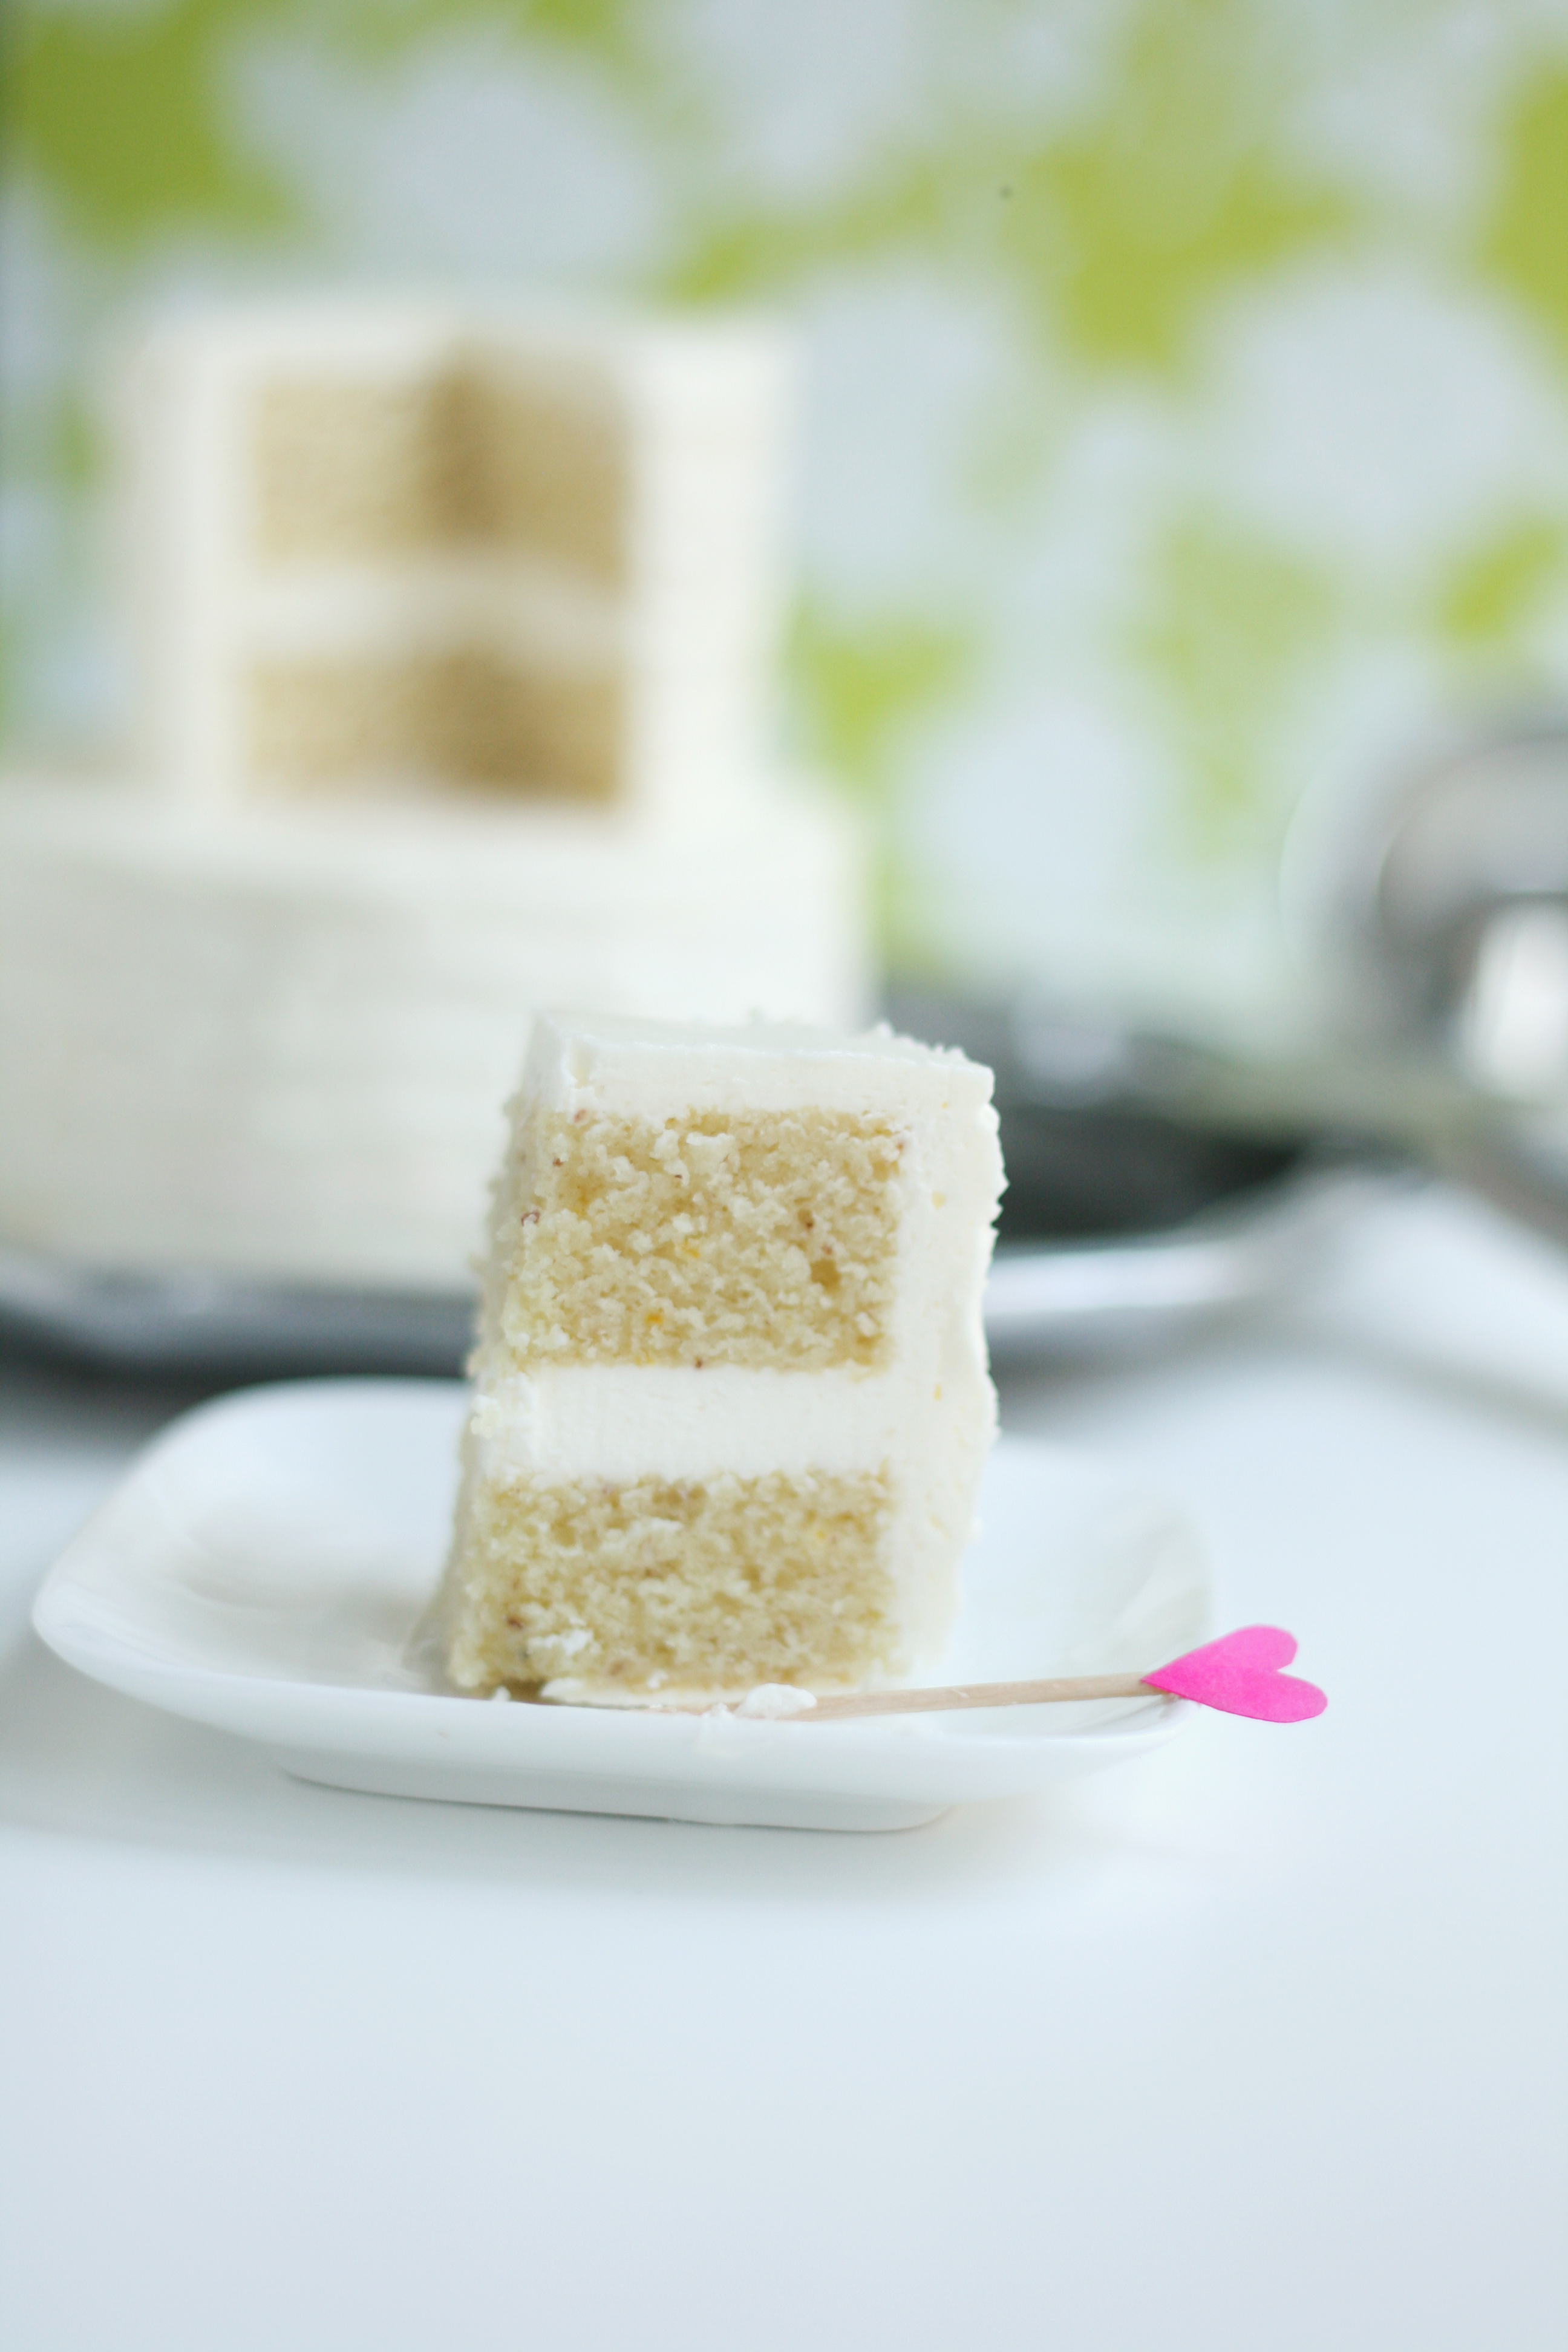
Speaking of sweet, I made a cake. A mini anniversary cake. I think I’ve started a new tradition in our marriage.
Isn’t it cute? Anything tiny is somehow cute. At it’s widest, it’s 3.5 inches—perfect for 2 people. It tastes like a wedding cake too. You know the wedding cake taste—fruity, decadent, and rich. So I took a risk and crafted a new recipe with hints of orange and almond (based off this one). Luckily the risk paid off—it’s my new favorite cake. Happy Anniversary to us!
Anniversary Cake Almond + orange cake, inspired by Cake Love makes one 9-inch pan
DRY 1/2 c.+ 2 tbsp. unbleached AP flour 2 tbsp. potato starch (I use Bob’s Red Mill) 3 tbsp. finely ground almonds 3/4 tsp. baking powder 1/2 tsp. salt
LIQUID 1/2 c. half and half 1/2 tsp. almond extract 1/2 tsp. orange zest 1 tbsp. orange juice, freshly squeezed
CREAMING 6 tbsp. unsalted butter, room temp 3/4 c. + 2 tbsp. extra-fine granulated sugar (I food process my regular sugar) 2 large eggs
1. Preheat oven to 350º. Set rack in the middle of the oven. 2. Set out ingredients and equipment. Sift flour. Finely pulse almonds to a flour like consistency. Measure dry ingredients into separate mixing bowl. Add flour and almonds and whisk together. Measure liquid ingredients into a separate bowl and set aside. Place butter and sugar in bowl of standing mixer. Crack eggs into a separate bowl and set aside. 3. In the bowl of a standing mixer fitted with paddle attachment, cream together the butter and sugar on the lowest speed for 3-5 minutes. (This will feel odd, but keep it on low.) 4. With the mixer still on the lowest speed, add the eggs one at a time, fully incorporating after each addition. Stop the mixer and scrape down the sides of the bowl. 5. Add the dry ingredient mixture alternately with the liquid mixture in 3 to 5 additions each, beginning and ending with the dry mixture. Move swiftly through the step to avoid overworking the batter. Don’t wait for the dry or liquid mixtures to be fully incorporated before adding the next. This step should take a total of about 60 seconds. 6. Stop the mixer and scrape the sides of the bowl all the way down. Don’t miss the clumps of ingredients hiding on the bottom. Mix on medium speed for 15 to 20 seconds to develop the batter’s structure. 7. Prepare the 9-inch round cake pan. Line the bottom with parchment paper. Do not spray the sides of the pan. (This helps to keep your cake from doming in the middle as it bakes. The cake is able to crawl up the side as it bakes and maintain an even shape.) 8. Place batter in pan. Bake for 28 minutes. 9. Once the top of the cake doesn’t jiggle in the center, test for doneness by inserting a toothpick into the middle of the cake. The center should be an even blonde color and the edges should be just beginning to pull away from the pan. When the skewer shows a touch of crumbs or comes out clean, the cake is done. 10. Cool cake for 20 minutes before removing from the pan. Use a small off-set spatula to loosen the cake from the rim of the pan. Carefully invert and remove parchment paper. Allow to cool completely before assembling.
Italian Meringue Buttercream with a hint of orange recipe from Cake Love by Warren Brown; makes 2-2 1/2 cups * a candy thermometer is necessary for this recipe
1. Set out ingredients and equipment. Separate the egg whites into the bowl of a standing mixer fitted with the whisk attachment (for the 1/2 egg white, crack into separate bowl and only add half of the white). Measure 1/2 cup sugar and the water into a 1-quart, heavy-bottomed saucepan. Gently stir to combine. Measure the remaining 2 tablespoons of sugar into a separate bowl. Cut the butter into tablespoon sized pieces and set aside. 2. To make the sugar syrup, place the candy thermomometer in the sauce pan and heat the mixture over medium-high heat. Partially cover with lid to capture the evaporating water—this helps to moisten the sides of the saucepan to prevent sugar crystals from forming. 3. With the mixer on high speed, begin whipping the egg whites to stiff peaks. When the peaks are stiff, you have a meringue. 4. Keep the mixture running and pour the 2 tablespoons of sugar into the meringue. 5. Raise the heat under the sugar syrup to bring the syrup to 245° if it’s not there already. When it has reached 245°, remove the thermometer and slowly pour the syrup into the meringue, with the mixer running. (It helps to hold the pan just above the height of the mixer. Pour confidently trying to hit the meringue and not the side of the bowl.) 6. After 1 to 2 minutes, reduce the speed of the mixture to medium for 3-4 minutes or until meringue is cooled. Add the butter 1 tablespoon at a time. Increase the mixer speed to high for 1 to 2 minutes or until the butter is fully incorporated. Add orange oil. Mix one final time.
Assemble the Cake 1. Using biscuit cutters, cut two 3.5″ circles and two 2.5″ circles. 2. Assemble the tiers separately. Fill bottom layer of each tier with buttercream. Apply a crumb coat to each tier. Refrigerate for 30 minutes. 3. Ice bottom tier and top tier separately. To achieve the rustic look, pull a butter knife around the circumference of the cake. Start from bottom and work up. 4. Using a flexible spatula, carefully place the top tier of cake on to bottom tier. Clean up any knicks in the move. The italian meringue buttercream repairs easily. 5. Store cake in refrigerator, covered. Serve at room temperature. *For in-depth cake assembly instructions, click here.
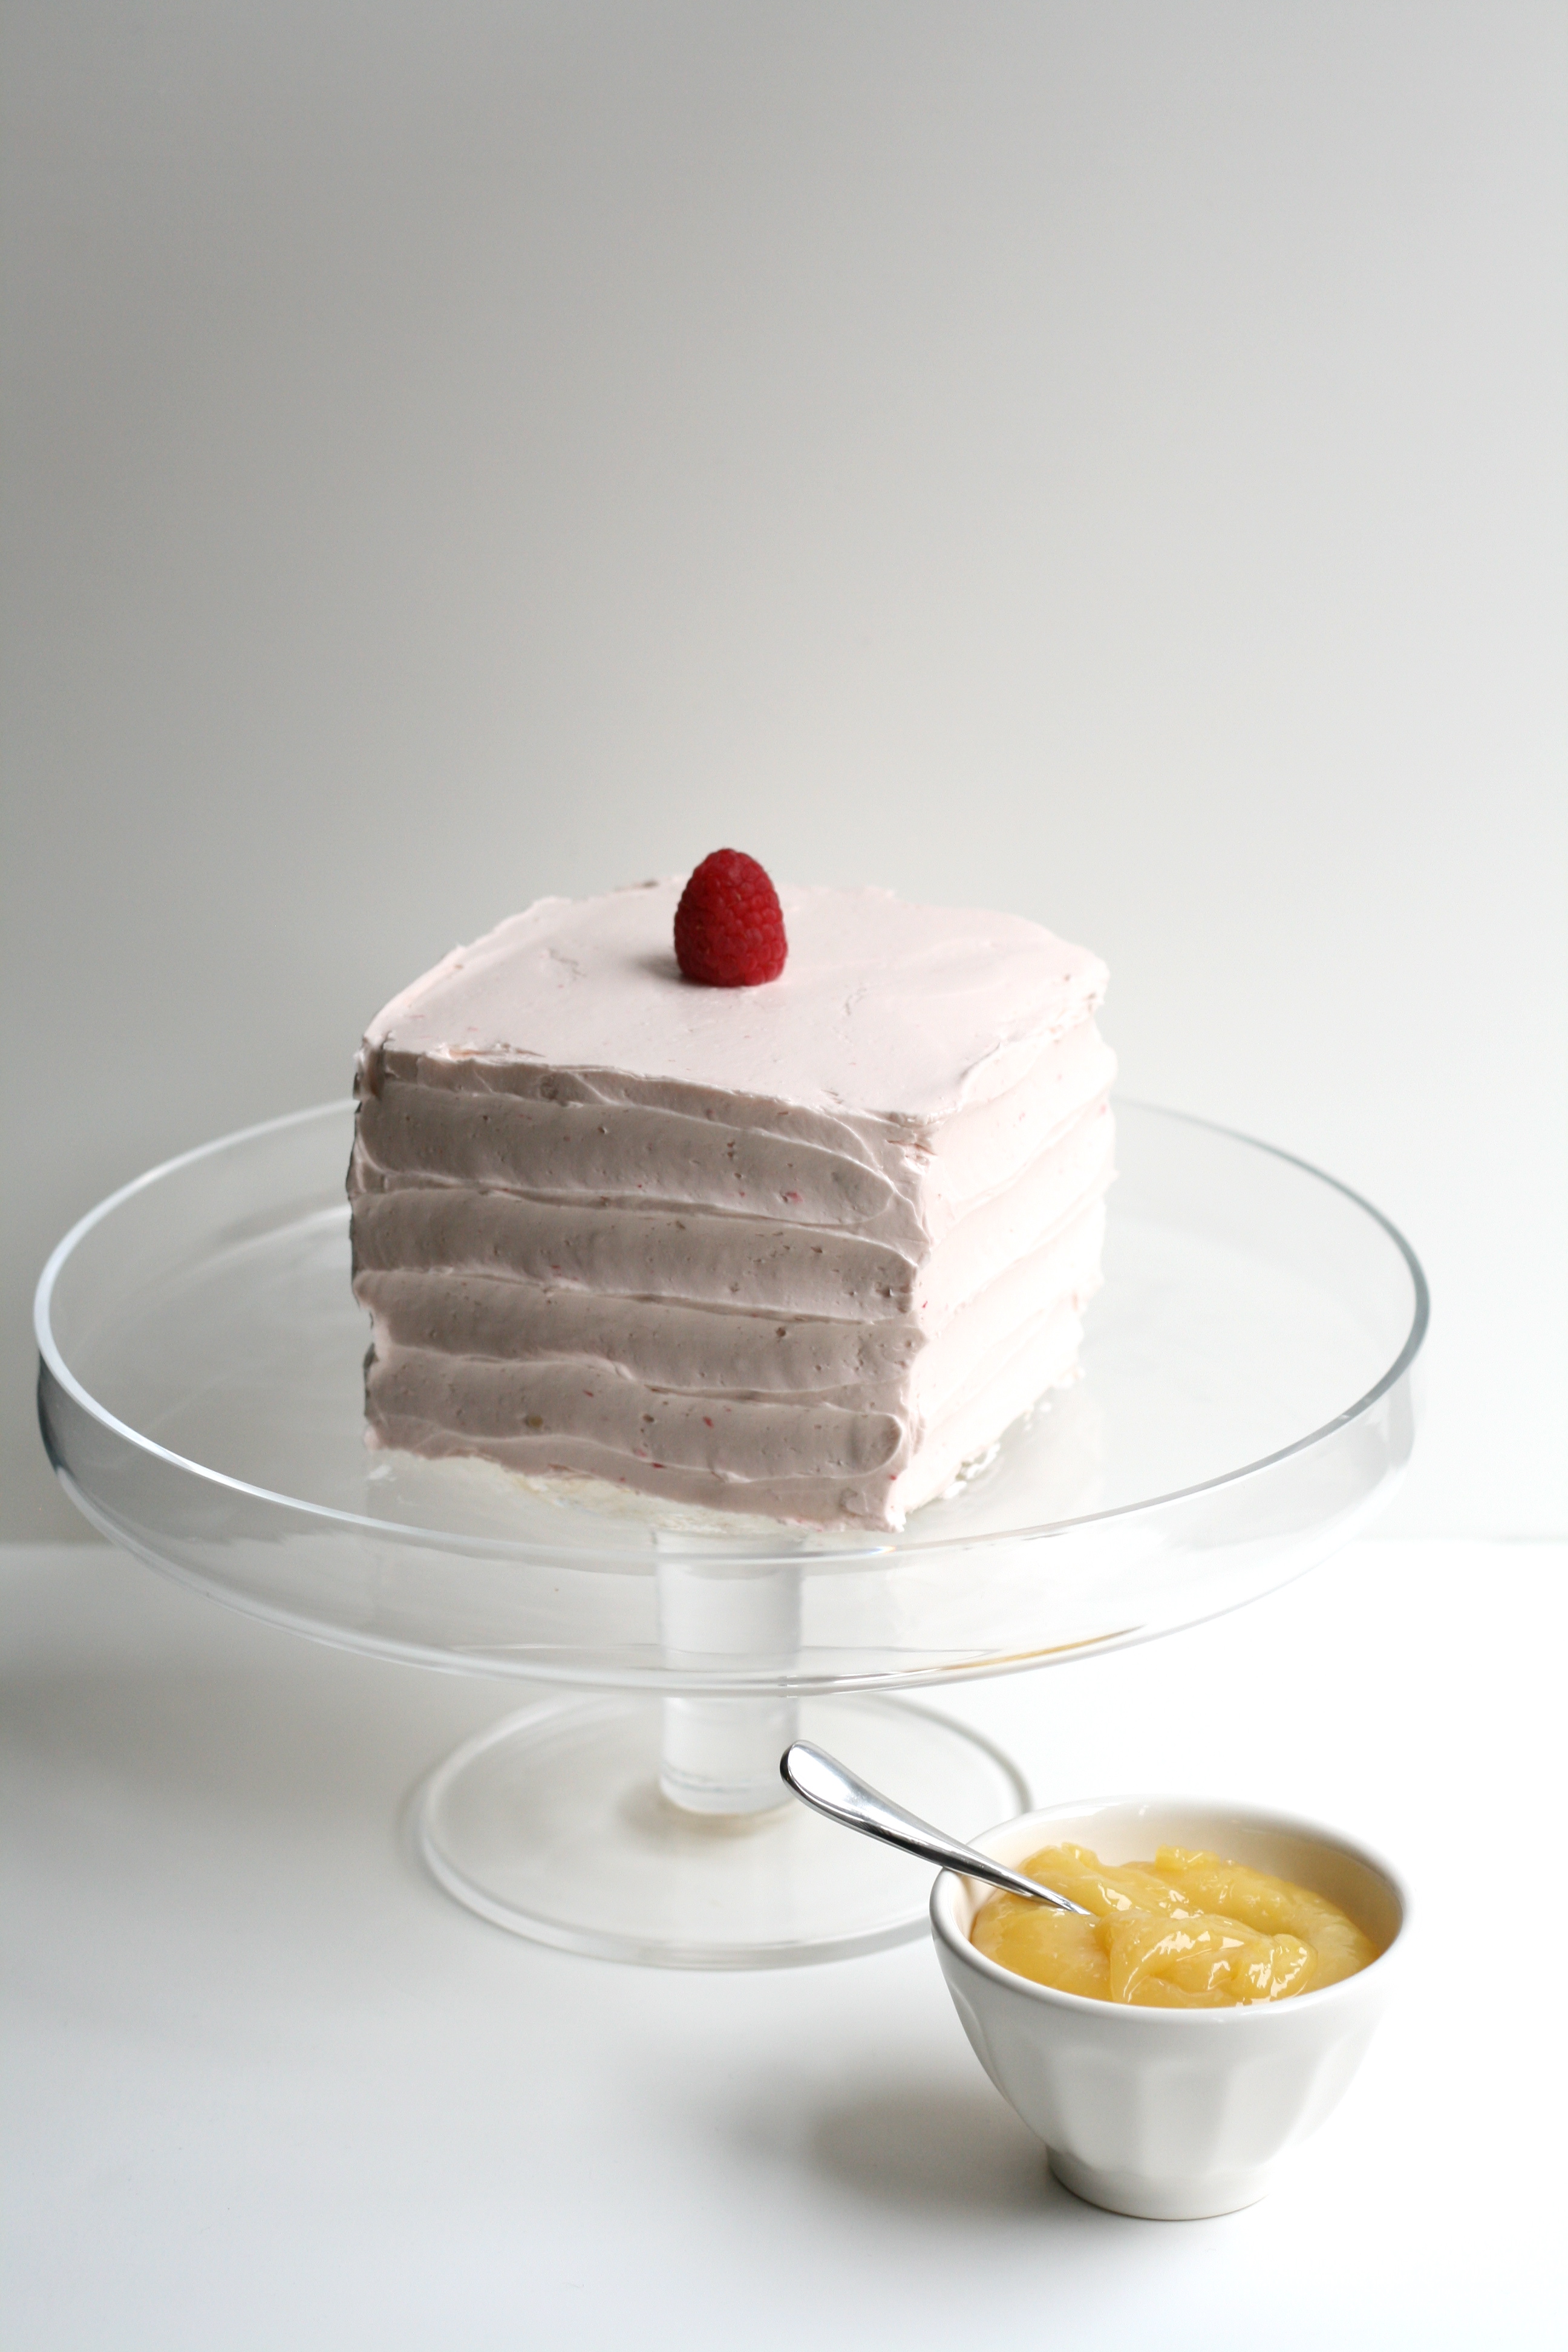
We celebrated my husband’s birthday last weekend. We’re now closer to 30 than 20. Kind of weird. In normal fashion, I asked him what kind of cake he wanted. Without hesitation, he said Lemon Raspberry Cake.
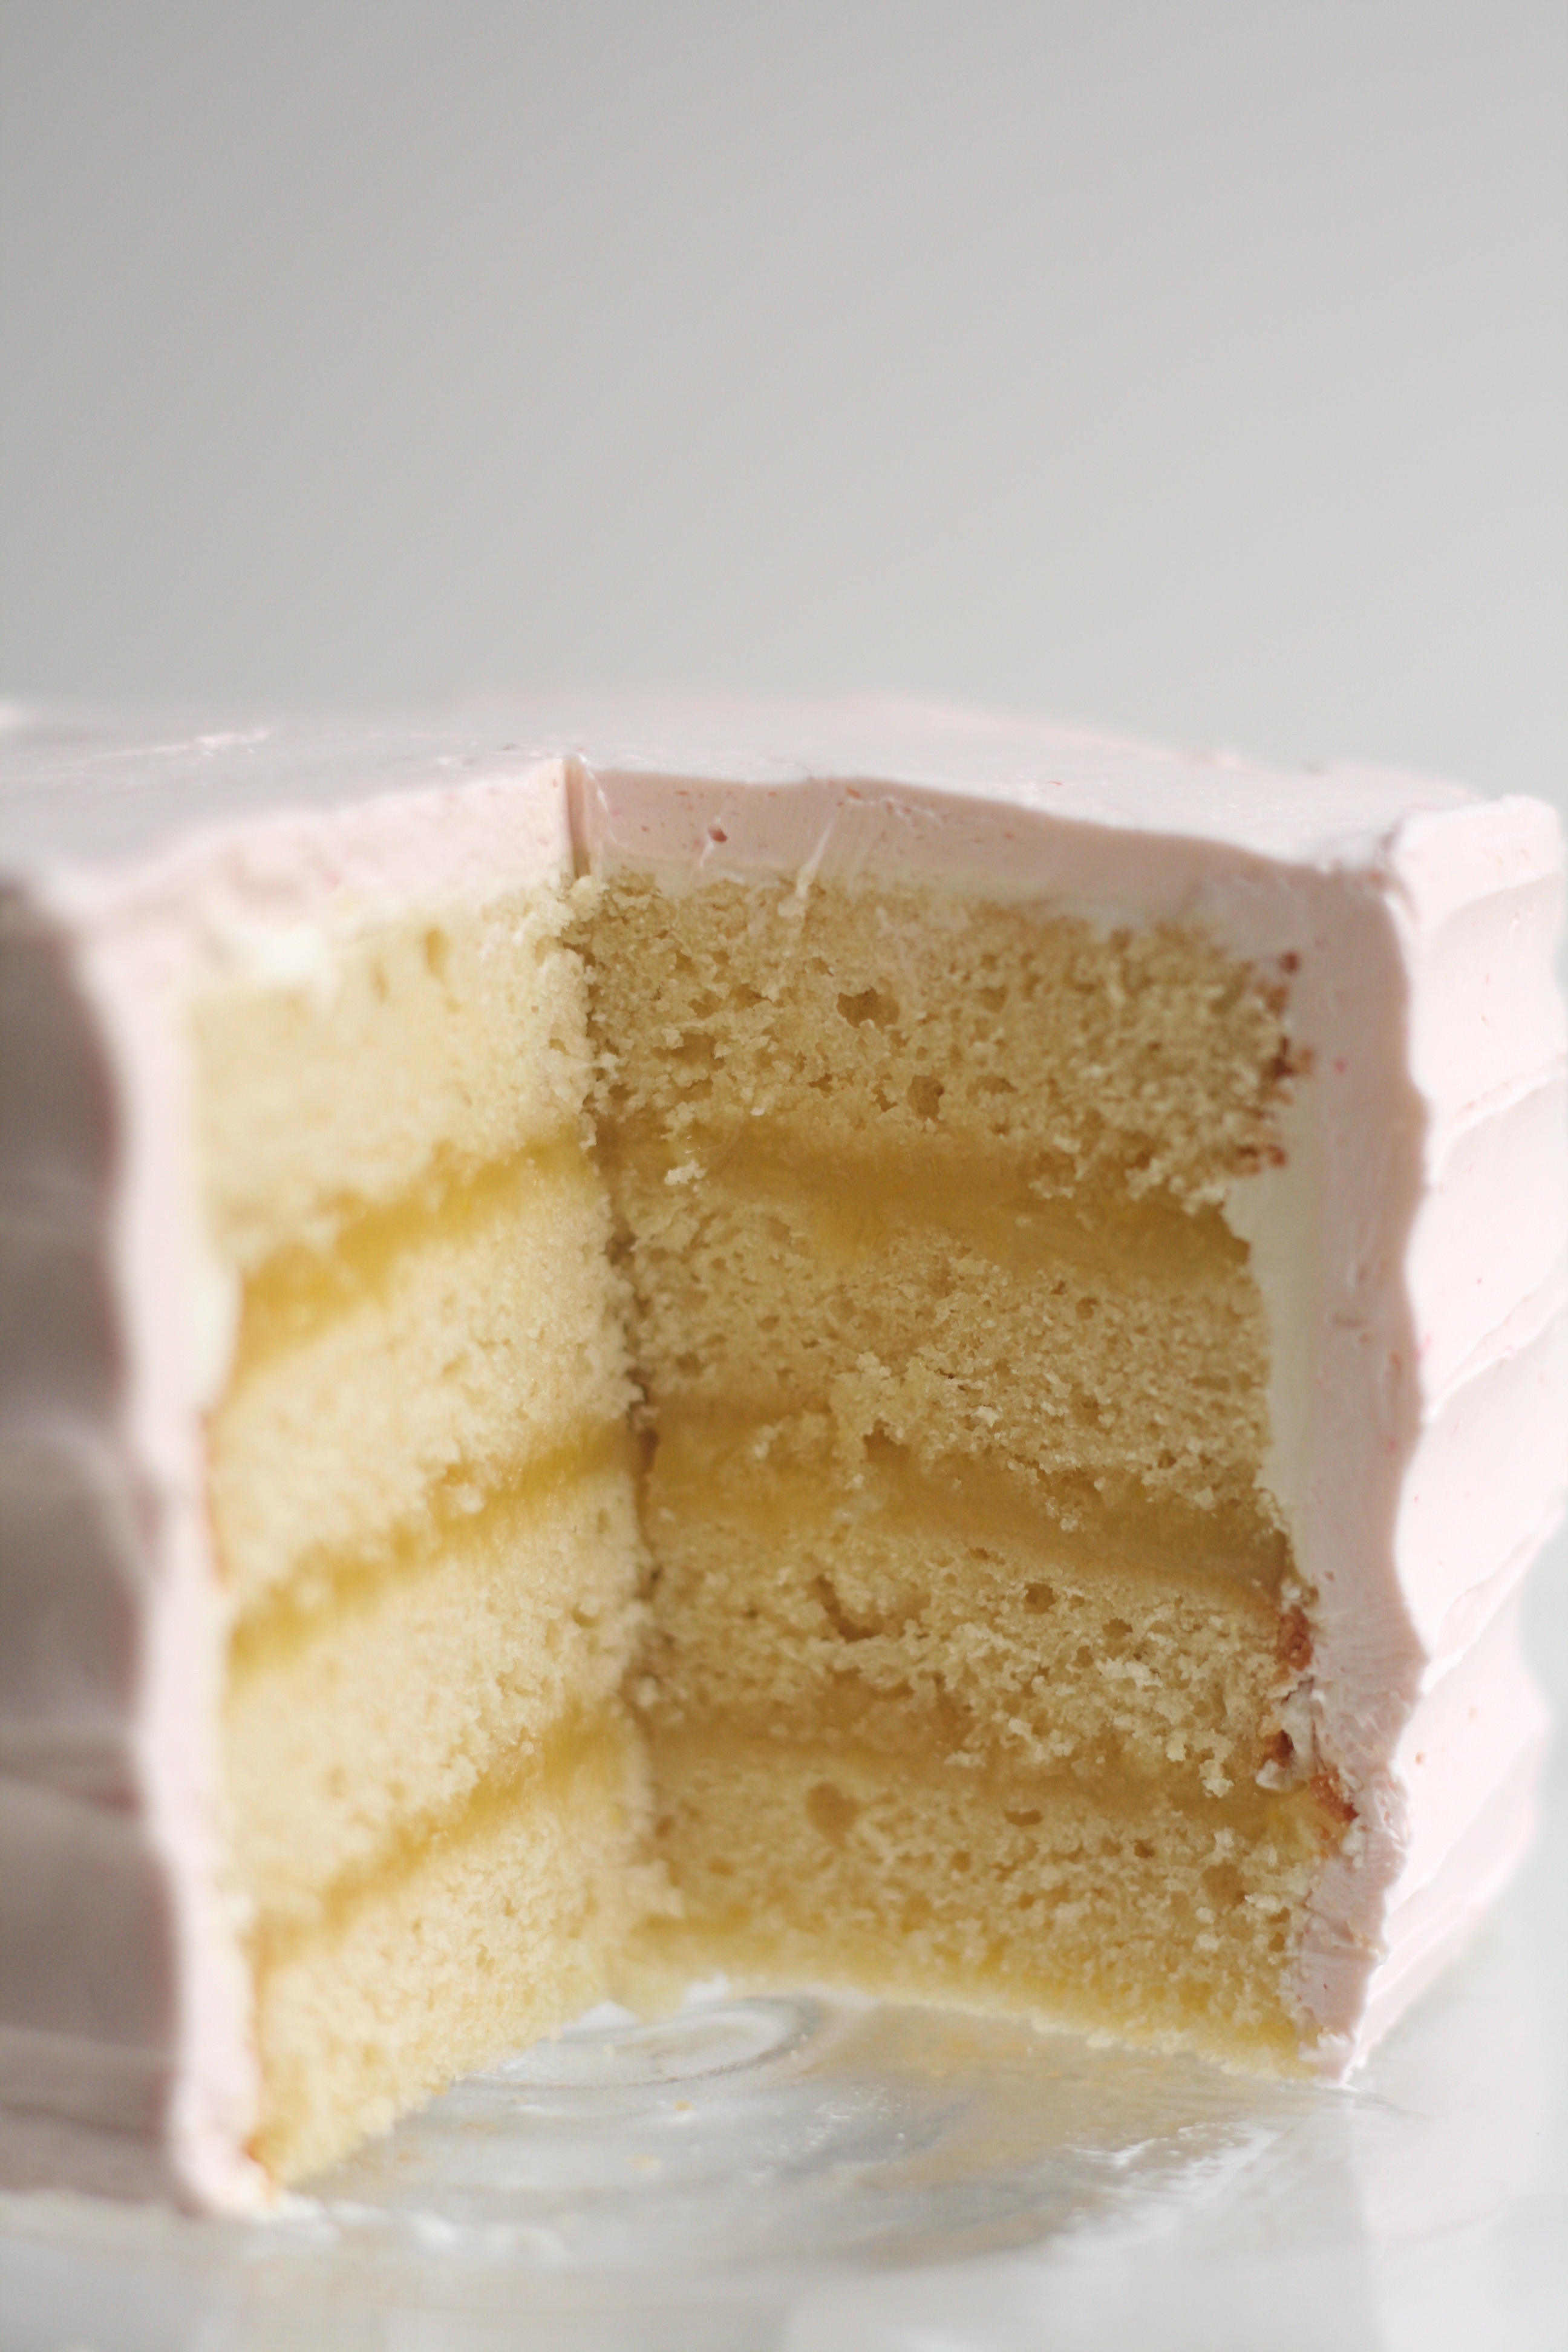
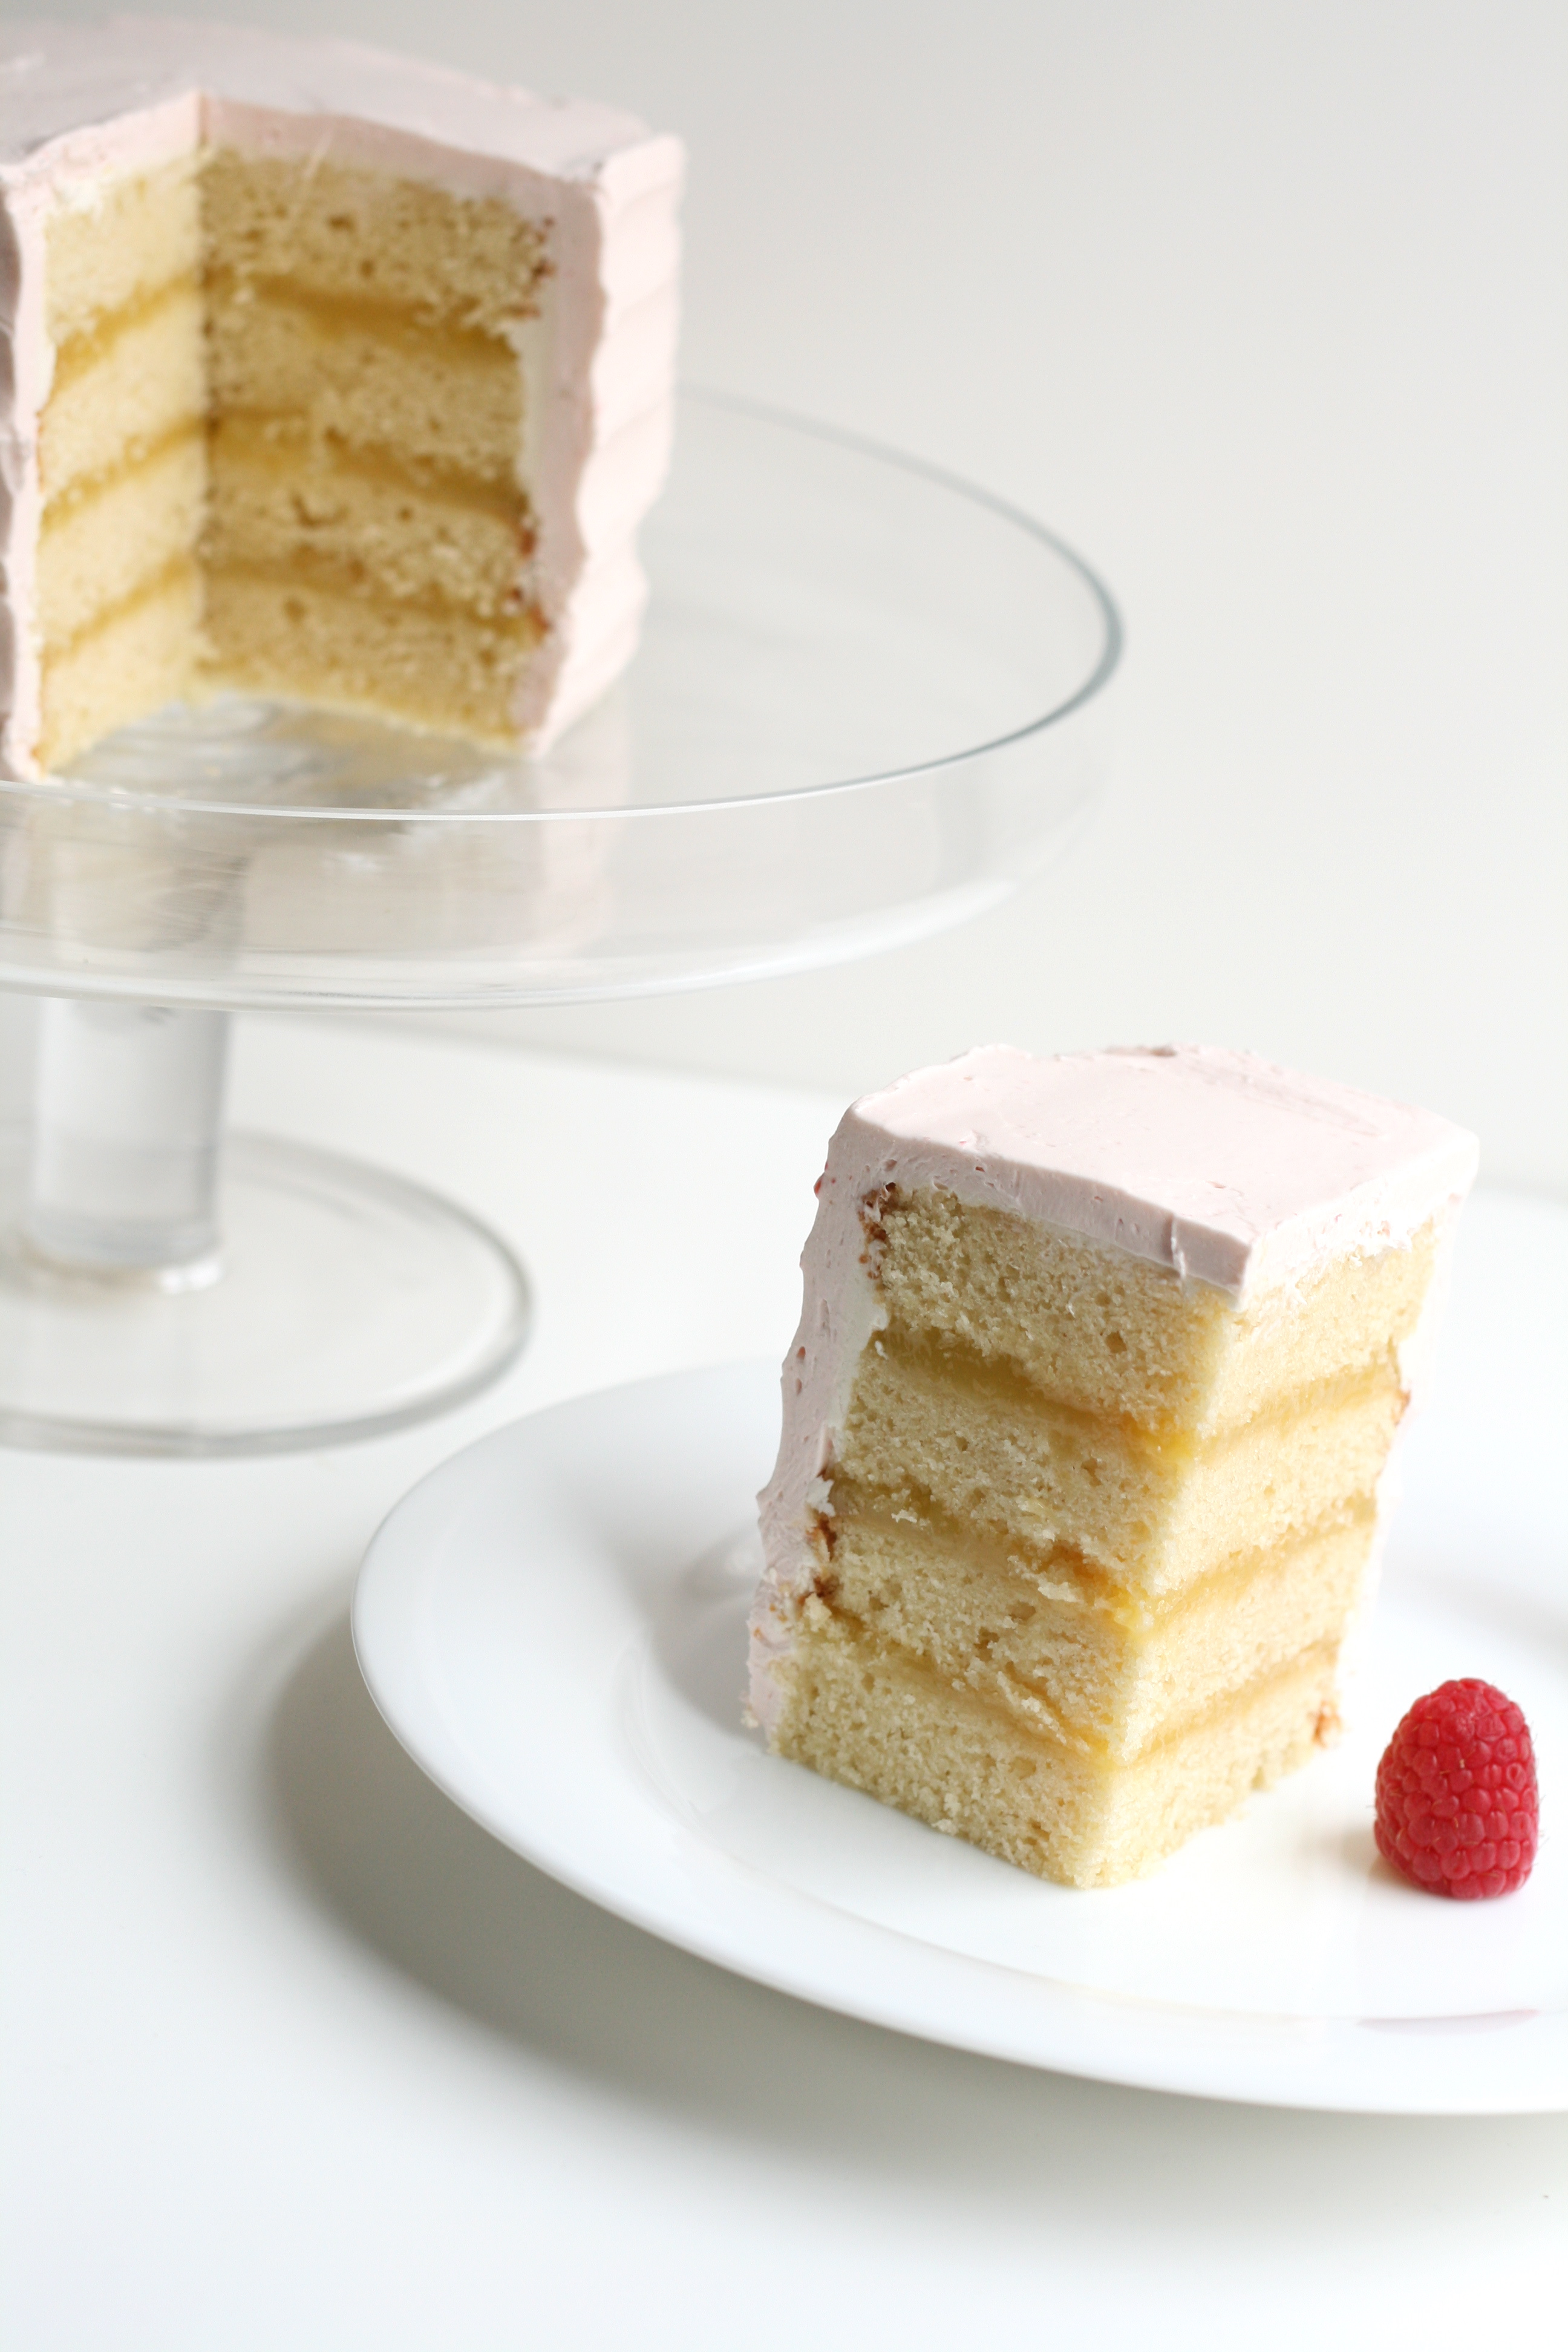
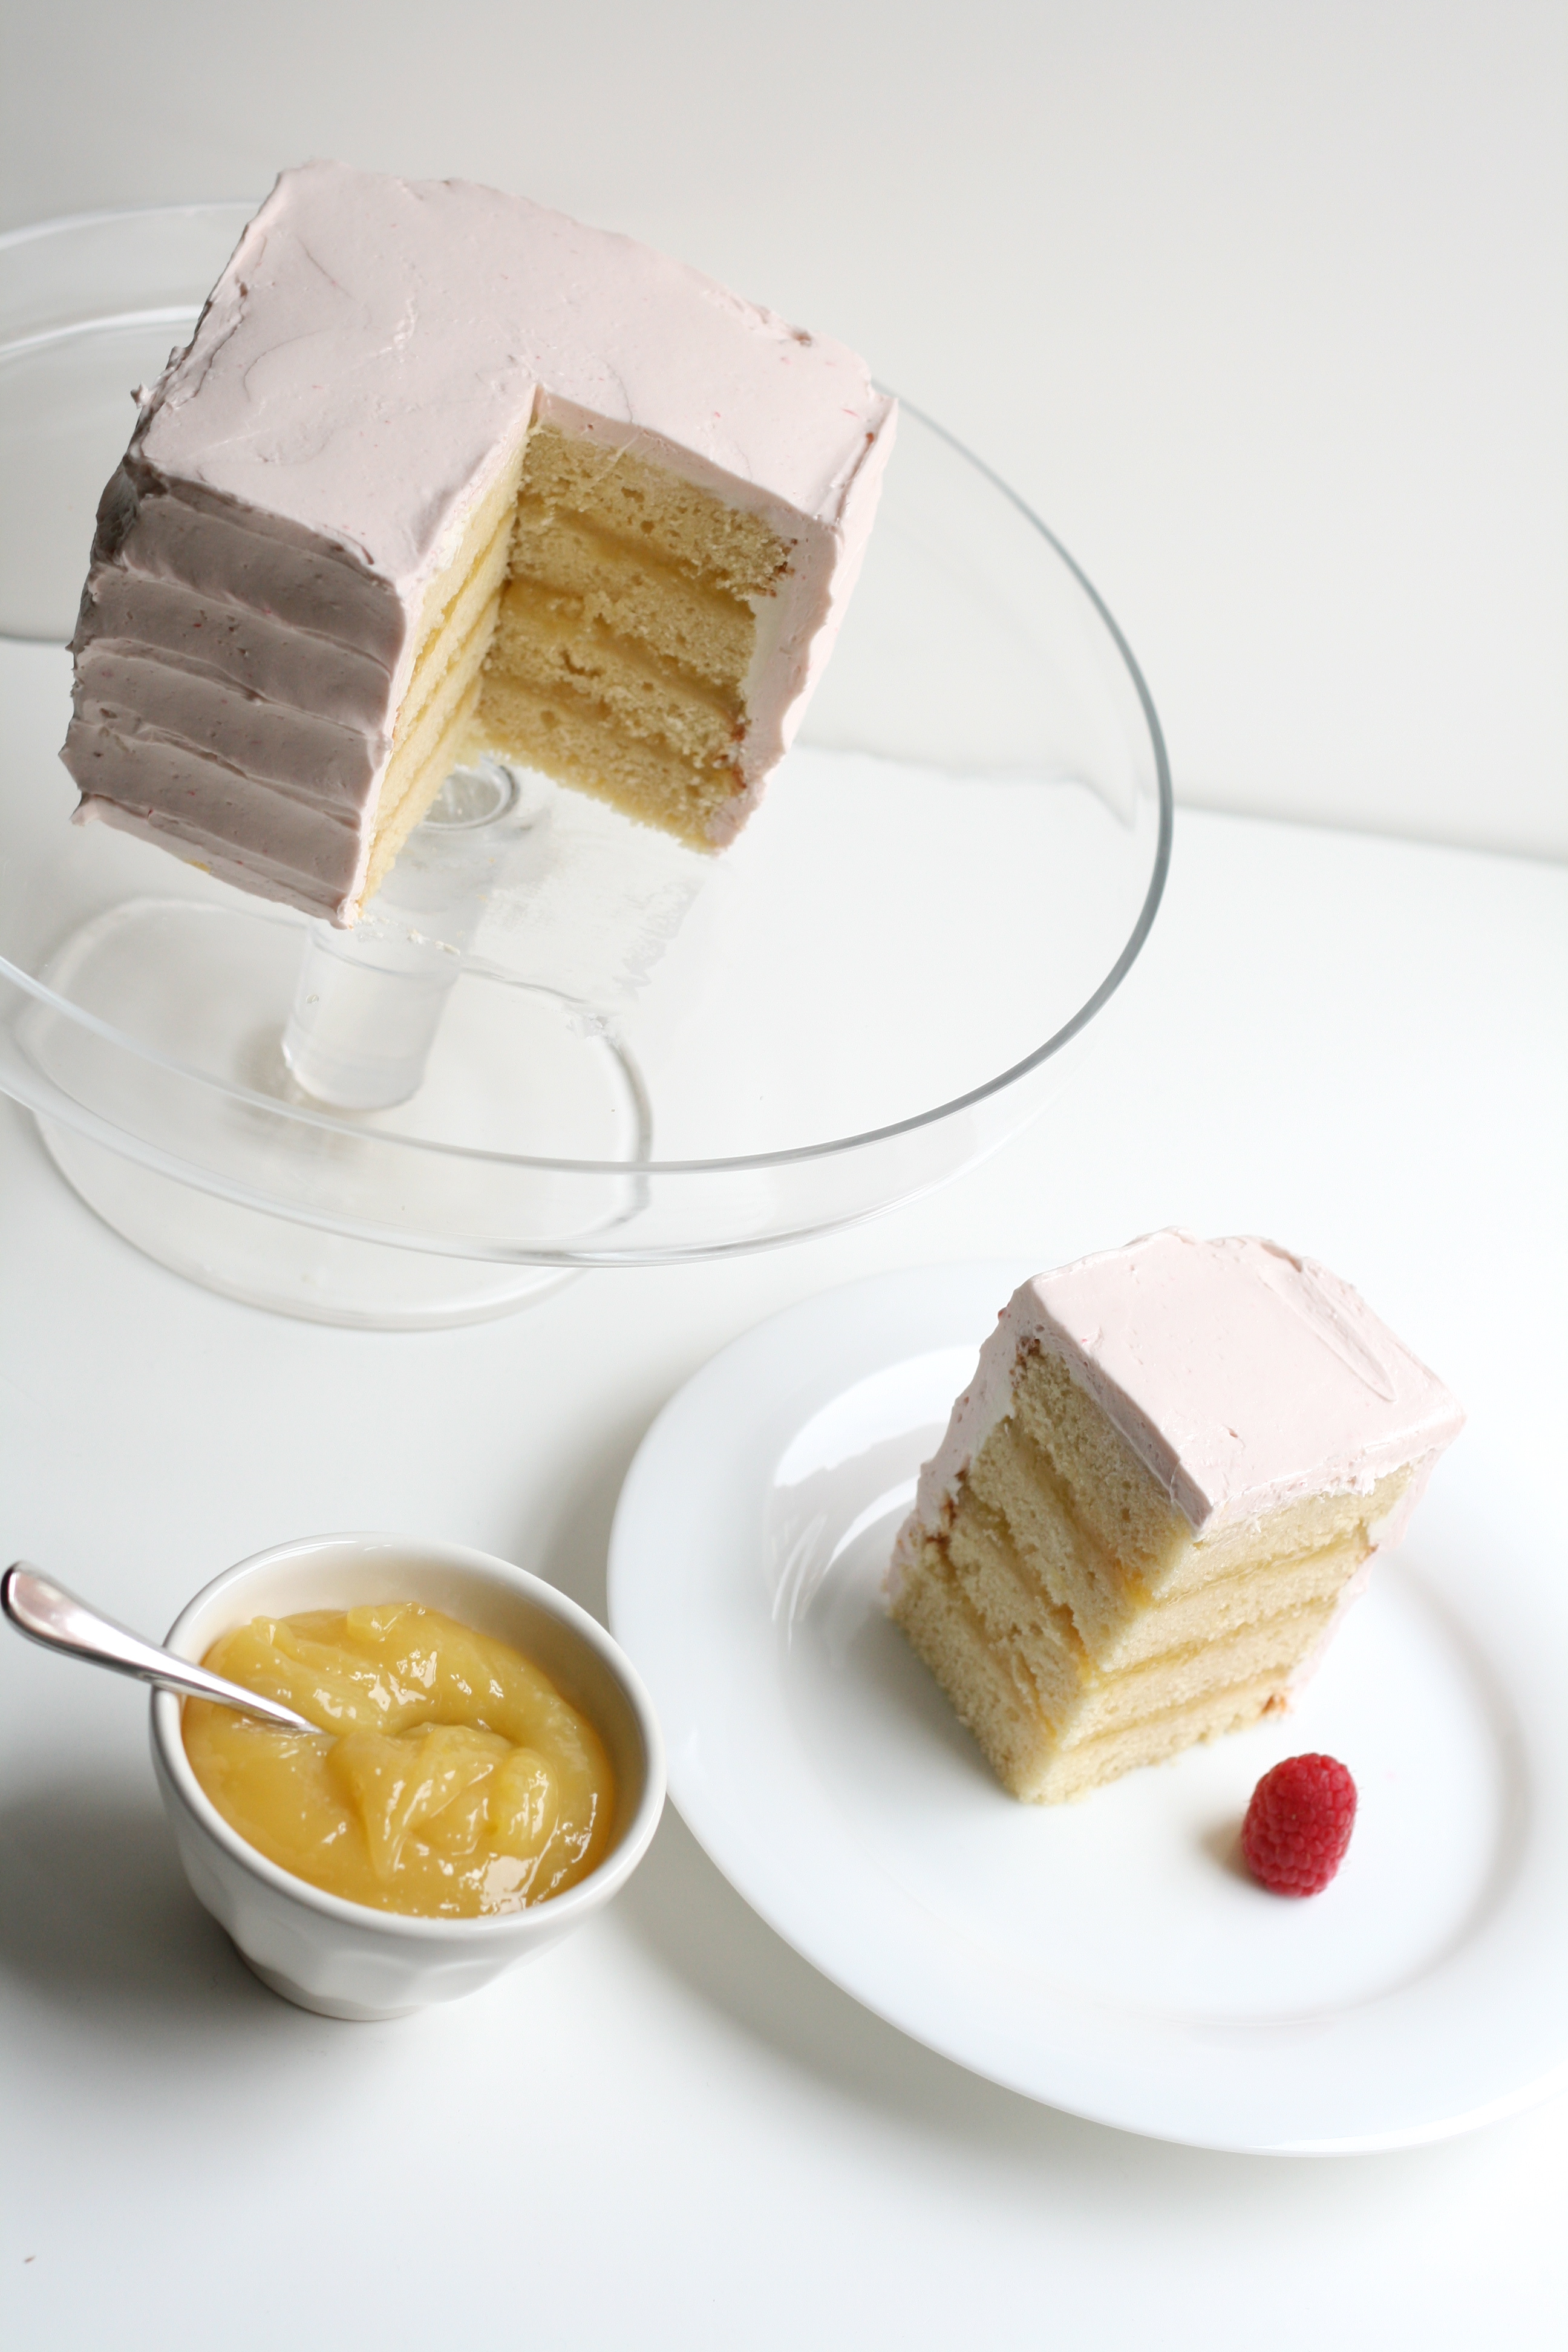
I was so excited he knew what he wanted, I made the cake without hesitation hoping he wouldn’t change his mind. As I was putting the final touches on the cake, I realized something. The cake was pink. Pale pink. I had just made my husband a pale pink birthday cake. I never considered that raspberry icing would produce a pink cake. Happy birthday little girl husband!
Luckily, he ate it in all it’s pale pink glory. I guess I could have done raspberry on the inside and lemon on the outside. The scarecrow said it best—If I only had a brain.
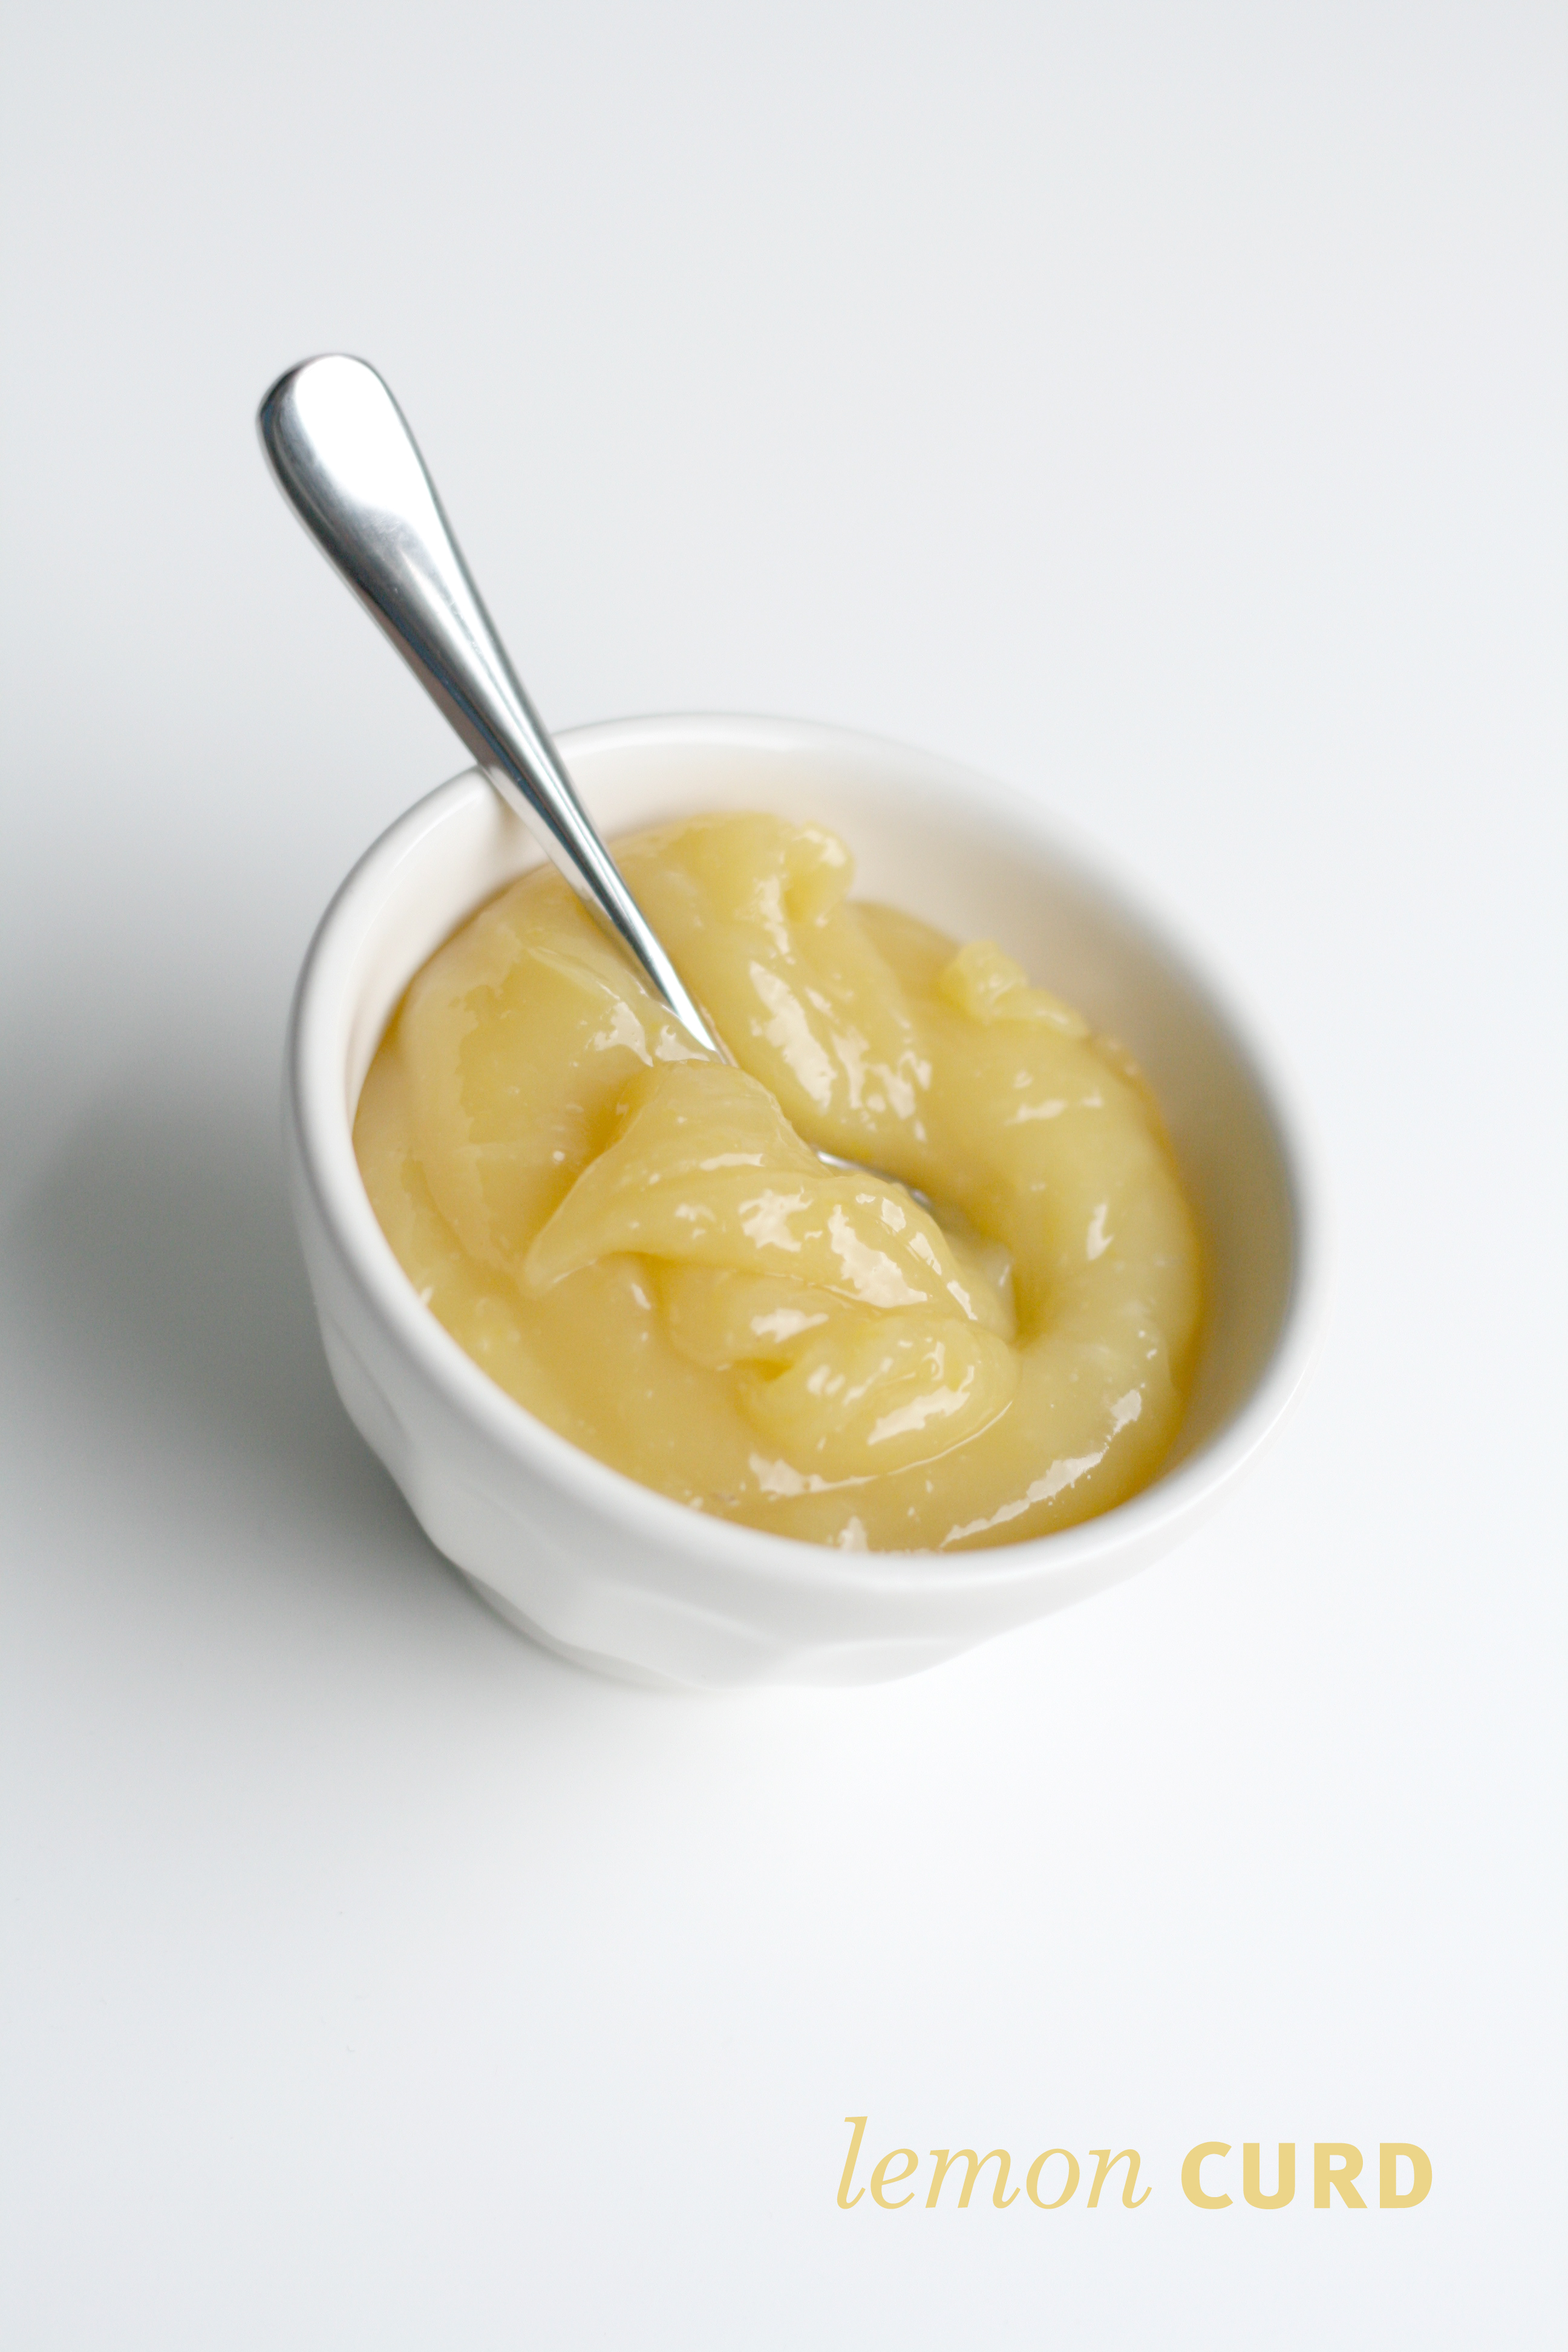
Speaking of lemon, this graced the inside of the cake.
Between all four layers.
Mini Lemon Raspberry Cake Yellow Butter Cake + Lemon Curd + Raspberry Italian Meringue Buttercream
Yellow Butter Cake I halved the Yellow Butter Cake recipe from a couple posts back. Bake in a square pan. Follow recipe as directed. Check cake at 20 minutes. Allow to cool. Cut cake into fourths to achieve mini square cake as pictured.
Lemon Curd recipe from Cake Love by Warren Brown; yields 2 cups
1 c. fresh squeezed lemon juice 2 1/4 c. sugar 2 tsp. cornstarch 4 large eggs 4 egg yolks 1 1/2 sticks unsalted butter, chilled
1. Squeeze lemon juice making sure to strain out seeds. Measure sugar and cornstarch into a heavy bottomed saucepan. (I use my Le Creuset for this.) Crack eggs and yolks into a separate bowl and set aside. 2. Whisk lemon juice into sugar mixture, followed by the eggs and yolks. 3. Whisk in cold butter one tablespoon at a time. 4. Set saucepan over medium heat and bring to simmer, whisking continuously. 5. When you begin to see lava bubbles—large, slowly forming bubbles that burp steam—reduce the heat to the lowest setting and whisk briskly for 1 minute to pasteurize the lemon curd. (Lava bubbles usually appear 10 minutes in.) 6. Pour directly into bowl, and cover with plastic wrap pressed to surface to keep a skin from forming. 7. Immediately refrigerate for at least 3 hours before using. Note: I halved the recipe for the mini cake.
Raspberry Italian Meringue Buttercream I halved the Italian Meringue Buttercream recipe from a couple posts back and added raspberries. Make recipe as directed. If you are making a full recipe, you’ll need 1/2 c. raspberries. If you are making a half recipe, you’ll need 1/4 c. raspberries. Puree raspberries in food processor. Using a fine mesh sieve, strain the puree into a bowl to remove seeds. Add puree to buttercream and whip until combined.
Ice the Cake For a quick tutorial, click here. Serve cake at room temperature.
Can I let you in on a little secret? I wanted to show you a slice of the cake, but I wasn’t serving the cake until later that evening. So, I cut the cake. Took some pics. And put the cake back together. The Italian Meringue Buttercream is very forgiving like that.
I had planned on doing an easter post today. But my idea flopped. Many tireless hours went into, and it flopped. Yes, I do want some cheese with this wine. I wasn’t going to tell you what I was making incase I decided to give it another try. But, I’m not. I’m no good at these things. And by “things” I mean cake balls. I’ve tried a couple times, and they’re just not my forte. I have these conflicting thoughts of “Don’t give up!” and “Just stick with what you’re good at.” Well, I’ve decided to stick with what I’m good at, leaving the cake balls to Bakerella. Don’t get me wrong, I’m up for a good challenge. And, I don’t mind if I fail from time to time. But I’ve learned I’m much better at baking than I am at decorating (case in point—cake ball fail). I’m much better at perfecting the classics (scones, cakes, cookies, macarons) than coming up with something new. I’m much better at sticking to my purist ways, than bending the rules and using the not so pure stuff. My take-away from all of this is—stick with what you’re good at, and get really good at it.
Shawoof (wiping sweat off brow). That was cathartic.
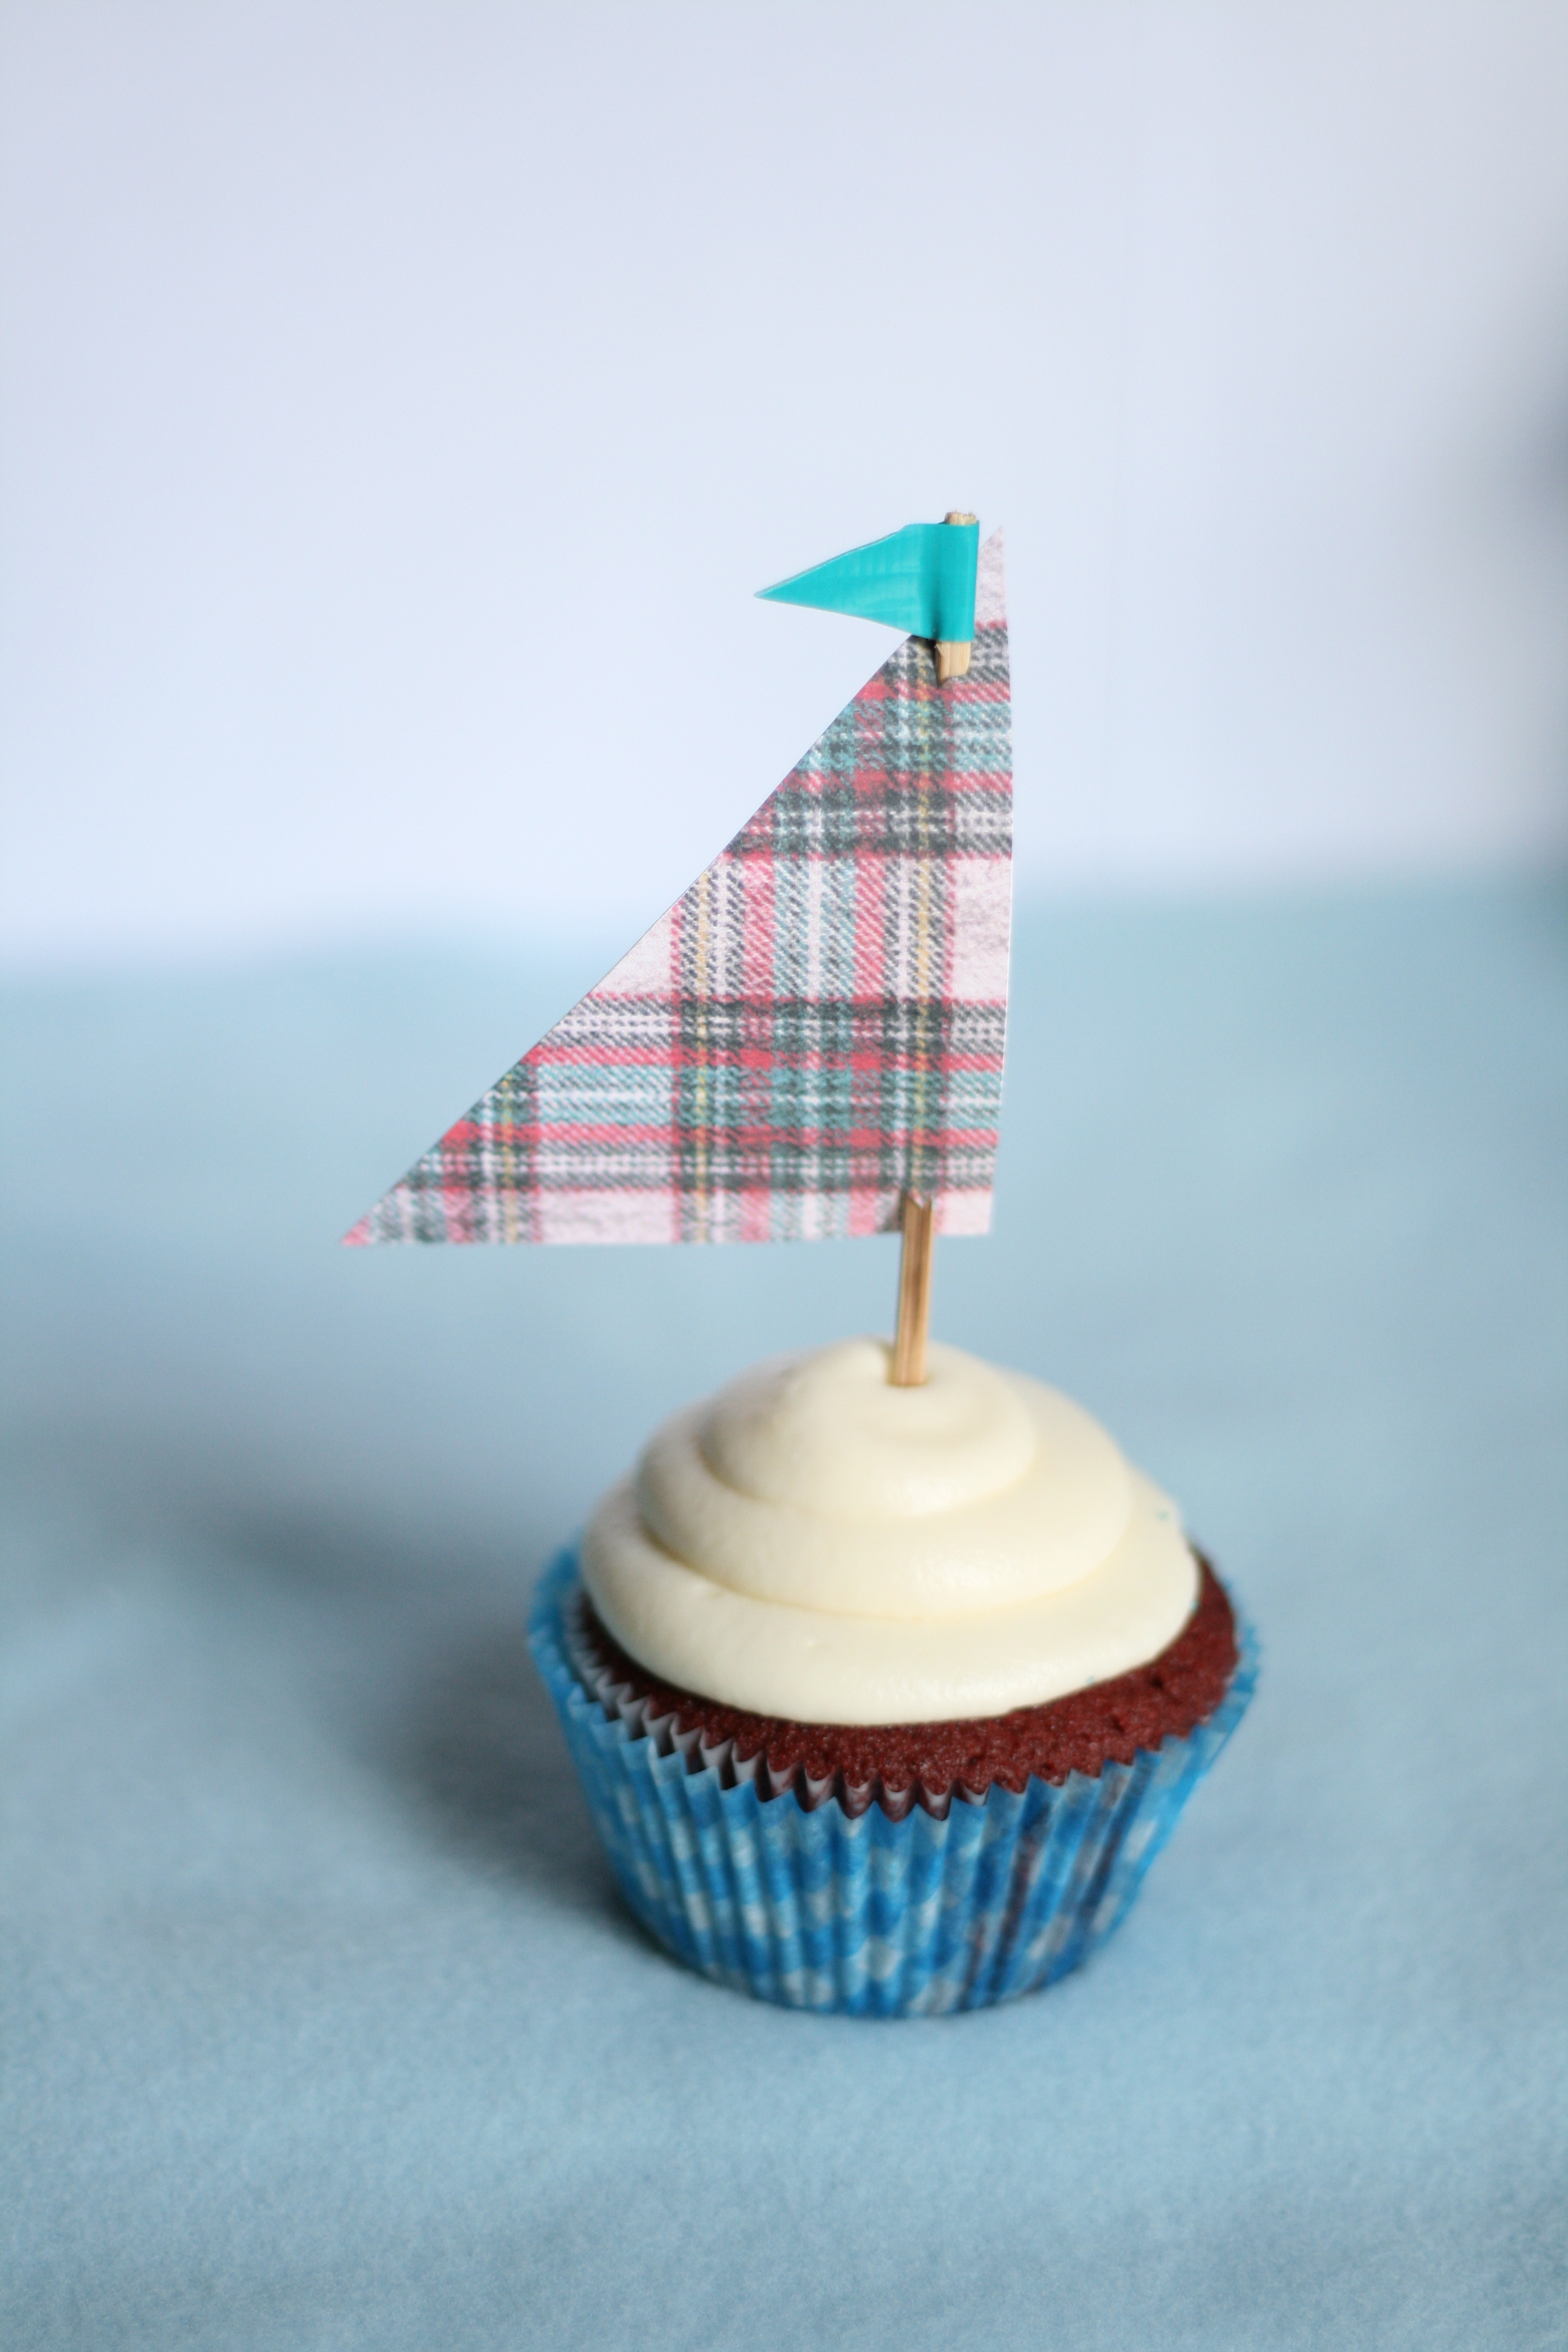
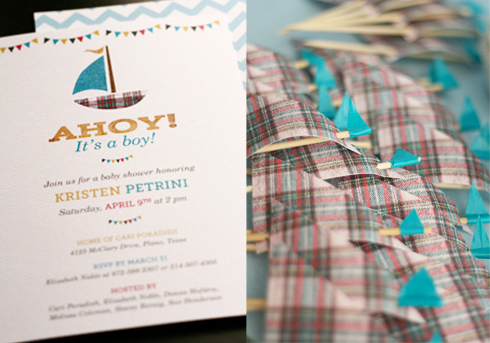
Now on to the good stuff. Red Velvet Cake! Remember the Sailboat Cupcakes from the last post? I told you I’d be back with the recipe. As promised, here it is. But first, I have to do another plug for my favorite baker—Warren Brown from Cake Love. His recipes make the best cakes ever (no lie). He is a purist as well. He believes in baking cakes from scratch. None of that artificial stuff. However, he does make a Red Velvet Cake because of it’overwhelming request at his bakery. It’s the only thing he uses food coloring in. You can leave the food coloring out and call it Brown Velvet. Or you can use the India Tree products (this is what I use), which are made from vegetables pigments.
DRY INGREDIENTS 2 1/4 c. Cake Flour (I used unbleached AP Flour) 2 tbsp. Cocoa Powder 1 tsp. Salt 1 tsp. Baking soda
WET INGREDIENTS 1 c. Buttermilk 1 tsp. Vanilla Extract 1 tsp. Apple Cider Vinegar
CREAMING INGREDIENTS 2 sticks of Unsalted Butter (room temp) 1 1/2 c. Superfine Sugar (You can pop regular sugar in a food processor to achieve this) 2 large eggs 1 oz. Red Food Dye (Opt out and make it Brown Velvet)
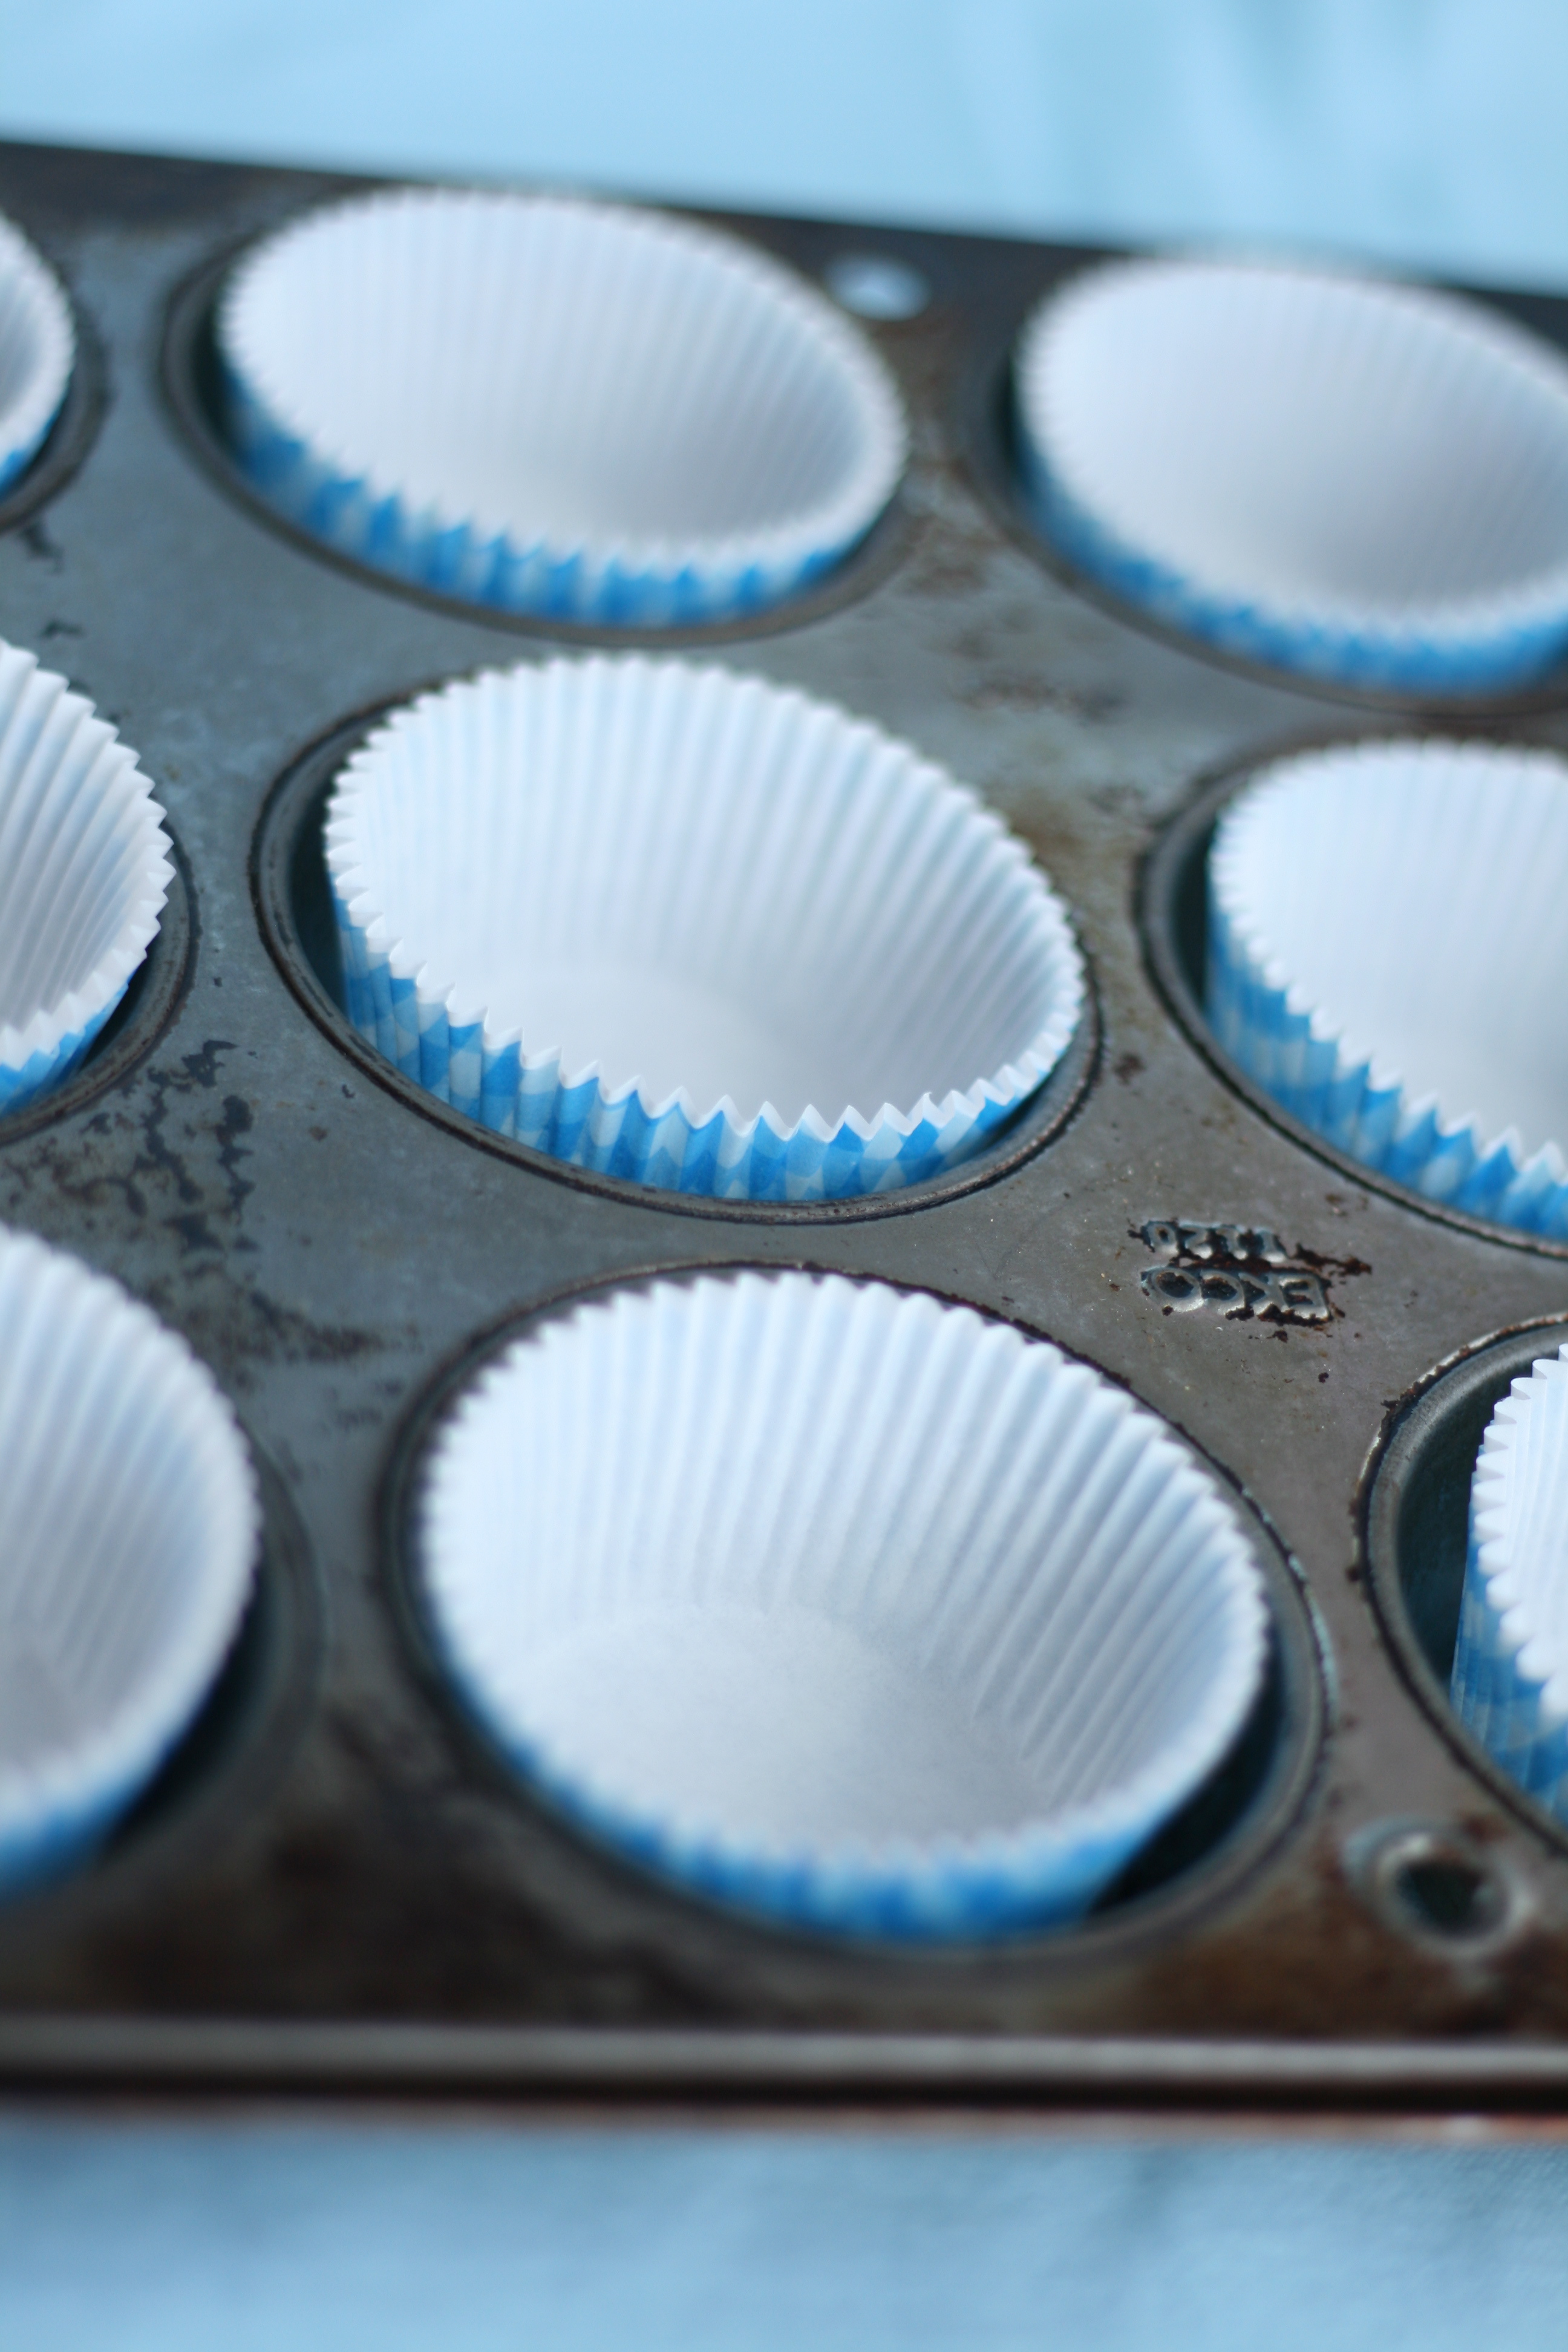
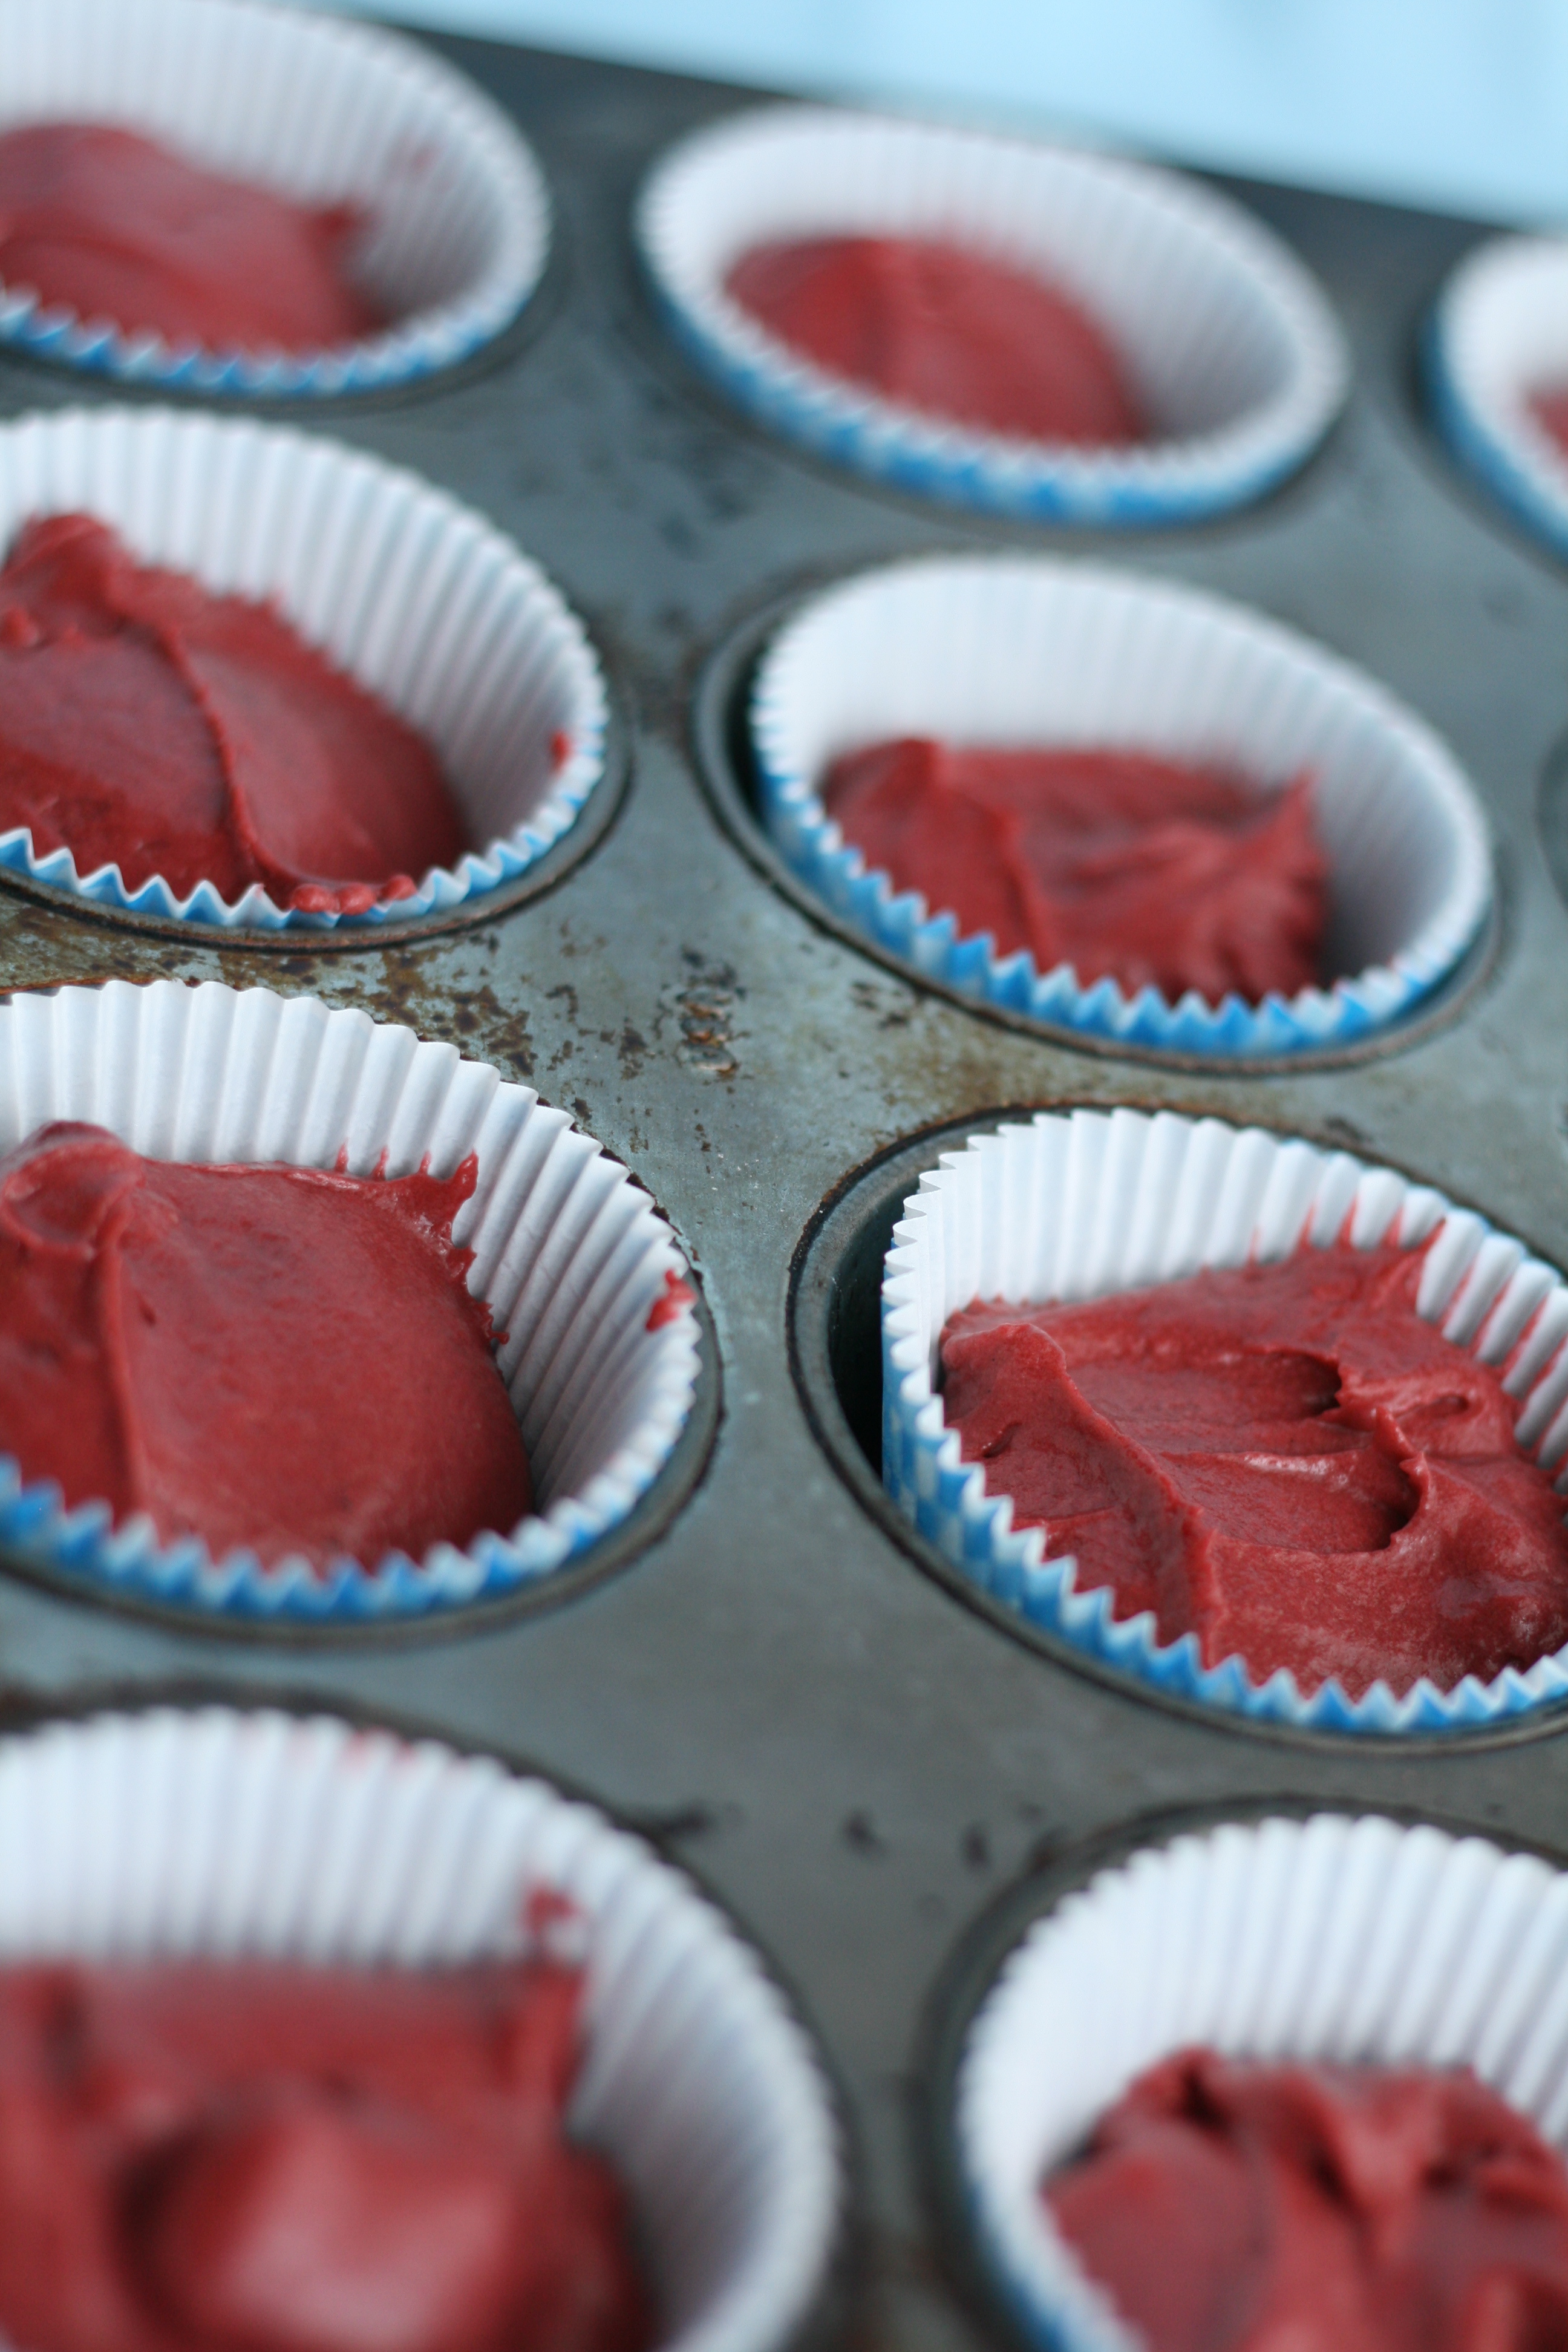
1. Preheat oven to 335° and place the rack in the middle position. Line 2 cupcake pans. (Read the last post for a cupcake liner tip.) 2. Measure the dry ingredients and wet ingredients into 2 separate bowls. Whisk each to combine. 3. Measure the the butter and sugar into the bowl of a standing mixer fitted with the paddle attachment. Cream together on low speed for about 5 minutes. 4. Add eggs one at a time into the well creamed butter. Beat in the dye. 5. Alternately add the dry and wet ingredients about a quarter at a time. (This should only take a minute.) Scrape sides. Beat on medium-high speed for 1 minute. 6. Pour the batter into the liners and bake the cupcakes for 20 to 24 minutes, or until a wooden skewer comes out clean. 7. Cool the cupcakes for 5 minutes before inverting them on to a flat surface. Allow them to come to room temperature before frosting.
Cream Cheese Frosting recipe by yours truly
2 sticks of Unsalted Butter (room temp) 16 oz. Cream Cheese (room temp) 1 tsp. Vanilla Extract Dash of Sea Salt 3-4 c. Powdered Sugar
1. Cream together butter and cream cheese. 2. Add vanilla extract and salt. Mix. 3. Add powdered sugar one cup at a time. Mix well between each addition. After 3 cups, taste to see if additional powdered sugar is necessary. 4. Ice your cupcakes. Looking for tips? Check out the last post.
If you missed it, click here for the sailboat decorations. For matching invitations, click here.
P.S.—These lovely little sailboats made their debut on the very talented Shauna Younge’s blog! Thanks Shauna!